


Sick Bees – Part 13: Simple Microscopy of Nosema for Beekeepers
CONTENTS
Bringing the Spores into Focus
Care and Feeding of your Microscope
Sick Bees – Part 13:
Simple Microscopy of Nosema for Beekeepers
Randy Oliver
ScientificBeekeeping.com
First published in ABJ November 2011–this article extensively revised in March 2019.
It is greatly surprising to me that with the great interest by beekeepers in Nosema ceranae, how few actually make the effort to monitor the levels of this parasite in their colonies! Even more surprising is that, despite the considerable expense, many blindly treat their colonies without having any idea as to whether their bees are actually infected!
The first common misconception is that dysentery is a field sign of nosema infection.
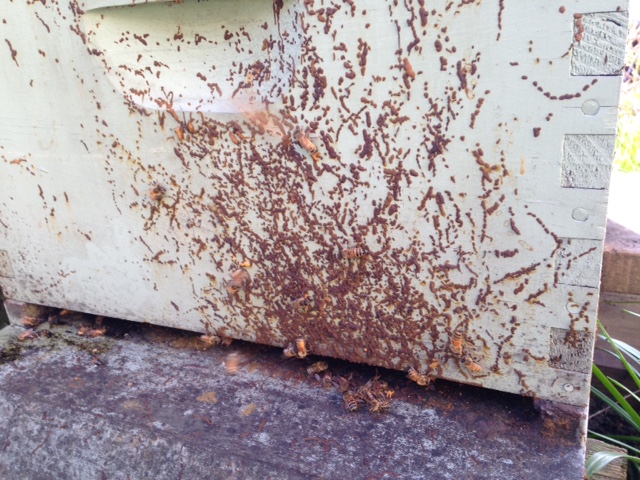 Dysentery at the hive entrance–but not necessarily a sign that nosema is involved. Photo credit Monique Vescia
The photo above is a typical field sign of dysentery–apparently indicating that the workers are having a difficult time maintaining water balance, resulting in their hindguts becoming distended with excess moisture. Although nosema does not appear to be the cause of dysentery, if infected workers defecate within the hive, it can lead to the transmission of the parasite within the hive.
The only way to tell whether your bees are infected by nosema is by looking through a microscope.
In my previous articles, I addressed the importance of monitoring infestation levels of the honey bee parasite Varroa. Now I’m going to move on to another common parasite—nosema—of which similar monitoring allows one to make informed management decisions. It is far better to learn to monitor nosema levels yourself than it is to depend on sending the occasional sample off for testing!
Checking for nosema infection level does not require laboratory expertise, and the cost of a good microscope can be quickly recouped by not wasting your money on unnecessary treatments. Unfortunately, many beekeepers are intimidated by the thought of learning how to use a microscope, get frustrated due to unfamiliarity with the necessary techniques, or have trouble identifying the spores. I hope in this article to guide you step by step through the entire process of monitoring for nosema.
EQUIPMENT NEEDED
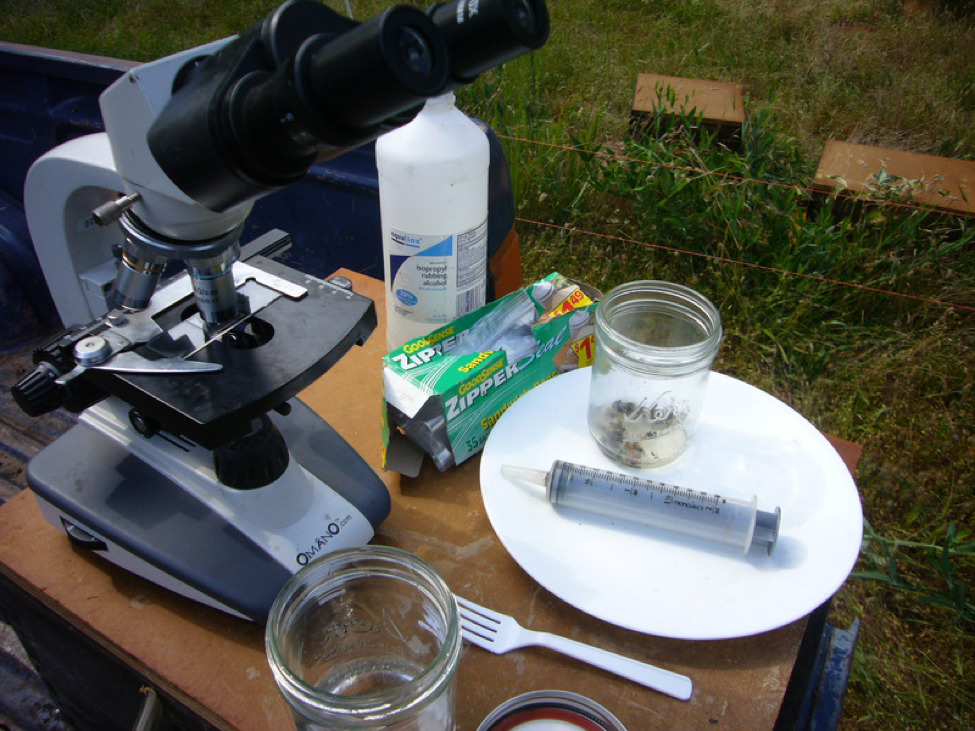 Equipment for lab or field testing of nosema spores. If you plan to take the scope into the field, purchase a battery-powered scope and a protective case (I like the knockabout aluminum case that can be carried in my truck). The 60ml syringe can be purchased at any farm store.
The more experience that I have with nosema, the less concerned I am with the parasite. That said, I no longer take a scope to the field, instead bringing bee samples back home for microscopic examination.
The photo above shows all the equipment you will need. I highly recommend the Omano OM36L microscope (shown), which has binocular eyepieces, battery power for field use, and a mechanical stage for moving the slide around (Microscope.com offers a “Beekeepers Special”). I’ve used many brands of high-quality microscopes in labs around the world; for some reason, the optics of this particular scope really make nosema spores stand out! My advice is to pay the money for a decent scope, as this is likely the only one that you will ever purchase, and you don’t want to be stuck with one that does not live up to your expectations.
You can save money by getting a monocular (single eyepiece) scope (such as the OM136C). Whatever you buy, I do recommend that you get a scope with an adjustable condenser and rubber eyecups.
TAKING BEE SAMPLES
When Nosema ceranae first invaded the U.S. in the early 2000s, we all freaked out. One reason is that the recommendation was to take bee samples from the entrance of the hive, and I went so far as to design “The Suck-a-Bee” shown below.
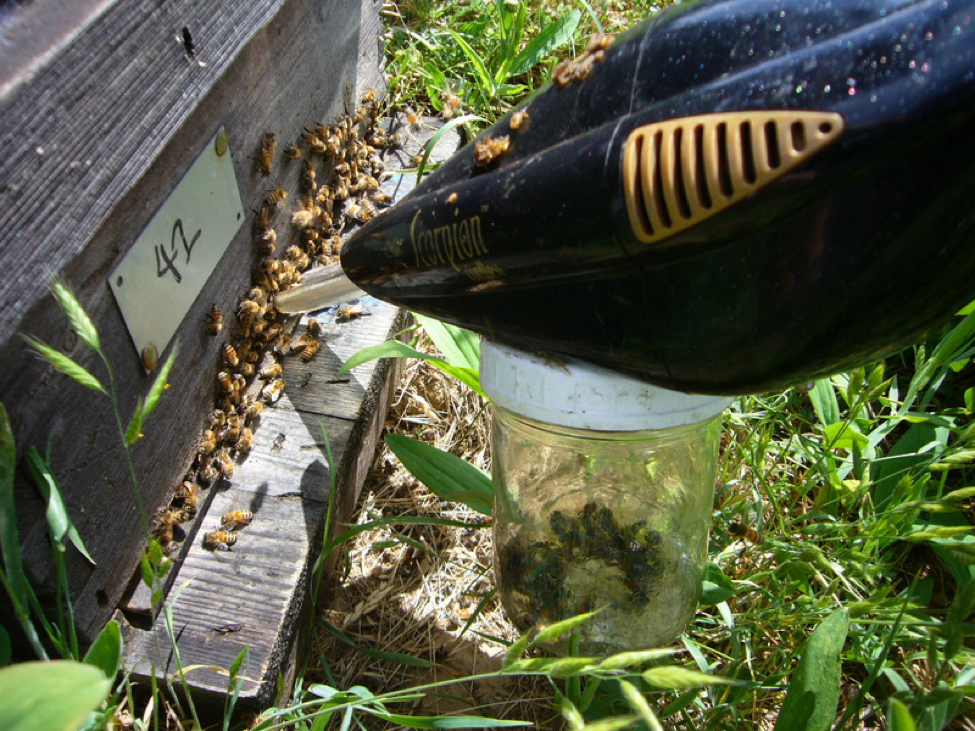 Begin by taking a sample of at least bees 50 from the entrance of the hive. These bees will be the oldest bees, and therefore the most infected. Kill the bees in rubbing alcohol or freeze them.
I no longer take samples from the entrance for a number of reasons:
- Entrance samples contain a disproportionate amount of highly-infected older bees.
- It is difficult to compare results with others who have taken samples from under the lid.
- My current opinion is that under-lid, or upper frame samples are better indicators of the actual degree of infection of a colony, as they better reflect the prevalence of infected bees in the hive.
I now simply lift the lid and brush bees into a ziplock bag or jar of alcohol. If necessary, I pull an outside frame to obtain enough bees.
TAKING AND PROCESSING THE SAMPLES
It is far better to view many samples quickly than to spend a lot of time with fewer samples, due to the inherent variation in samples from hive to hive, and week to week. I’ve switched to the really quick and clean “ziplock method,” which I learned from labs in Canada and Australia. I now use a two-step 10-bee/ 10-bee method, based upon a sample of at least 25 bees taken from under the hive cover or from an outside comb (not from the entrance).
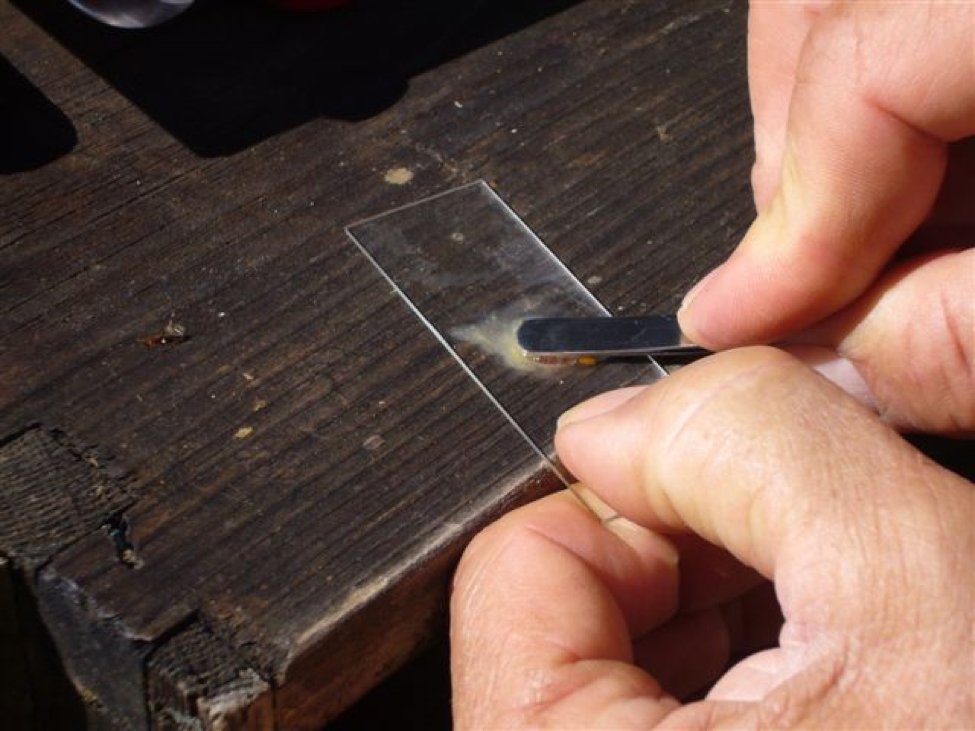
The simplest way to take a bee sample is to gently drag a vial containing rubbing alcohol downward over some bees, the friction will cause them to release their grip and fall into the vial as below: Another way is to brush the bees directly into a ziplock bag:
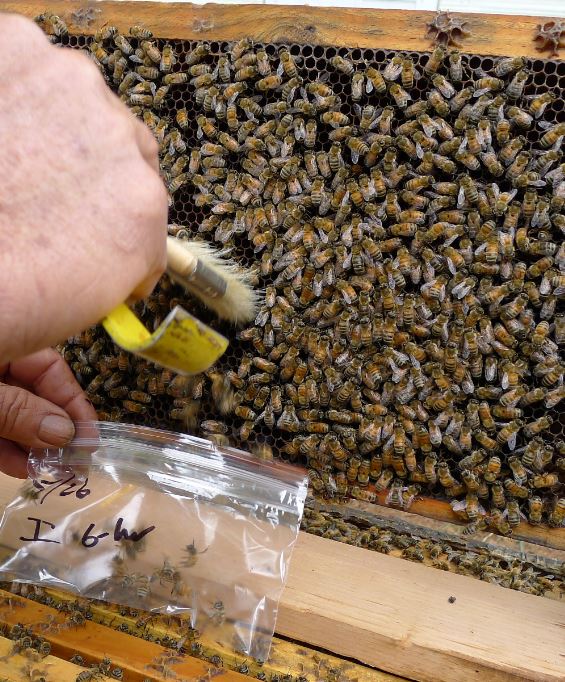 Bees brushed into a ziplock back need to be quickly chilled on ice in order to prevent them from overheating and defecating.
You can also test the bees after performing an alcohol wash for varroa by simply counting some out:
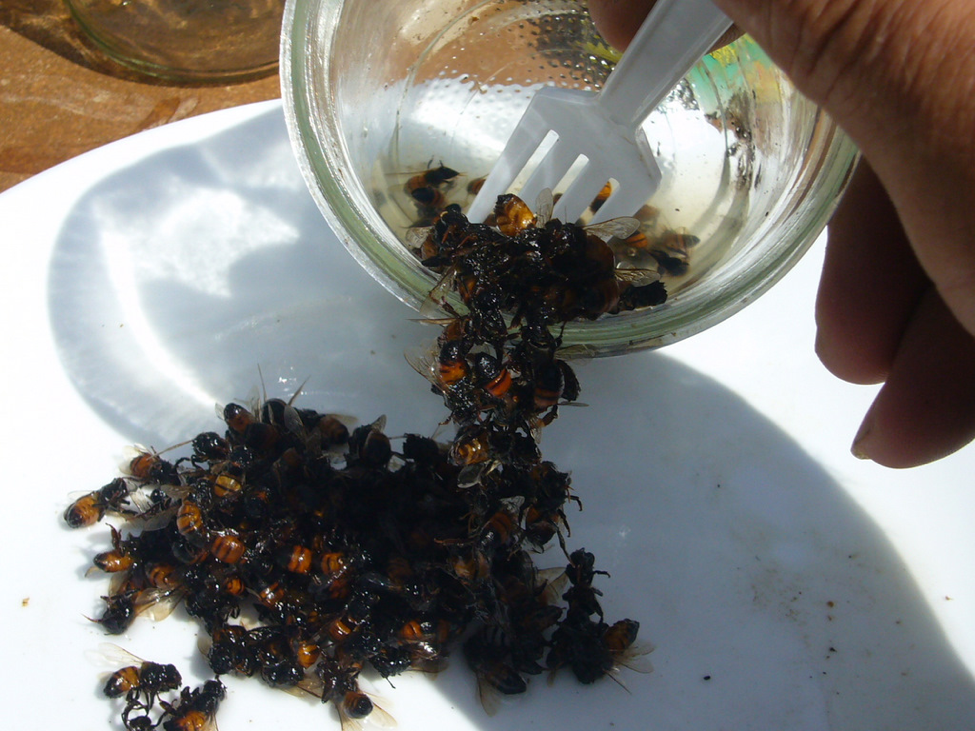 Dump the drained bees onto a white plate, then spread them out into a single layer, so that their legs aren’t all stuck together. In the photo below I’m counting bees into groups of ten for a research project.
 A plastic fork is very handy for sorting the bees, due to its light weight. You can count bees quickly five at a time into groups of ten. Count out at least 50 if possible. If the number of bees is something other than 50, write the number down at this time so that you don’t forget it when it’s time to add the water!
Here’s the problem: Samples smaller than 50 bees can be badly skewed by one highly-infected bee. A single bee may contain 500 million (500M) spores. That means that it alone will contribute an average spore count of 10M spores per bee to an entire sample of 50 bees, even if not a single other bee is infected! Therefore, the larger the sample size, the more accurate the results. Don’t place too much stock in the count from any single sample!
I typically crush 10 bees for my initial assessment.
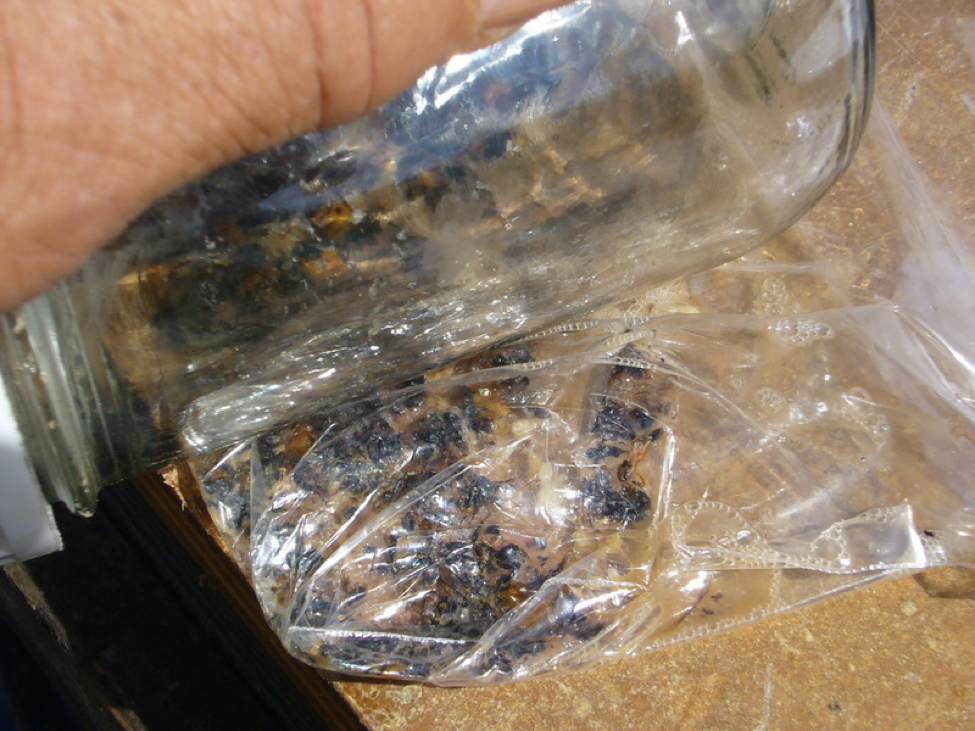 Place the counted sample into a ziplock bag. Crush the drained bees (no liquid yet) by rolling over them firmly with a round quart jar or 750 mL wine bottle (these work better than a rolling pin). Roll them with considerable pressure until there is no more crushing sound and their guts are all squeezed out of their bodies and mashed up. Tip: roll away from the edges of the bag, otherwise the seams will occasionally blow out.
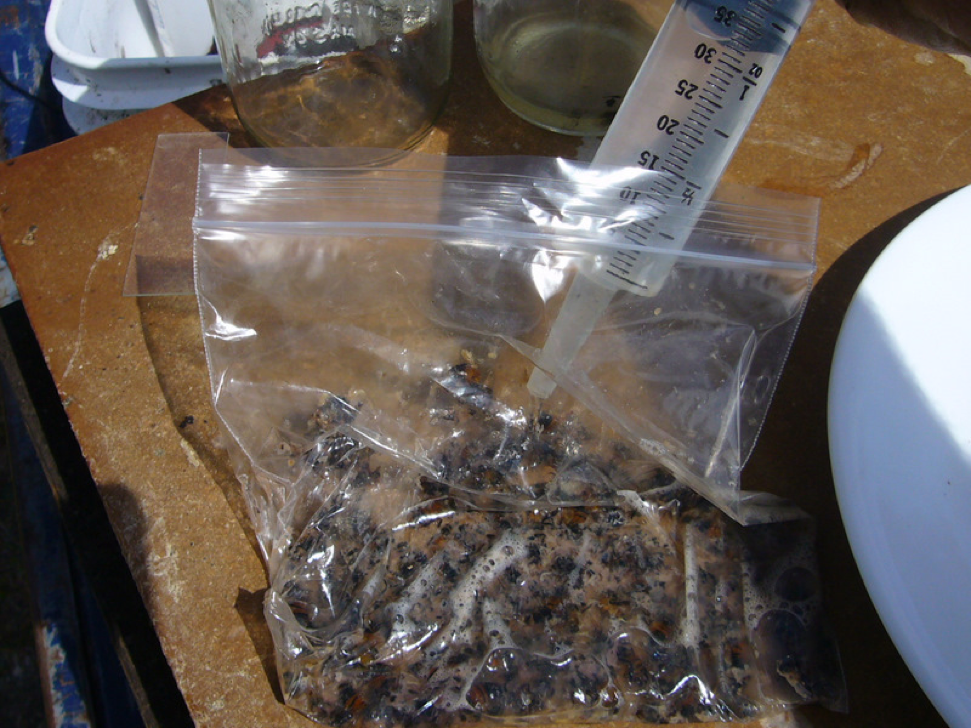 Now add 1mL of water per bee. If there were 50 bees in the sample, add 50mL. I like using a 60ml syringe (available from a feed store). Use the syringe to wash down the inside of the bag, being careful not to contaminate the syringe (I normally keep the syringe clear of the mouth of the bag). In a pinch, 1 tsp = 5mL.
1. If you want a rough quantification of the spore count, then add 1 mL of water per bee. If there were 50 bees in the sample, add 50mL. I like using a 60ml syringe (available from a feed store). Use the syringe to wash down the inside of the bag, being careful not to contaminate the syringe (I normally keep the syringe clear of the mouth of the bag). In a pinch, 1 tsp = 5mL.
2. What I now prefer is to only crush 10 bees, and then add about 3 mL of water, which concentrates any spores.
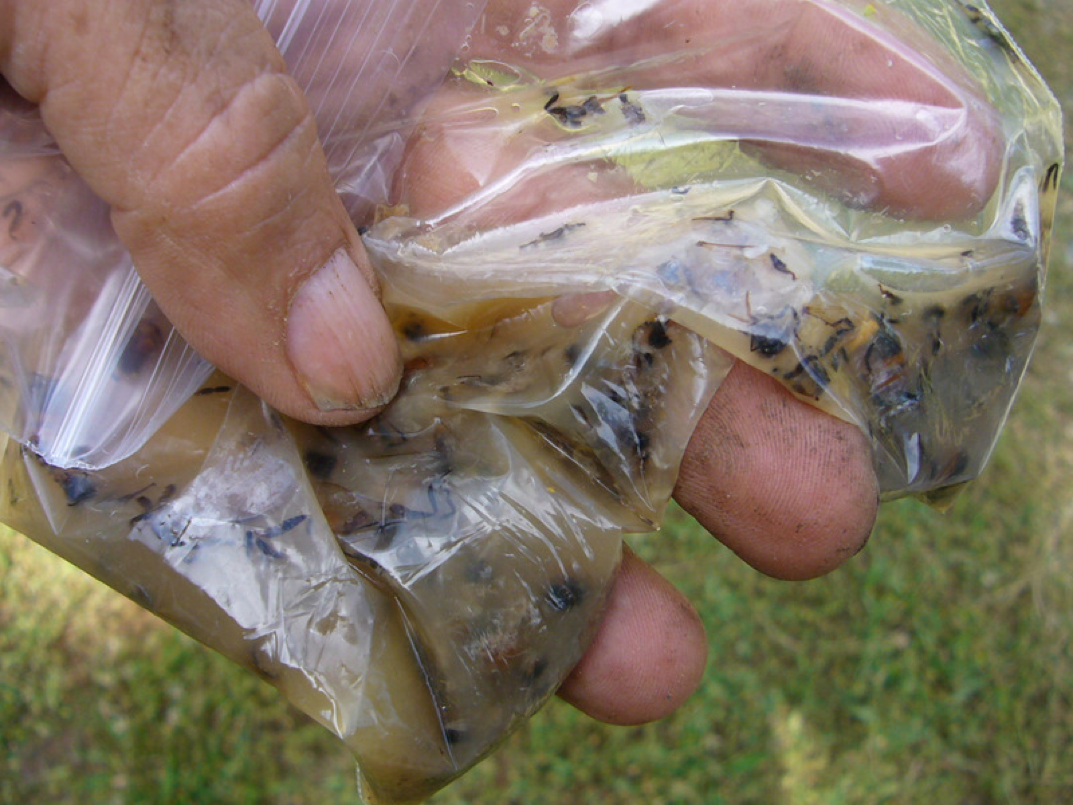
Then knead the bees thoroughly with your fingers in order to homogenize the released gut contents into the water:
 Now add 1mL of water per bee. If there were 50 bees in the sample, add 50mL. I like using a 60ml syringe (available from a feed store). Use the syringe to wash down the inside of the bag, being careful not to contaminate the syringe (I normally keep the syringe clear of the mouth of the bag). In a pinch, 1 tsp = 5mL.
At this point, you can if you wish, filter the liquid through cheesecloth or a nylon stocking in order to remove most of the trash, but I generally find this to be unnecessary.
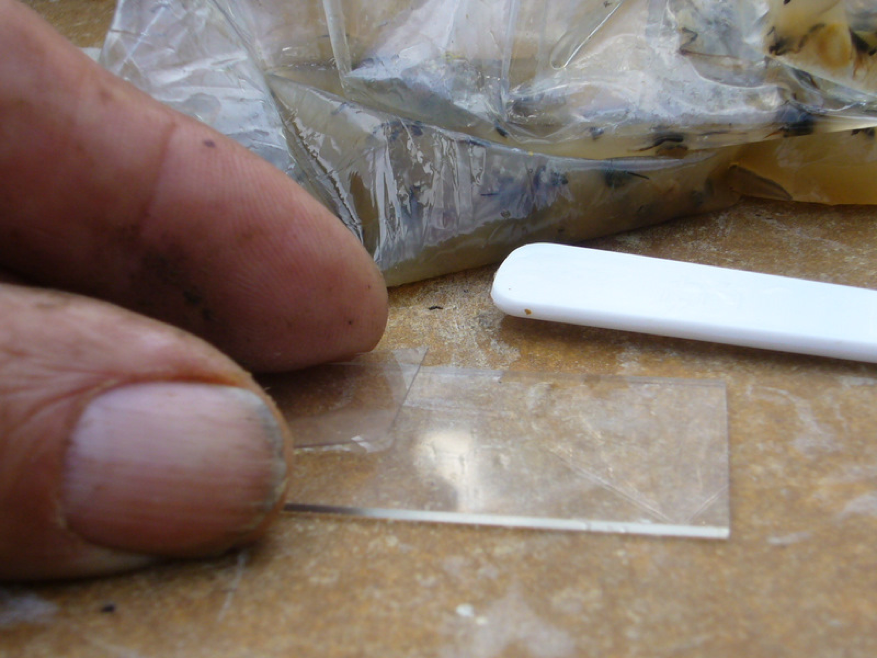 Take the handle end of the multipurpose plastic fork and quickly dip it into the freshly-mashed liquid (the spores settle out quickly when you stop stirring). Stir the handle around and lift it out, then touch it to a glass slide so as to place a drop of the liquid onto the center of the slide. Rinse the fork handle immediately so that it is ready for reuse! Set a cover slip over the drop and lightly tap it with your finger so that it settles down.
If there are any bee parts under the cover slip, use a fresh drop, as the parts will hold the cover slip up and skew your spore count higher. If any water puddles around the cover slip, blot it off with a paper towel so that it doesn’t get on the microscope lens (this is really important—don’t ever shove a wet slide onto the platform, as it will crud up the lens).
Now here’s the beauty of the ziplock method—once you’ve gotten your spore count done, you can simply zip the bag shut and toss it into the trash—no mess or washing up! It only takes me 2-3 minutes per sample turnaround, and a minute of that is simply waiting for the spores to settle.
I’ve given instructions for viewing the sample below, but first let me explain how to interpret your sample.
- If you’ve diluted the sample with 1 mL of water per bee, you can divide the number of spores that you see by 5 in order to obtain a rough estimation of the average number of spores per bee. Even easier is a triage assessment–
- No spores visible–colony not infected.
- A few spores visible–nothing to worry about.
- Spores everywhere in the field of view–then you want to determine the percentage of bees in the hive actually infected.
- Similarly, for a 10-bee sample diluted with 3 mL of water, use the same triage interpretation, and then move to the next step–individually process 10 of the remaining bees in the sample as detailed at Individual bee gut squash
If only one or two bees in the sample are infected, I wouldn’t worry about it. However, if more than half the house bees are infected, the colony has a problem with nosema.
BRINGING THE SPORES INTO FOCUS
The following directions are specifically for the OM36, but will apply to most scopes.
 Use the above photos to locate the different microscope adjustments. After the first setup, very few subsequent adjustments are needed.
- (Applies only to the first slide). Rotate the lens turret so that the 4x lens (the shortest one; with a red ring) clicks into place. The degree of magnification is the product of the 10x eyepiece (ocular) lens and the 4x objective lens in the nosepiece (turret)—in this case giving a magnification of 40x. At this magnification you can easily view bee body parts, but nosema spores would only be pinpricks.
- Place the prepared slide (with a cover slip over the liquid, and any wetness blotted off) onto the stage, clipping it into the spring-loaded holder. Click on the lamp (at back of the scope base), and turn the lamp brightness to about the “4” setting. Adjust the slide location so that the light shines up through the center of the “gunk” on the slide.
- Use the coarse focus knob to adjust the lens to about 7/8” above the slide.
- Now look through the eyepieces, and turn the coarse focus knob back and forth slowly until the bee debris comes into focus.
- Adjust the diaphragm (the size of the hole through which the light passes) lever toward the dark range, so that the debris looks “natural” and has clear texture.
- Adjust the distance between the eyepieces until you see only a single, round image.
- Looking through your right eye only, use the fine focus to adjust image until it’s sharp.
- Now, looking only through your left eye only, turn the knurled ring on the left eyepiece until the image is sharp. You have now customized the scope for your particular eyes and interpupillary distance.
- Now rotate the turret to snap the 10x lens (the next longer one; with a yellow ring) into place. Increase the light with the diaphragm lever if necessary. Slowly turn the fine focus knob back and forth a bit until the debris pieces come into focus. Now you are viewing at 100x magnification, at which nosema spores are barely visible. Feel free to explore the slide at any time by using the stage adjustment knobs (note the since a microscope inverts the image, that the image moves “backwards” relative to the movement of the actual slide).
- Now rotate the turret to snap the 40x lens (blue ring) into place, and adjust the fine focus slightly —the lens will barely clear the cover slip! Be careful not to focus down too far and crunch into the cover slip! At this magnification (400x) nosema spores are easily visible, but still small.
- Use the stage movement knobs to locate a pollen grain or bee hair. Now adjust the diaphragm lever again to the optimal light level so that those objects are clear to see.
- Now focus down (top of knob going toward the back of the scope) to the lowest level that objects are in focus and look for nosema spores. You must wait at least 60 seconds from when you first prepared the slide in order to allow the spores to settle—you can watch them as they fall to the bottom and suddenly come into focus!
- Once you find spores (you may not find any in your sample), move the fine focus until they “glow.” Then adjust the condenser (this focuses the light beam) to the point where the glowing spores are bright against a relatively dark background. You can now fiddle slightly with the adjustments to get the best possible image in which the nosema spores stand out.
- Once you’ve made all the above adjustments, you can leave them set. Subsequent slides can simply be placed on the stage, and the only necessary adjustment will be the fine focus. Whew!
SPORE IDENTIFICATION
Nosema spores have a few distinctive characteristics that will confirm your identification:
1. Nosema spores are still quite small even at 400x!
2. The spores are distinctive elongated ellipses—similar in shape to vitamin or fish oil capsules (but variable).
3. They will all be about the same size (N. ceranae spores are somewhat variable, especially bee to bee).
4. Most of the spores will settle to rest at the bottom of the liquid, and will thus all come into focus at the same level.
5. Note: Brownian motion due to the vibration of water molecules may cause the nosema spores to jiggle and move about slightly.
There are two distinctive characteristics that will confirm the identification of nosema spores—these can be best observed by jiggling the fine focus knob back and forth slightly as you view the spores.
6. The spores will be clearly outlined with a smooth, dark elliptical line,
7. then the outline will fade, and the centers will glow brightly. A spore must have both of these characteristics, as other objects will also have oval outlines or glow, but won’t do both.
With practice, your brain develops a “search image” for the spores, and they begin to jump out at you from the background debris.
8. Nosema ceranae looks somewhat different than N. apis to the experienced eye—apis is a bit larger and broader, and the ends of the spores are “blunter.”
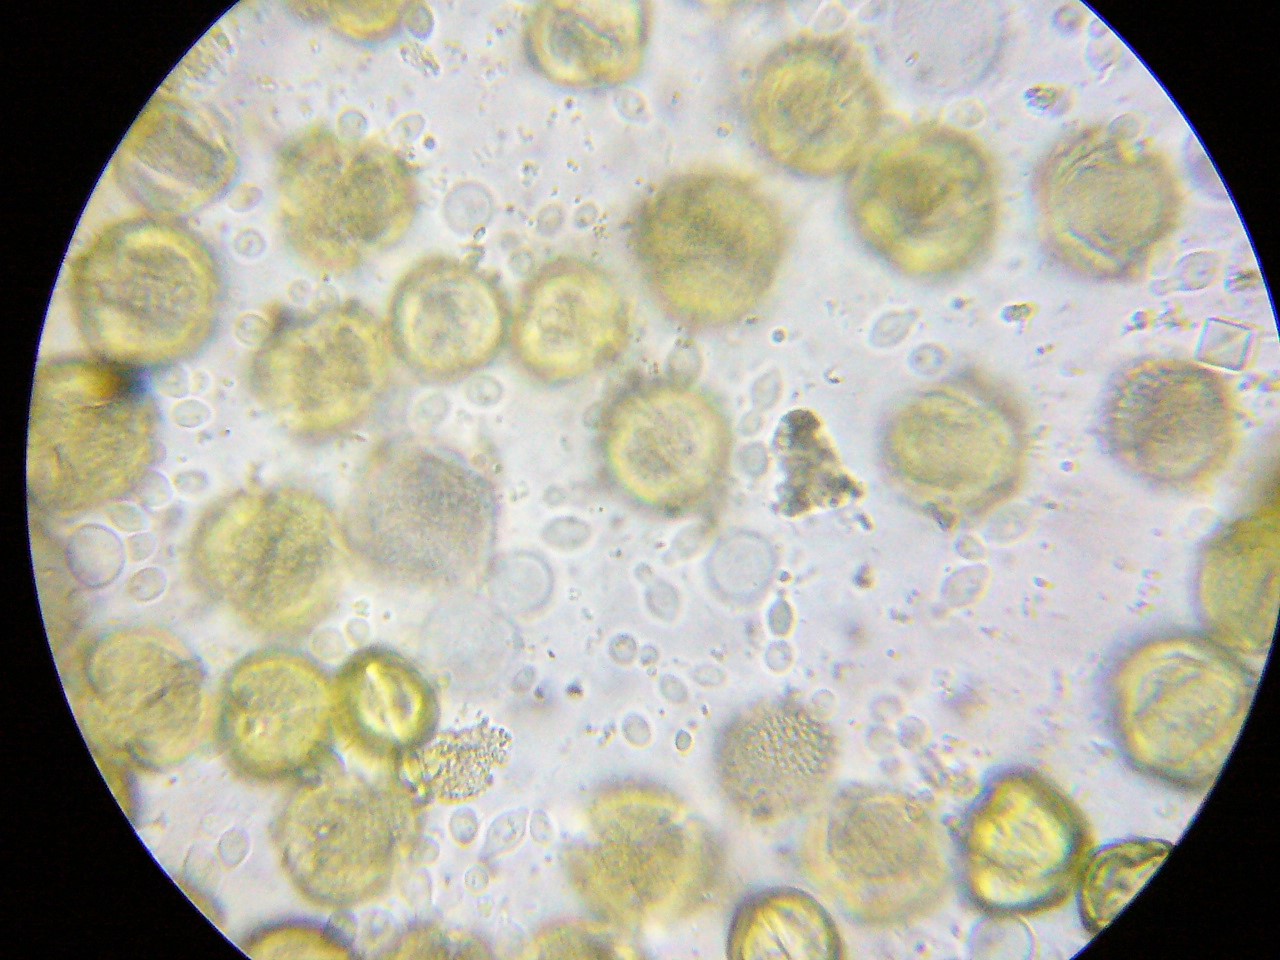
 Note that I’ve adjusted the condenser and lighting to give me a dark background that really shows the glow of the polar bodies in the center of the spores. These are typical N. ceranae spores—note their size relative to the bee “hairs” (one is feathery) and the yellow pollen grains. All photos are © the author, and were taken with a simple digital camera held to the eyepiece of the scope.
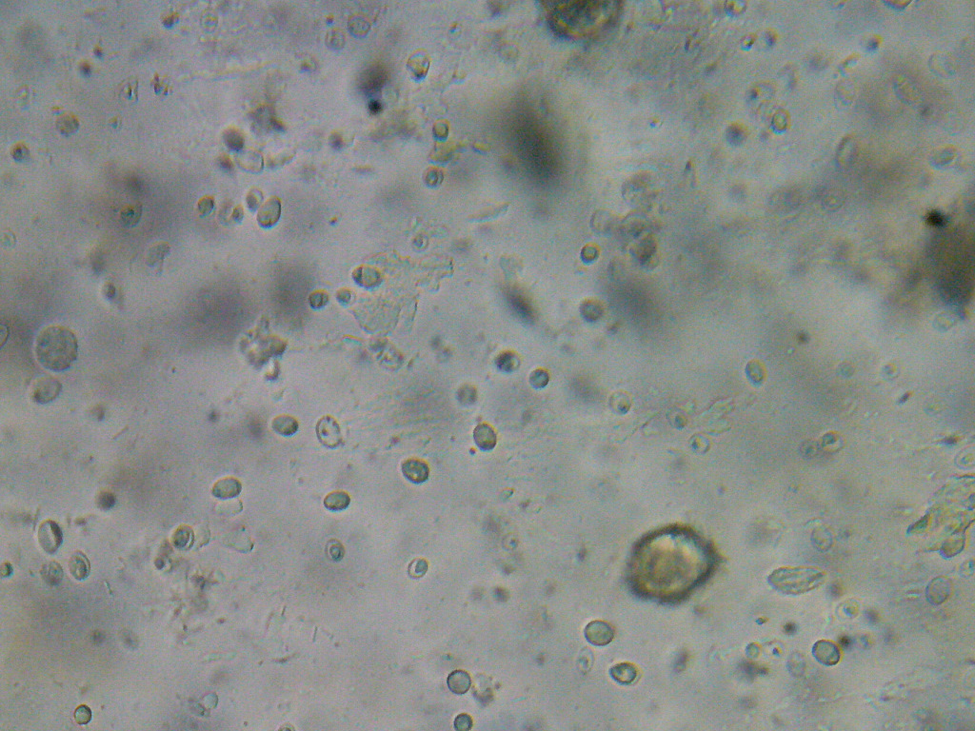
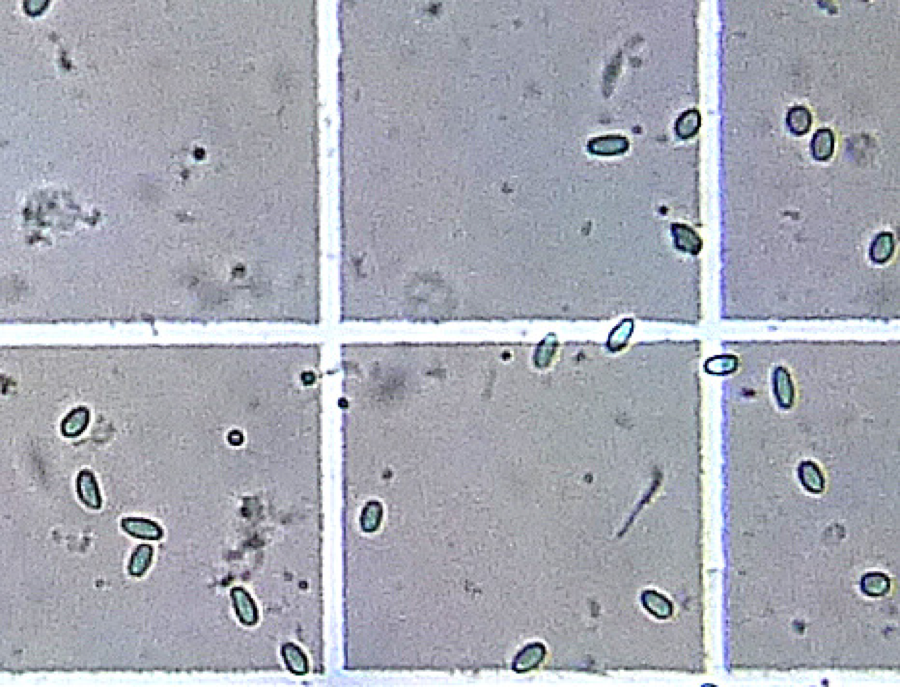 Note in this photo that N. ceranae spores are quite variable, and noticeably different from bee to bee. Some will be extra long, pointed, or even curved like bananas! Note the spore at the lower far right, which is standing on end, rather than lying on its side, thus making it appear to be circular.
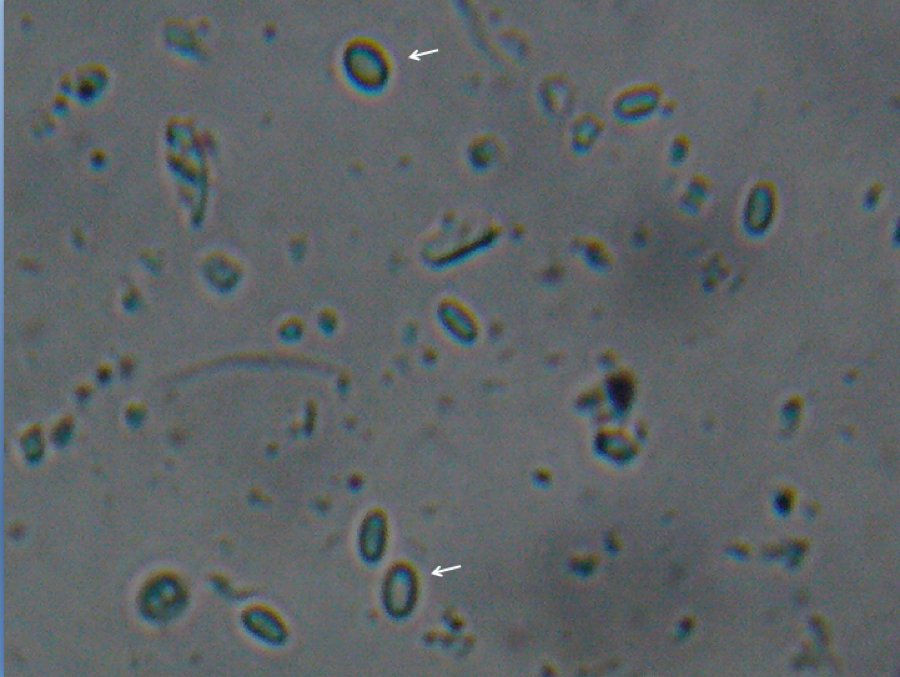 A slide containing both species of nosema—I’ve marked the two “fatter” N. apis spores with arrows. You’re unlikely to see N. apis, as N. ceranae has largely displaced it, although apis may pop up during cooler weather. There are indications that N. apis may be the more serious pathogen of the two.
COUNTING THE SPORES
I’m going to assume here that you ‘re going to simply do “field of view” counts on a simple glass slide, as I don’t feel that tedious hemacytometer counts are generally justified unless you are compiling data for research.
Use the stage adjustment knobs to “take a trip” around the slide. Pick an area to view that has a representative spore density.
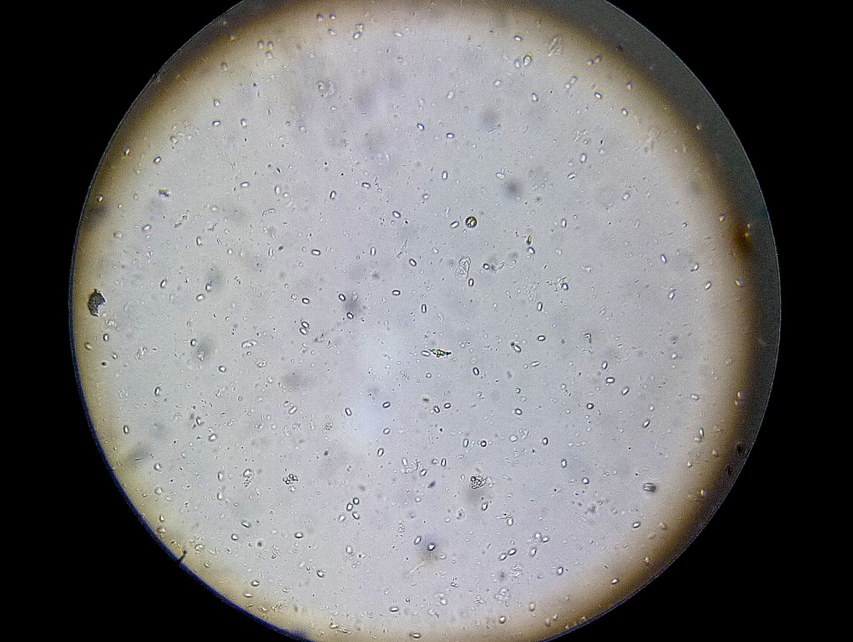 This is a “field of view” at 400x of a filtered sample. You can see approximately 80 spores. If you divide the field of view number (in this case, 80 spores) by 5, the result is an approximation of the average spore count per bee in millions (80 5 = 16M spores per bee). This is all the accuracy that you need for management decisions. In fact, after several views, you will likely simplify counting down to one of three levels: none, a few, or too many. With practice, this triage can be done with a glance through the lens.
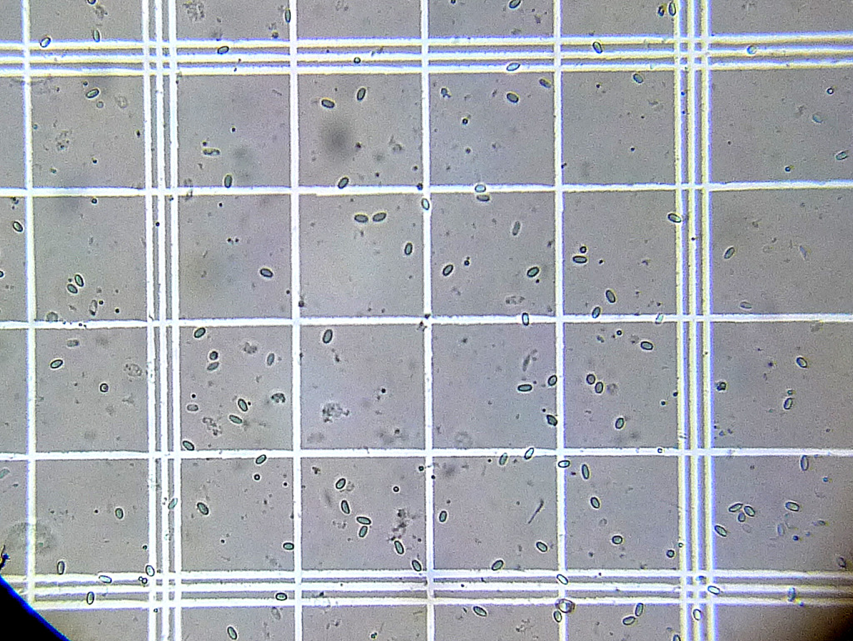 This is the view in a hemacytometer (for counting blood cells) of a droplet from the same sample as the above slide. There are 400 of the incredibly tiny squares in a square millimeter! Scientists accurately quantify counts by determining the average number of spores per square, and then multiplying by 4 million (in this case, the spore estimate would be about 14M based upon the mean of the 16 squares within the triple lines—very close to the estimate above; note that normally one would count a total of 80 squares).
If you do decide to get a hemacytometer, I recommend a Reichert Bright Line—order through a lab supply, but make sure that they call the manufacturer directly and ask them to ship one with an extra dark background. Note that in the above photo, I’ve adjusted the scope such that the spore “outlines” are in focus, but the centers of the spores are not glowing much. Compare it to the following photo:
 In this photo, I’ve adjusted the fine focus such that the centers of the spores glow, which leaves the outlines out of focus. If you slightly turn the fine focus back and forth, the spores will look like flashing lights, which really makes them stand out (just make sure that what you’re looking at still has the smooth elliptical outline, as other objects will also glow).
WHEN TO BE CONCERNED
For Nosema apis, the treatment threshold was considered to be a mean spore count of 1M per bee. On the other hand, there is considerable debate as to what constitutes a worrisome spore count for Nosema ceranae. What I observe in the Sierra foothills is that N. ceranae typically builds up during winter, and especially during spring pollen flows, then disappears by late summer. In most colonies, no more than 2-3 bees out of 10 get infected. So long as fewer than 3 bees (taken from an outer comb) out of 10 are infected, I don’t see any correlation with wintering problems. Come early summer, however, that level may be associated with reduced honey production by the colony.
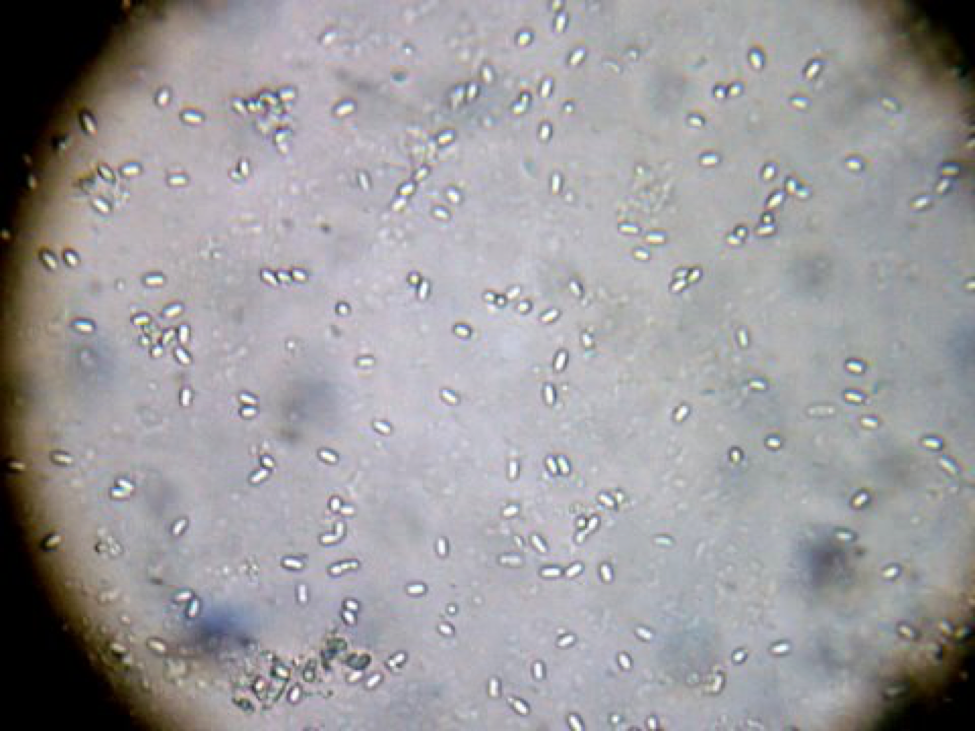
 If you really want to see a lot of spores, or if you wish to determine what percentage of bees are actually infected (the best measure of colony infection), then you must view the gut contents of one bee at a time. This is easily done by placing a drop of water on the slide, and then crushing and mushing a bee’s abdomen into it. The number of spores can be quite impressive (don’t even try to count them)!
 The spores in this “gut squash” are too numerous to count. A prep from a highly-infected bee often has wall-to-wall spores. I call this my “Halloween” photo.
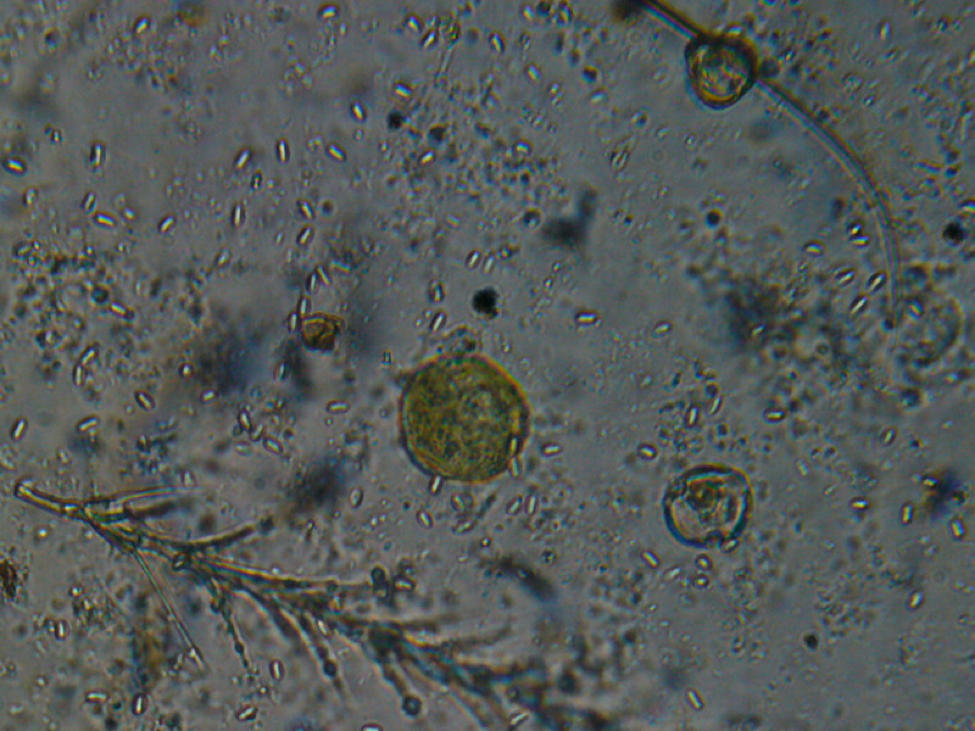
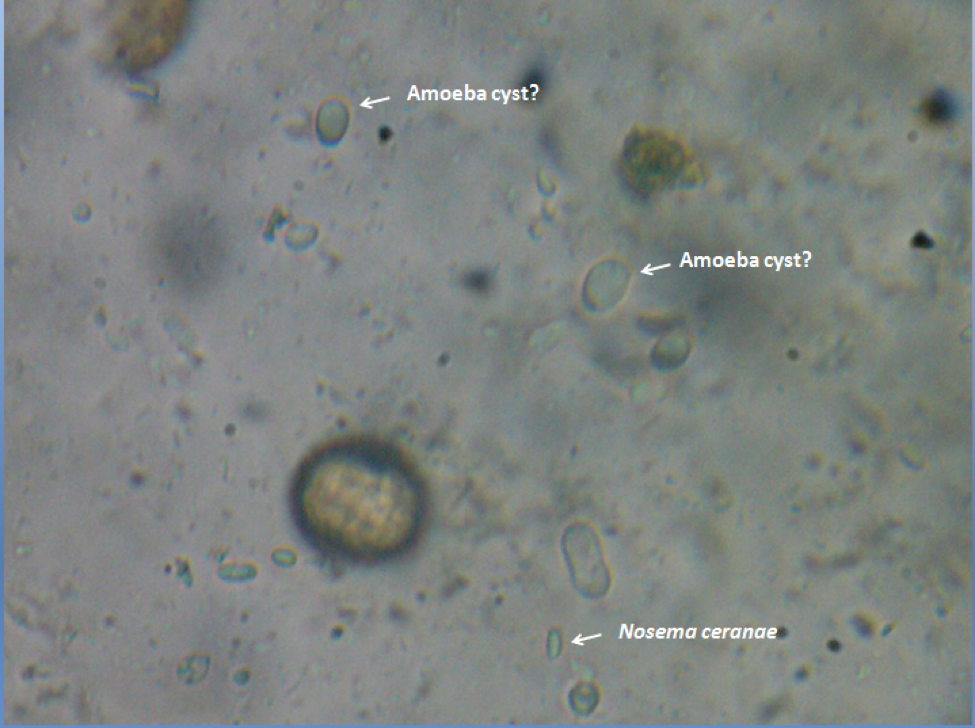
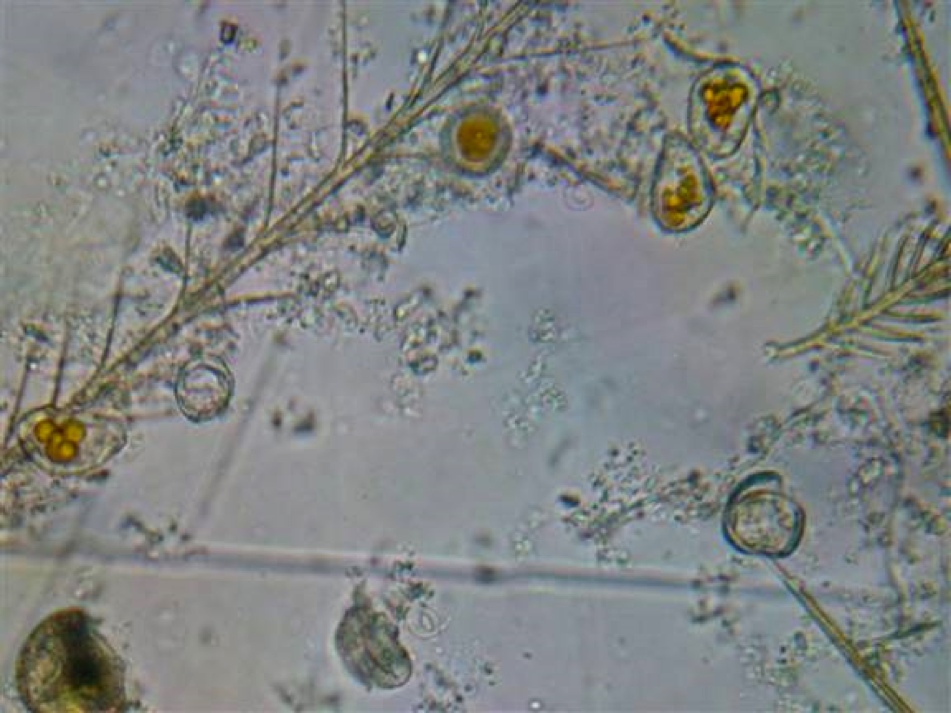
 If you sample house bees, and see a great deal of pollen in the gut, then you have found a nurse bee, which are rarely infected. This nurse came from a sick colony, and is clearly badly infected with nosema (there also appears to also be an amoeba cyst at center lower right). Dr. Mariano Higes (pers comm) finds that when the infection spreads to the nurses that the colony starts to seriously go downhill; my own observations appear to confirm this.
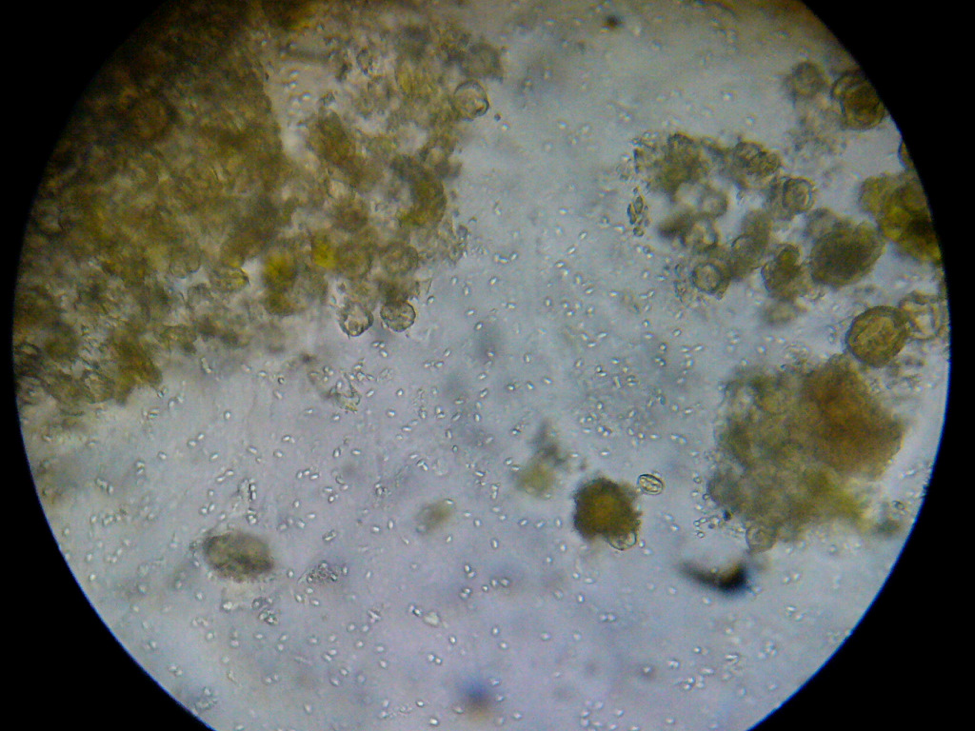
 You can also check for spores in dead bees on the bottom boards of deadouts, those that have flown out and dropped dead on the snow (above), and in dysentery samples scraped from the hive. You may be surprised how seldom you will find nosema spores! What I do often find in deadouts and dysentery are oval amoeba cysts (several times larger than nosema spores, and not glowing in the center).
I have found no particular relationship between nosema and dysentery, other than that colonies exhibiting dysentery are more likely to transmit nosema spores.
 Note that what I’m guessing to be amoeba cysts are larger and more oval than nosema spores, and don’t glow in the center. I find these cysts commonly in dead winter bees and dysentery samples.
 The above photomicrograph of the infective cysts of Malpighamoeba mellificae (image from https://en.wikipedia.org/wiki/Malpighamoeba_mellificae)
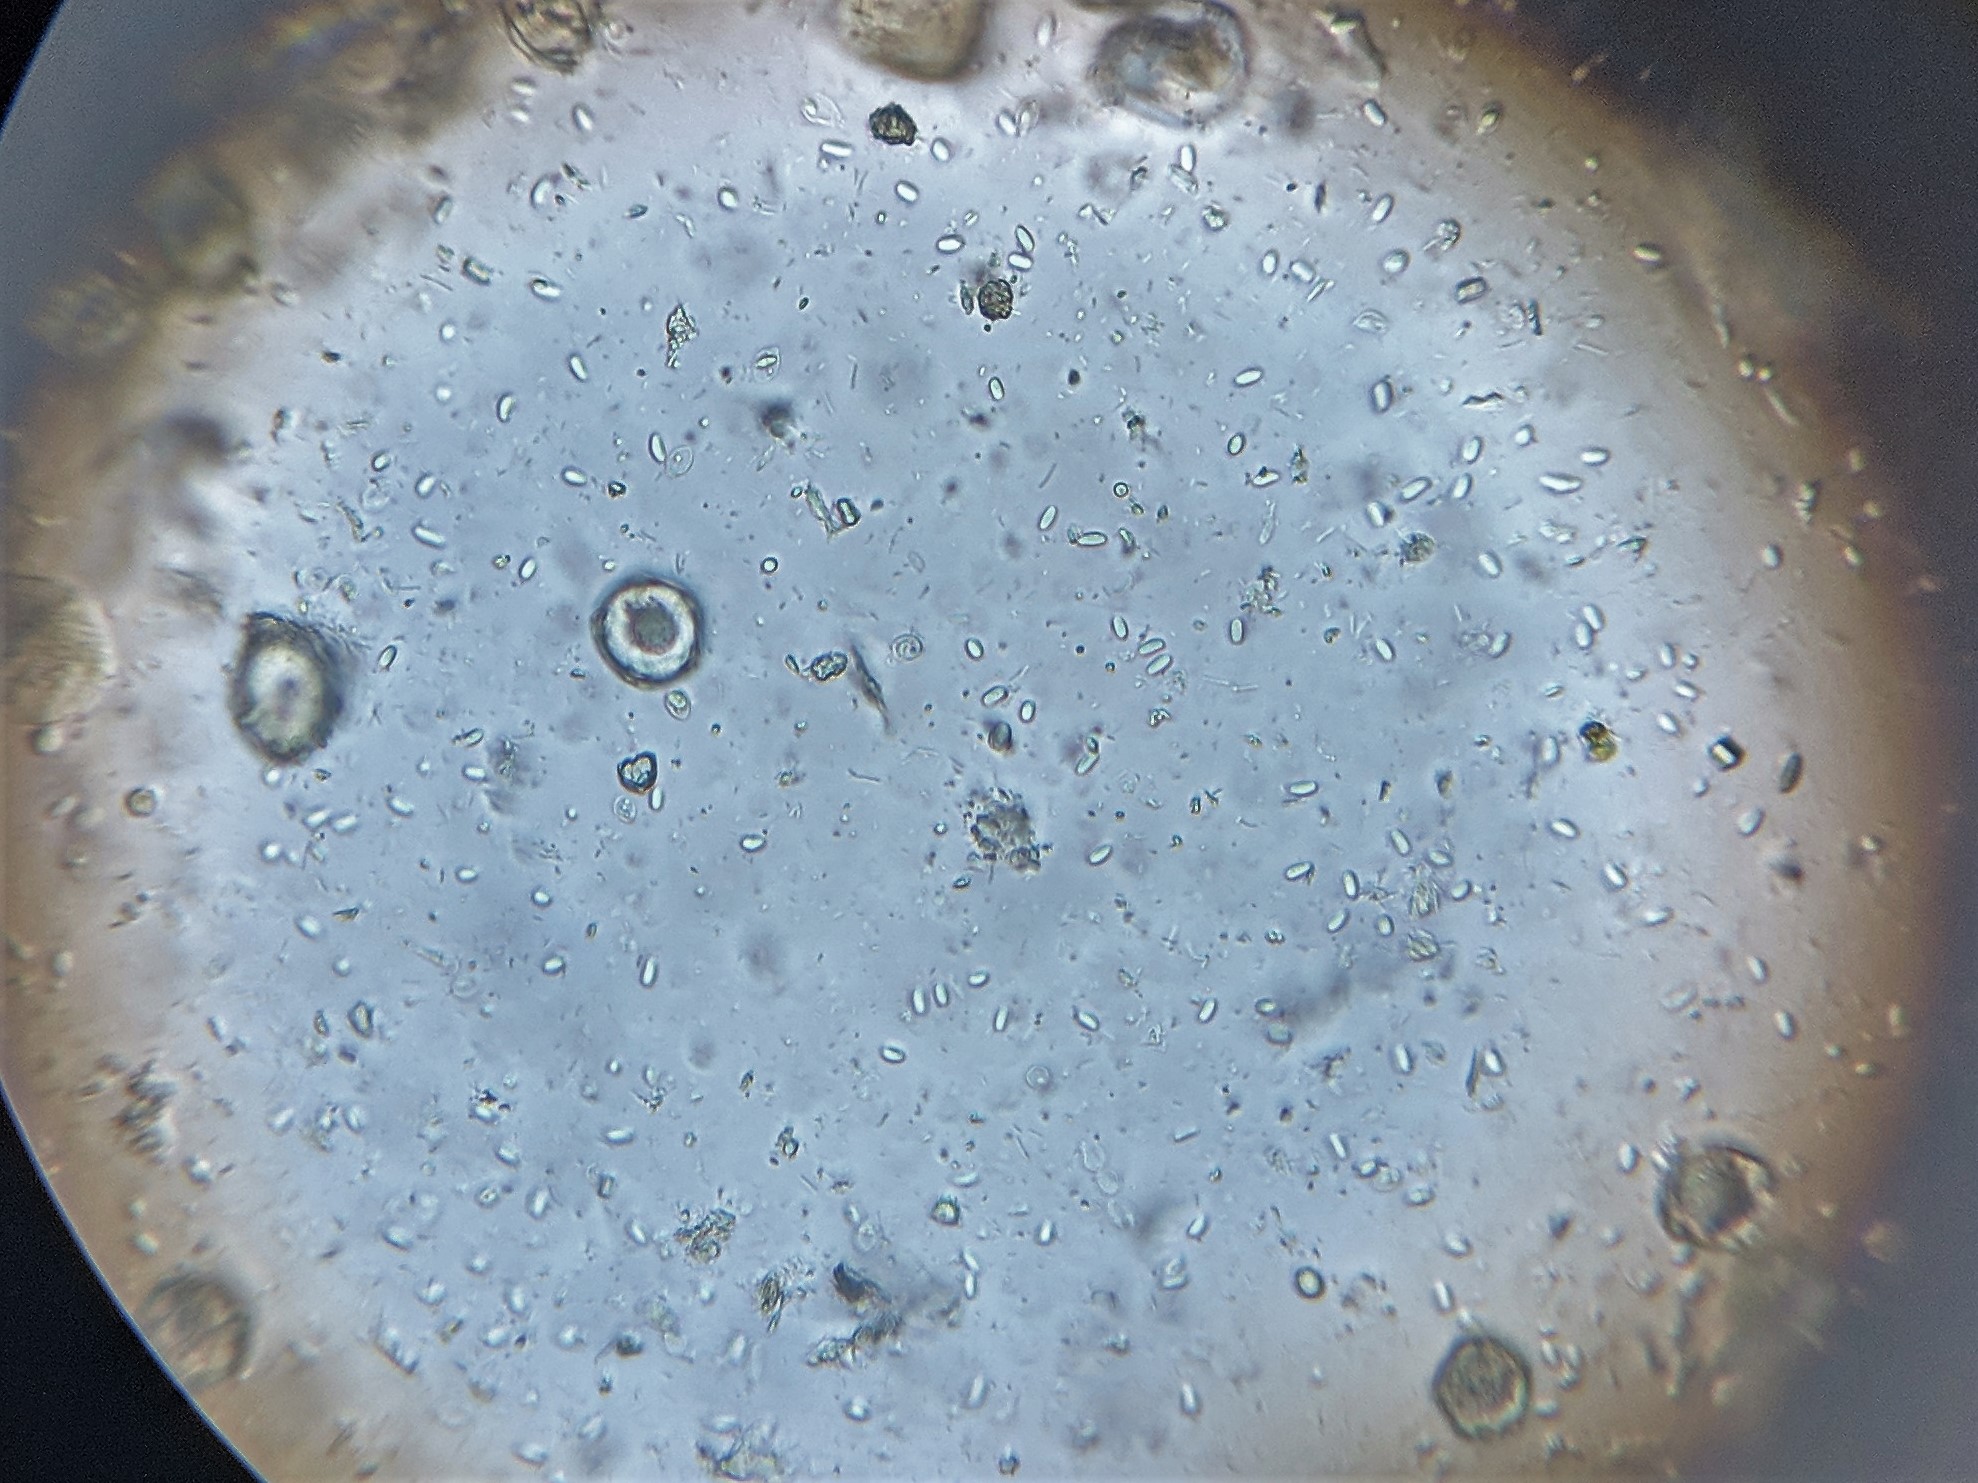 A colony suffering from dysentery can certainly also be infected by nosema. The photo above was from dysentery scraped from the top bars of a colony that failed to initiate broodrearing in spring and was confined to the hive by a long stretch of rainy weather (the combination can lead to dysentery). The larger objects are pollen grains–the one at the lower right showing the angular nature of alder pollen.
When I dissolve and view samples of dysentery, I don’t necessarily find evidence of nosema, and if so, it’s often at a low level. What I do often find are things that appear to be either yeast or amoeba.
 This 1000x micrograph is of pollen that I diluted with thin sugar syrup and allowed to ferment for a day. The ghostly gray ovals are, to the best of my knowledge, cells of yeast.
 A gut sample from a deadout in winter, apparently with a bad amoeba infection.
In other samples of sick colonies I may find “fried eggs” as in the above photo, these are spores of rust fungi, which bees gather as food (https://scientificbeekeeping.com/fried-eggs-identified/). If you look at enough bee gut samples, you will see all kinds of infections, most of which I’ve been unable to identify.
I’ve shown many beekeepers how to quickly process bees for spore counts. I suggest that every bee club purchase a scope, and assign one member to gain proficiency at its use. At the break during your meetings, you can easily process a great number of bee samples in a few minutes (have everyone bring a counted sample in a ziplock bag). Such sampling will allow beekeepers to actually track nosema levels throughout the season, and determine whether it appears to be a problem in your apiaries.
You can also buy a microscope camera that will transmit the image on the slide to your laptop or to a digital projector for all members to view at the same time (as opposed to having a queue waiting at the scope). I’ve tried several digital cameras — be forewarned that the image will not be quite as clear as when viewed directly through the microscope lens, but definitely worthwhile as a training aid. Microscope.com offers the OptixCam series, of which I found the OCS-3.0 ($329) easy to use and adjust.
CARE AND FEEDING OF YOUR MICROSCOPE
Now that you’ve forked over your hard-earned cash for a shiny new microscope, treat it well for a long life. A microscope is a precision tool full of delicate parts. Don’t ever bang or drop a scope — those tubes may contain 15-20 lenses that can be jarred loose! A wise practice is to always carry a scope with both hands. Keep the scope covered or in a case when not in use. Dust, moisture, skin oils, and bee guts are the scope’s enemies! Wipe off any liquids with a soft cloth moistened in isopropyl alcohol. Never touch the lens surfaces with your fingers or regular tissue paper. Use only microscope lens paper or a Q-Tip, moistened in lens clearer or alcohol.
COMING UP
Now that you know how to determine spore counts, I will be following this article with a deeper look into our current state of knowledge of Nosema ceranae.