


The Varroa Problem: Part 10-Smokin’-Hot Mite Washin’
The Varroa Problem: Part 10
Smokin’-Hot Mite Washin’
Randy Oliver
ScientificBeekeeping.com
First published in ABJ September 2017
If you had asked me even a month ago as to how many of your hives to sample for varroa, I’d have suggested using Katie Lee’s plan of 8 hives per apiary [[1]] (in truth, we’ve rarely sampled even that many). And I would have definitely said that there was no way in the world that I could sample every single one of my hives. But I was wrong!
Getting Serious about Breeding
I recently published the article “Bee Breeding for Dummies” [[2]], and have now posted a pictorial version to my website [[3]], hoping to encourage our queen producers to shift the genetics of our bees towards mite resistance. I’m not a proponent of the “Bond Method”–which involves unnecessarily allowing colonies to die–but rather of a “smarter” process based simply upon repeatedly selecting those colonies with the lowest rates of mite buildup [[4]].
The question, of course, is how realistic would it be for a queen producer to actually engage in such a breeding program? To answer that question, we should look at four factors that determine whether a program has a chance of being successful at breeding for a certain trait (in this case, varroa resistance) over a reasonable amount of time:
- There must exist a goodly degree of variability in the desired trait in the breeding population (i.e., a wide hive-to-hive variability in the rates of mite buildup),
- That the desired trait is heritable (that mite resistance be passed to the next generation),
- That the breeder can identify individuals exhibiting that trait (what this article is about), and
- That the breeder can apply a strong amount of selective pressure to the breeding population (how strongly you can shift the genetics of your breeding population by eliminating susceptible bees and promoting resistant lines).
Let’s go over the above one at a time.
FACTOR #1–Variation in Mite Counts
In my small commercial operation, we start about 2500 nucs each spring, keeping around 1500 for ourselves. We hit all of our nucs with oxalic dribble at the end of the brood break, so they all start with roughly the same low mite infestation rate in April. But by July, we generally find large hive-to-hive differences in mite counts, so we appear to meet the criterion of variability. As evidence, I’ve shown representative distributions of the mite counts in a few typical yards in Figure 1 below [[5]].

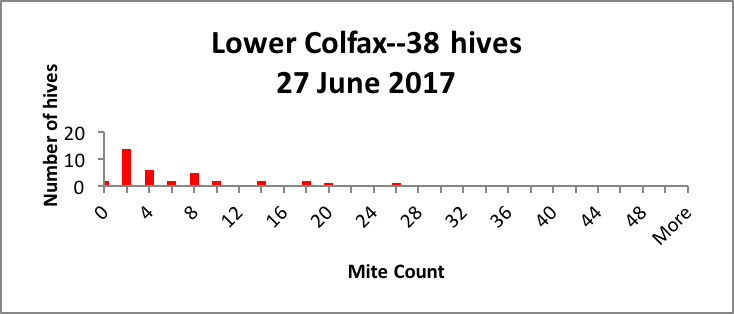
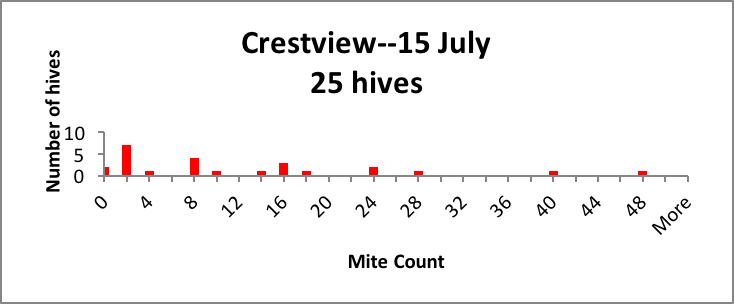
Figure 1. Distributions of mite counts in three representative yards in our operation. In the Drew yard, there were 3 zeroes and 5 1-2’s (potential breeders), and 7 mite bombs. In the Colfax yard there were 2 zeroes, 14 1-2’s, and 4 bombs. In the Crestview yard the distribution was more spread out, with 2 zeroes and 7 1-2’s as potential breeders, and a few high-count “bombs” likely to collapse without prompt treatment. |
As a breeder, I’m interested in propagating the genetics of those colonies that by some means manage to keep their mite counts far lower than the norm (generally the colonies with counts of 2 or below).
Practical application: If I simply treated all the hives in every yard by calendar date, I’d never know that I had potential breeders that might not require any treatment at all.
FACTOR #2–Degree of Heritability
Based upon last year’s results, it appears that there is indeed some degree of heritability of the mite resistance exhibited by at least some of my chosen breeders—we had a few daughter hives that kept counts low all season. But after grafting this spring, mite counts went up in all my breeders, although there are three that still have a chance of making it into their second winter without treatment [[6]]. As far as this month’s initial picks, later this season I’ll know whether I’m fooling myself or not.
FACTOR #3—The Identification of Desired Breeders
The gold standard for assessing the rates of mite buildup in a group of hives includes the measurement and tedious dissection of brood cells in each hive. Unfortunately, I don’t have the time, money, or inclination to do that. But there’s no reason that I can’t use much quicker comparative alcohol wash mite counts as an indicator.
The alcohol wash of ~300 nurse bees is a well-proven and reliable measure of the degree of mite infestation in a hive. That said, one must keep in mind that alcohol wash counts must be interpreted with a degree of caution:
Practical application: early in the season, the alcohol wash count increases at a slower rate than does the total mite population in the hive. And then when the colony population begins to decline in late summer, the count increases more rapidly than does the total mite population. My modeling suggests, however, that the alcohol wash pretty accurately reflects the actual degree of mite buildup during the time period from June 1st through August 1st.
As I learn to better model mite population dynamics, I can now pretty accurately predict the relationship between alcohol wash counts and the total mite infestation. In Fig. 2 below I illustrate the stepwise selection process that I’m now using to identify potential breeder queens (we started last season, but with less than a hundred mite washes).
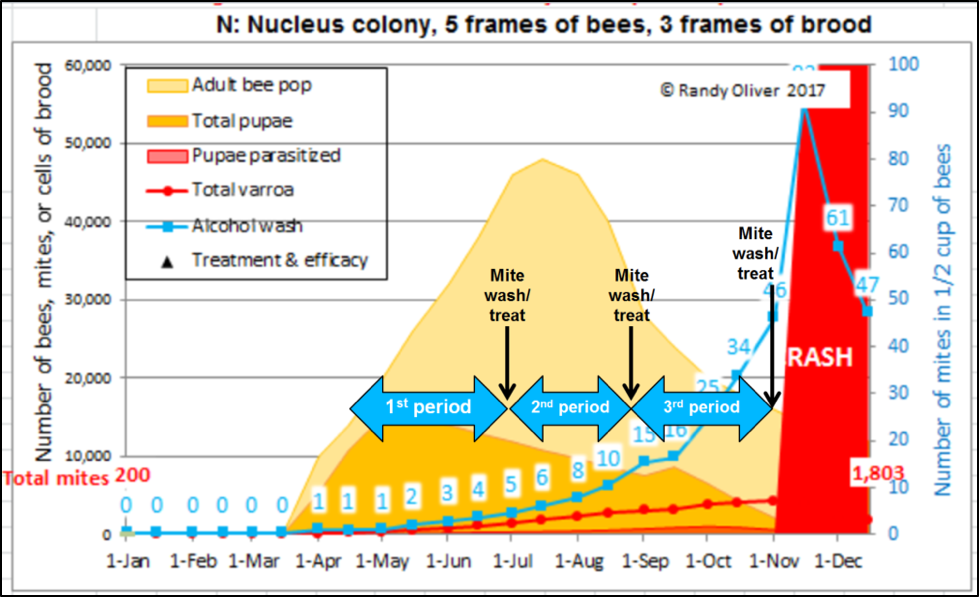
Figure 2. A simulation of typical mite buildup in colonies in my operation started as nucs in April–the blue numbers in the white rectangles indicate predicted median alcohol wash counts for the colonies if they didn’t receive mite treatments. The fat blue arrows indicate the mite buildup periods that I allow between my selection events for potential breeders (a winnowing process by which I eliminate most queens from consideration at each time point). The black arrows indicate when I perform mite washes, followed by treatment of any colonies that don’t pass muster.
After identifying, marking, and withholding treatment from the chosen potential breeders, we immediately treat the rest of the hives. Each potential breeder from the first test period must then prove that their low first count wasn’t a fluke–by testing low again at the second and third mite washes. Fortunately, I need to wash far fewer colonies for those tests, since I eliminate the vast majority from consideration at first wash, and again more at each subsequent wash.
Practical application: I’m mite washing these yards in the same order that we made up our nucs, so that each group of hives has had the same amount of time for the mites to build up (more on this later). So this sampling does not delay our treating of our yards in order to keep varroa under control. The second and third samplings of the low-mite potential breeders should be at monthly intervals, since the mite population can double in a month.
An added benefit of knowing the actual mite count of each hive is that I’ve identified the “mite bomb” colonies which will require additional treatment(s) over that which we give to the rest of the hives. The reason is that the required degree of treatment efficacy to get the mites in any hive under control is dependent upon the total mite population in that hive.
Practical application: let’s say that you sampled a couple of hives in a yard on July 1st, and got mite counts of 5. That would indicate total mite populations in the hives of ~1500 [[7]]. If you hit those colonies with a treatment giving 90% efficacy, that would leave ~150 mites remaining, and the colonies could likely go into winter in good shape without further treatment. But what if there was a colony in the same yard with a count of 25 mites (indicating ~8000 mites in the hive)? If you hit it with an identical treatment, that would leave 800 mites still alive, and despite being treated that colony may soon again become a “mite bomb” that infests the rest of the hives in the yard (remember, it showed little resistance to mite buildup). It helps with mite control at the whole apiary level to identify those potential mite bombs!
FACTOR # 4—The Degree of Selective Pressure Applied
Selection pressure—the degree of differential mortality or fertility applied (by the breeder) to effect a genetic change in a breeding population.
Ah, and now we reach the crux of the issue—how strong a selective pressure can I apply for the trait of mite resistance? If I were selecting from a pool of only 10 hives, the maximum pressure that I could apply would be 10 to 1. If I selected from 100 hives (assuming keeping only a single breeder), it would be 100 to 1.
Practical application: for a serious breeding program, I’d want to be selecting from at least 1000 hives, so that I can keep enough breeders each season to prevent excessive inbreeding. This means that I’d need to perform mite washes on all 1000 hives at the first assessment.
The problem of course was that I considered it totally unrealistic to think that I could possibly mite wash 1000 hives during the narrow window between when mite levels got high enough to test, and when I needed to treat to knock the mites back. I needed to come up with a way to perform those mite washes way faster.
Smokin’-hot Mite Washin’
I’m happy to say that I’ve recently figured out a way! A two-person crew can easily perform washes at the rate of one every two minutes (including taking the bee sample, washing and counting the mites, and labeling the hive). This works out (assuming $25/hr for labor) to only $1.67 per hive sampled [[8]]—less than the cost of most treatments. And that’s working at a comfortable and sedate rate–yesterday, we stepped up the pace and sampled our last yard of 25 hives in only 35 minutes (from when we pulled in ‘til we drove out).
How to do it
Following is a short pictorial of how we’re currently doing it—for a fuller version with more photos, go to [[9]].
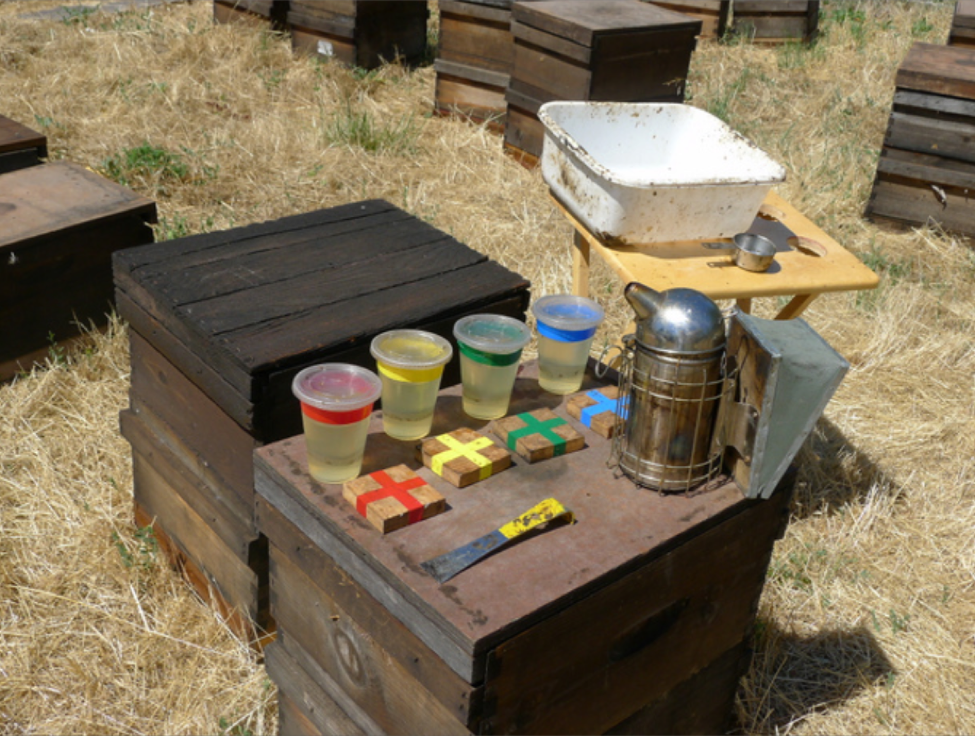
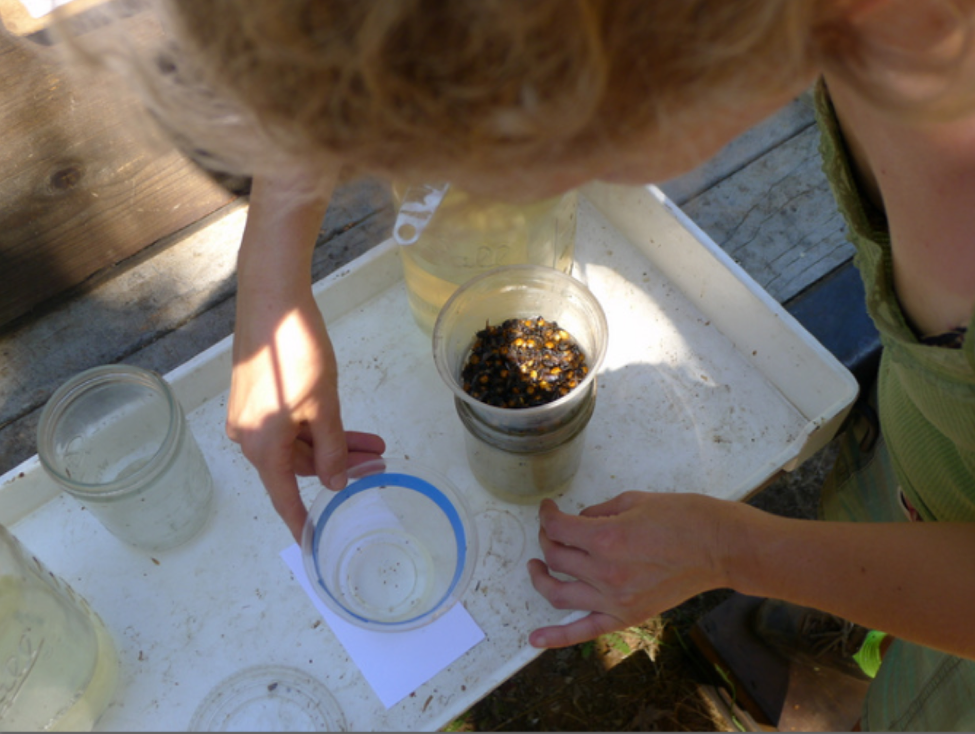
The necessary sampling equipment (above). Four color-coded mite wash cups and markers [[10]]. A folding table to move along near to the hives (with holes drilled into the table to hold the cups [[11]]). A Rubbermaid brand dishwashing tub, and a stainless steel half-cup measuring cup [[12]].
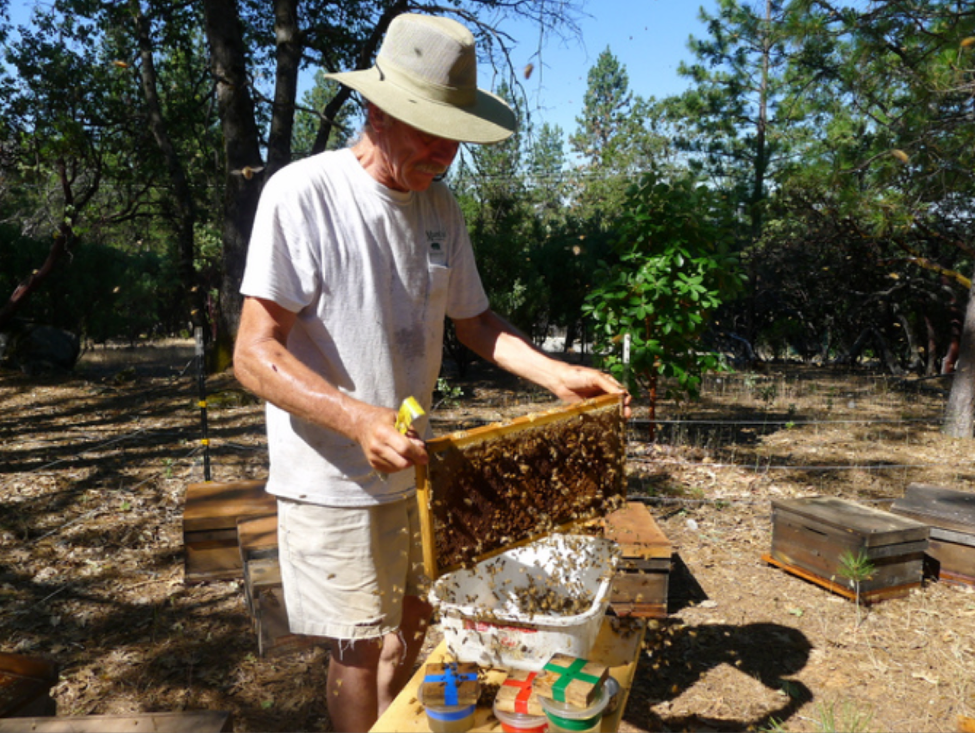
I do my first sampling when colonies are strong singles or doubles (definitely before adding honey supers). For consistency, I pull a similar frame from each hive—typically two frames in from the outside of the cluster. I want a frame with beebread or a little bit of brood, but don’t want to disturb the broodnest or the queen.
Practical application: the important thing is to sample after the workers in the hive have been replaced by those of the new queen, and then to allow enough time for the mites to go through perhaps three reproductive cycles. It initially takes about 40 days for the bee population to turn over, and then each mite reproductive cycle takes around 17 days. This means that you should allow at least three months from when you start the nucs until you perform your first sampling for mite counts. Generally, your first sampling should take place just before you apply your first summer mite treatment (or you could do it right after you pull your honey supers if that works better for you).

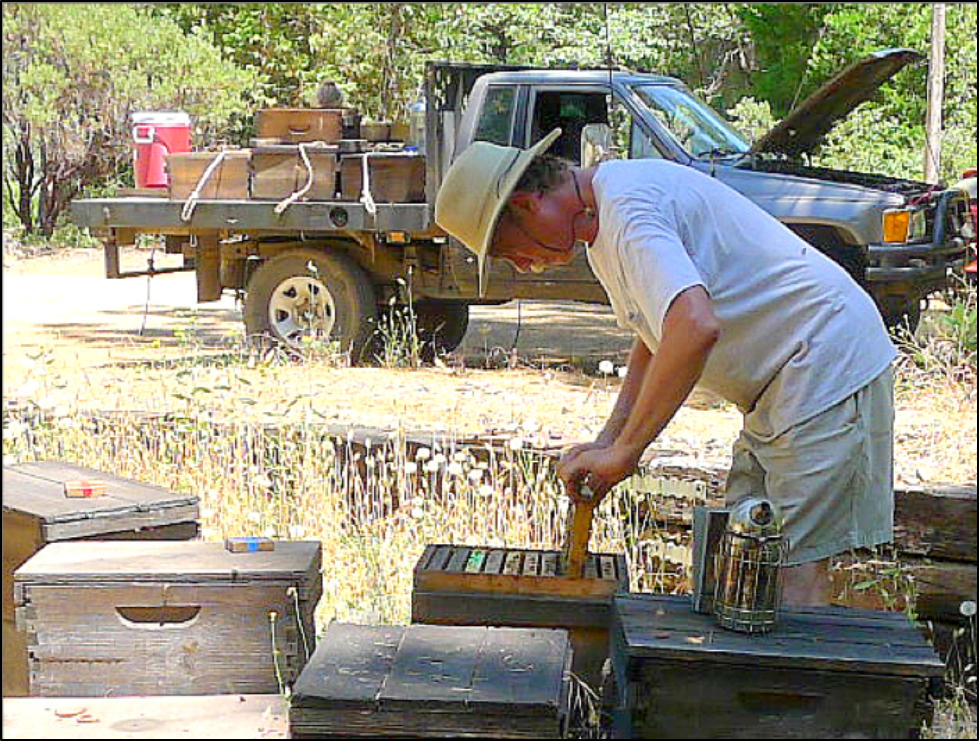
The person pulling the frames needs to have a good eye for spotting queens. I look for the queen as I step to the table [[13]]. These photos were taken in near 100°F (38°C) weather, hence the truck and the sample table being placed in the shade. I normally place the table immediately next to each group of hives as I move through the yard. The colored tape on the cups also indicates the fill level for the alcohol (every detail helps).

At this point (if I’ve pulled a brood frame) I can assess any hive for brood pattern, disease, honey production, etc. There’s no sense choosing breeders if they don’t head productive, healthy hives.
One quick shake into the tub (note that the frame should be held diagonal to the tub). Don’t shake any more bees than you need, as it makes it harder to spot a queen! If too many bees go into the tub, I scoop some back to the hive before I even look for a queen.
Most of the bees in the upper box of a hive will be mid-age and nurse bees, which are not inclined to sting. This shaking does not elicit any defensive behavior on the bees’ part—I can do this all day long, and generally only get stings when I accidentally press a bee against my skin (we do breed for gentle bees).

Any older bees immediately fly off—leaving only mite-rich younger bees for sampling. Don’t be in a rush to scoop the bee sample—shake the tub to encourage any older bees to leave.
Practical application: this also immediately tells you the average age of the workers in the hive—in a shake from a growing colony, most of the bees will stay in the tub (since there are few foragers in the upper hive body). Conversely, if the hive has been broodless for a while, most of the bees will fly off (since the colony then consists of only aged bees). This observation points out colonies with failing or missing queens.
Added note: There is little reason to disturb the brood frames in order to collect a sample of nurse bees. Here’s a graph from van der Steen [[14]]:
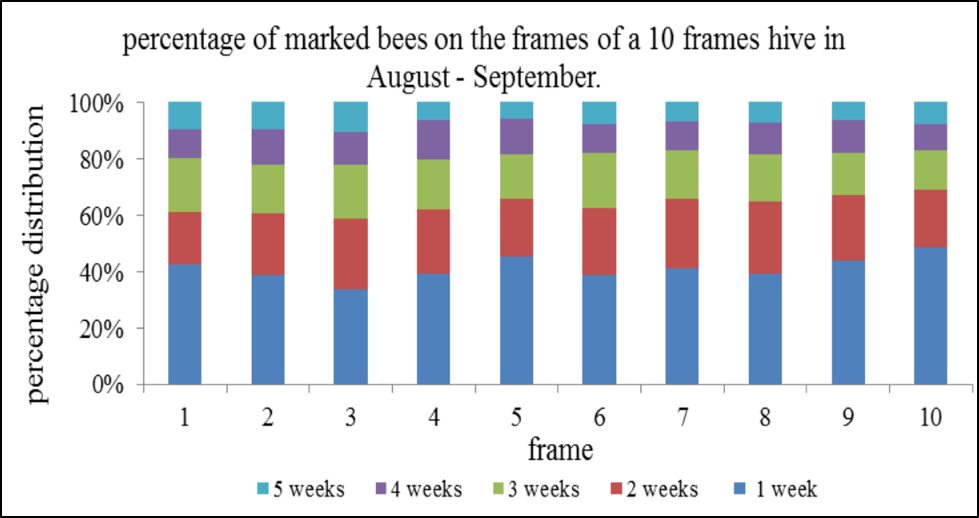
As you can see, nurse bees (blue and red) are evenly distributed across the frames. Other studies, including my own observations, confirm. So it’s pointless to risk harming the queen by pulling out a brood frame, simply in order to obtain a sample of nurse bees. By shaking any bee sample from near the broodnest into a tub, and then allowing the older bees to fly off, one can obtain a behaviorally-sorted sample of nurse bees. It’s easy to confirm, as you can pour handfuls of the remaining bees from hand to hand without receiving a single sting (I demonstrate this over and over).
Immediately after the older bees have flown off, the remaining young bees will fan out in a single layer, making it very easy to spot the queen if you missed her on the frame. I look carefully for a queen before I scoop up the bee sample (I find roughly one queen in the tub every two or three yards). It is extremely rare for us to accidentally kill a queen.
Practical application: the two main considerations for alcohol wash mite sampling are (1) to sample nurse bees, and (2) not to kill the queen. By taking the steps illustrated above, I achieve both of those goals.
You may have noticed my sweat-drenched shirt in these photos. Even under these conditions, Tara and I can easily sample 100 hives before it gets unbearably hot in the afternoon, and have done up to 150 a day (including driving to five different yards).
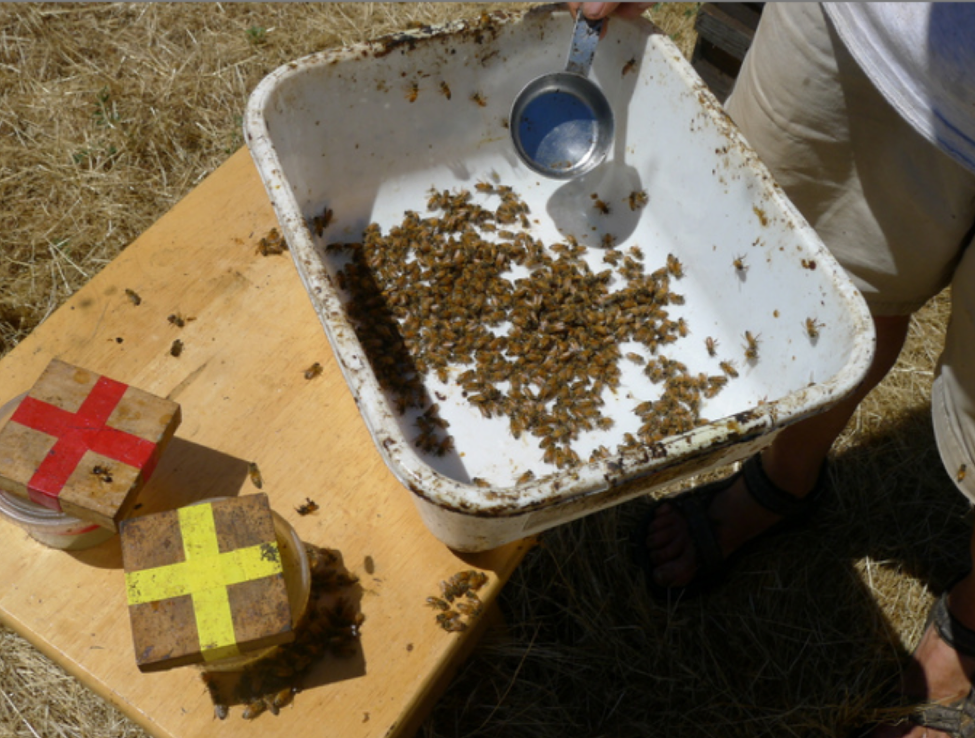
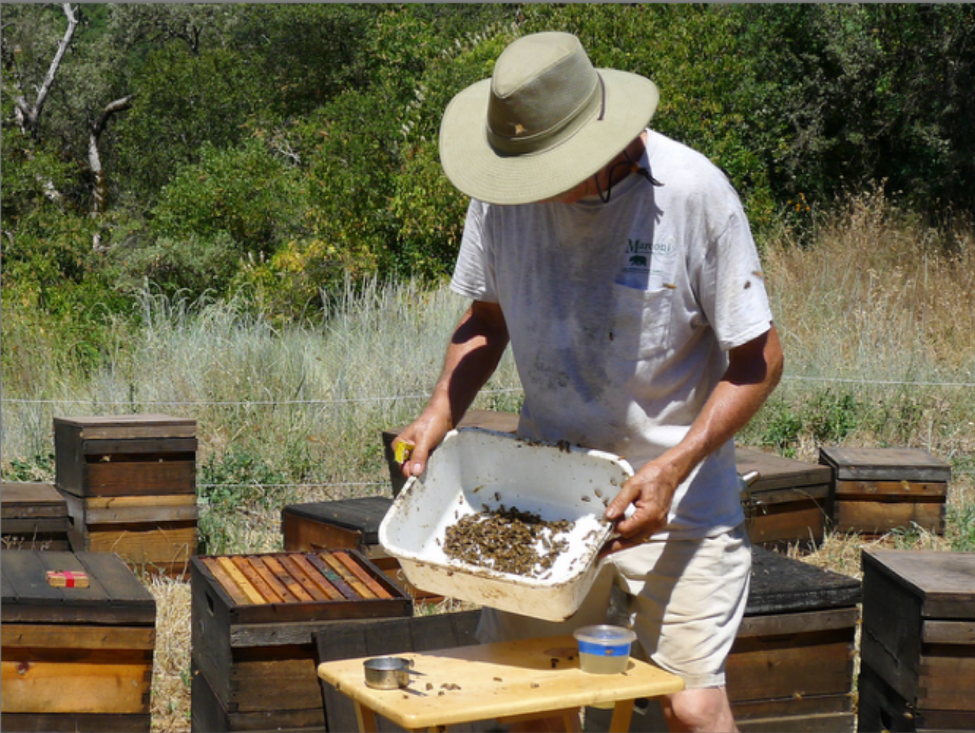
This is all the bees that you want in the tub. I then tilt the tub, tap it on the table, and scoop the cup up under the bees, thus not causing any bees to release alarm pheromone. If there is a nectar shake on, it makes the bees stick together, so I shake the combs more gently, and wash the tub and cup with water every few hives.
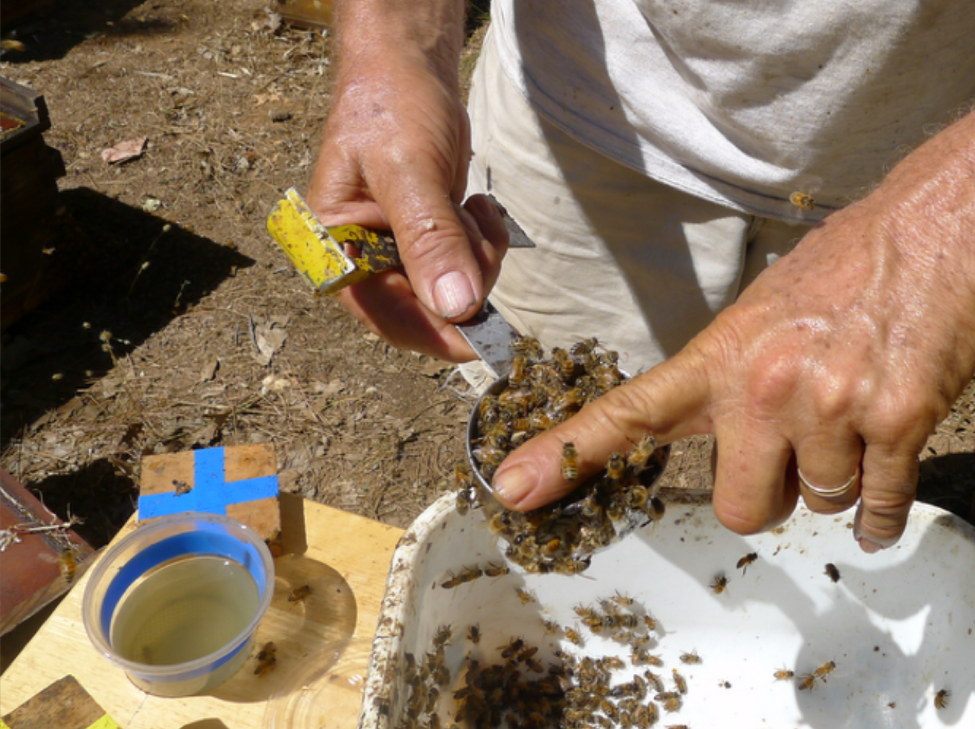
I immediately level the cup of bees with my finger for consistency in sample size. I’ve done this thousands of times, and have yet to be stung on the finger a single time!
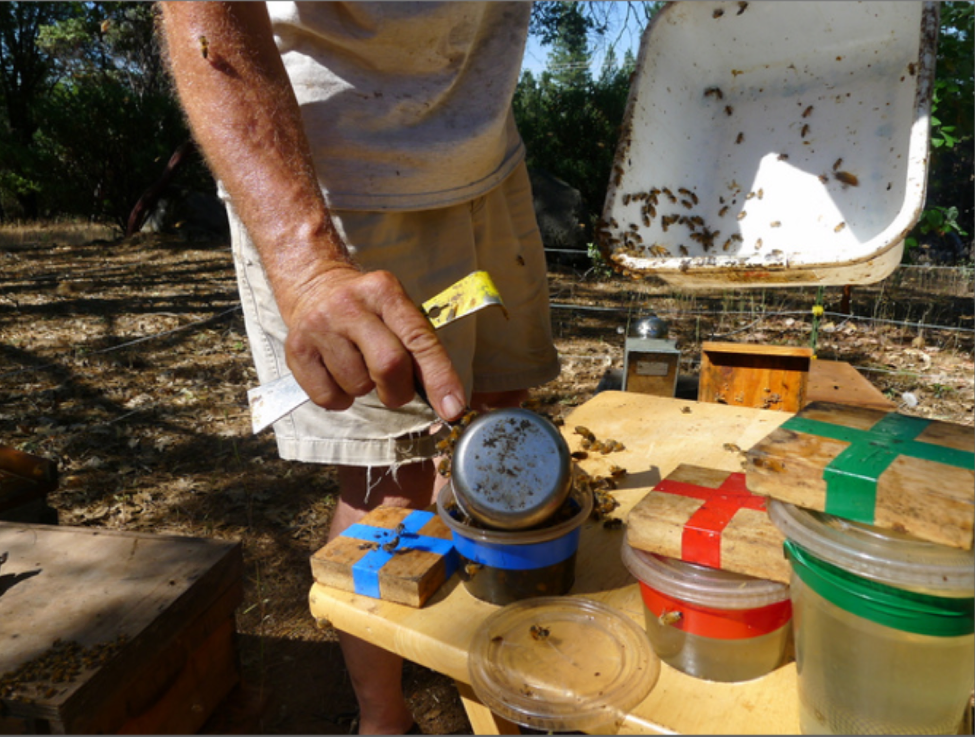
I immediately dump the bees into the alcohol, using the bottom of the cup to prevent any bees from flying away. I snap the lid onto the cup, and pick up the marker with the matching color to place on top of the hive when I return the remaining bees. Either I or my helper(s) then take the cups to the wash station and back. I immediately move on to the next hive—there’s no dead time. Four colored cups are all that we need in rotation, since the time involved in taking the bee sample just about perfectly matches the time at the wash table.
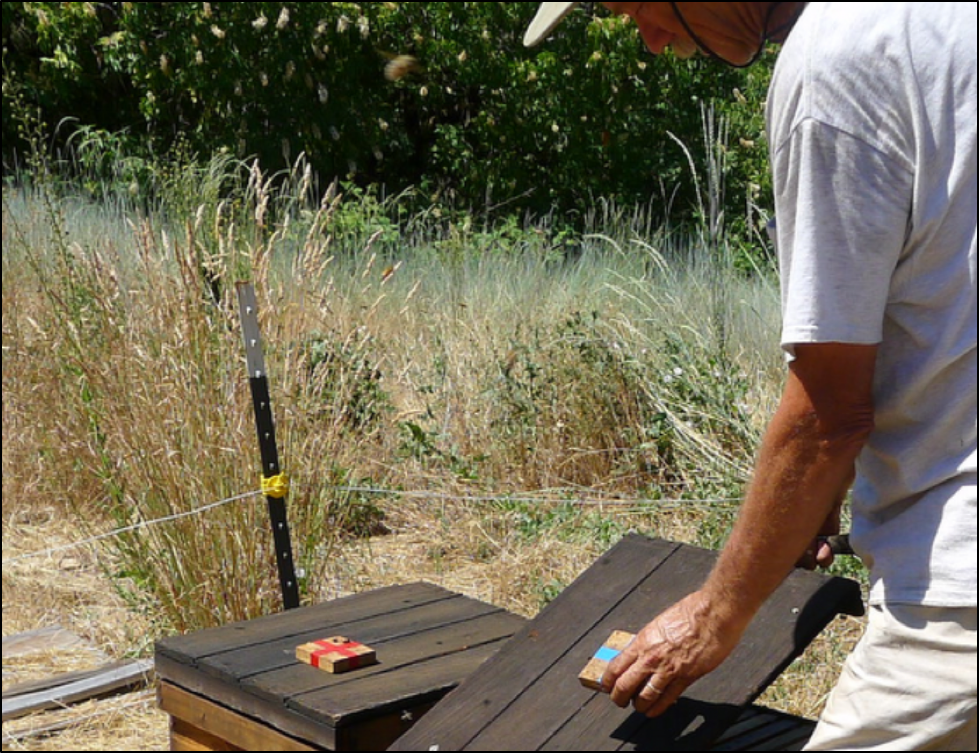
I generally leave my hive tool on top of the hive after I’ve taken the bee sample, and replace it with the colored marker when I shake the remaining bees out of the tub back onto the combs or in front of the entrance. With this simple color system we can work rapidly, yet easily keep track of which hives match their samples. When I run scientific trials, the hives are numbered, and I print out matching numbered pieces of paper to place into each sample cup.

The wash station (in the shade). Here’s my trusty assistant Tara McKinnon with my home-made mite shaker (powered by the truck battery) and extra alcohol. All operations are done over the white plastic tray in front of Tara. Wide-mouth mason jars fit our wash cups nicely, so we use them to hold the cups for draining the bees, and for holding the alcohol as we reuse it (more details on the web version). Taking mite washes as we do doesn’t rile the bees at all, so luckily we don’t need to wear a lot of protective clothing on hot days.

The washer runs nonstop [[15]], and we simply rotate the cups in order, so that each gets a 60-second agitation, which recovers 100% of the mites. After washing, remove the lid first, then slowly lift out the inner cup of washed bees (so as not to stir up the mites on the bottom) and place them in a drain jar to recover the alcohol. Then tip the cup containing the mites and pour the excess alcohol off (the mites stay at the bottom of the cup) for easier counting.
Tara counting mites (note that the mites always stay in their color-coded cup), while the washed bees drain before we toss them. The dead bees are typically consumed overnight by wildlife, or we put them in the compost pile. Yes, we do kill some bees, but at this time of year, the colony is losing a least 1000 bees per day to natural attrition—a sacrifice of 300 bees for a health checkup on the colony is well worth it.
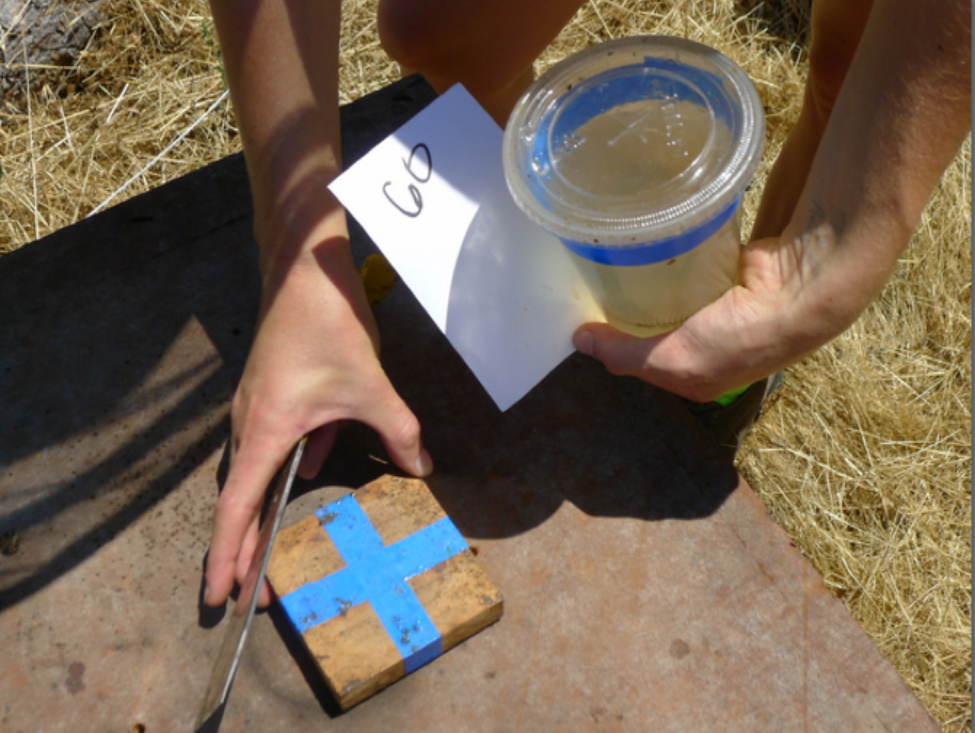
We write the mite count on an index card (this colony must have slipped through without spring treatment), and swap it for the marker when the helper brings back the refilled cup for the next sample [[16]]. We stick the card partially under the lid for the yard crew to easily see. “Mite bomb” hives such as this one are now marked for special treatment and further monitoring. Not surprisingly, the high-mite colonies often (but not always) aren’t performing as well as the low-mite colonies (even before we see any signs of DWV in the bees or brood).
We started by labelling only the low-mite potential breeders and high-mite “bombs,” but now label every single hive.
Practical application: leaving the mite count cards with the hives allows us to later check back on the efficacy of our treatments, and to track the mite buildup trend in subsequent washes.
We don’t treat those colonies marked as potential breeders, and do treat the rest of the hives (with “normal” counts) appropriately. We break the high-mite “bombs” down into singles, and blast them with formic acid to kill nearly all the mites (surprisingly we don’t manage to kill all the queens with this harsh treatment). We then make sure the undesirable old queen is dead (negative selection against “mite candy” genetics—we don’t want that queen producing drones next season), and requeen the colony to give it a fresh start.
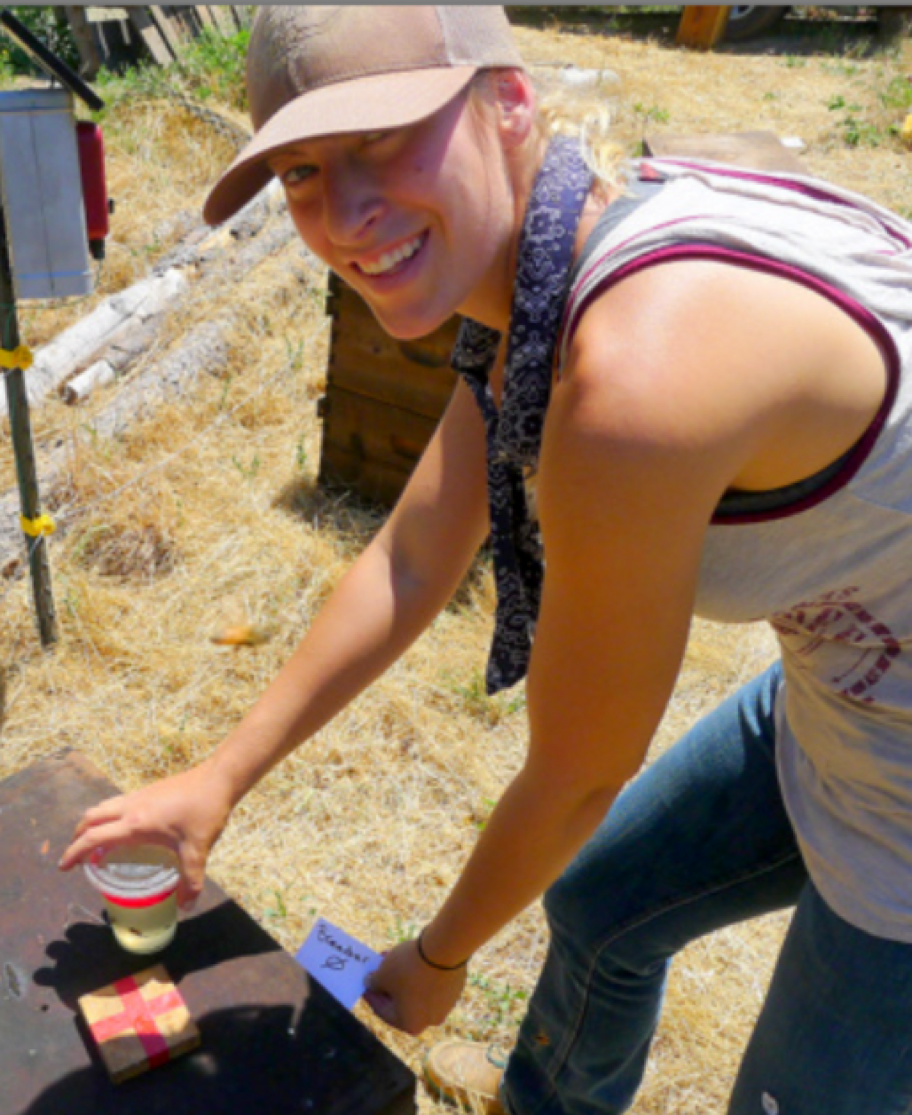
Here’s our intern Rachel Frantz smiling as she labels a zero-count hive as a potential breeder. These colonies are golden to us.
Practical application: by the time we’re done, each hive is labeled as to mite count and whether it is a potential breeder to test again, whether it is queenless, sick or weak and needs to be taken care of, needs a super, etc. The yard crew then follows us the next day, now knowing in advance what needs to be done, and takes care of everything very quickly. Thus, we’re using the most experienced member of the crew to do a quick evaluation of the status of every hive at this critical juncture. Our savings in mite treatments, labor, and fewer lost hives more than pay for the cost of the sampling, and as a bonus we are now engaged in a realistically serious breeding program for varroa-resistant bees.
The impossible becomes possible
Until this month, I would have considered finding time to do 1000 mite washes in quick succession to be impossible. But as I type these words, I’ve already done over 800 in 8 partial days, and am on track to hit 1000 in a couple more days. A bit tedious, yes, but it’s really opened my eyes as to the value of taking a quick peek into every hive in my operation at this critical point in time—just prior to applying our first summer treatments. It’s like I’ve unblinded myself as to the actual status of hive-to-hive and yard-to-yard mite infestations across my entire operation!
I’m still trying to grasp the implications of knowing that I can actually know the mite count of every hive. I’ve uncovered the possible “gold nuggets”—potential breeders that would formerly have gone unrecognized. And I’ve identified the “mite bombs” for which a single treatment would not have been enough to prevent them from reinfesting the rest of the operation. Keep in mind that in our operation we don’t depend upon the “easy” miticides such as amitraz—the treatments that we use are more costly, so identifying those colonies that don’t yet need a treatment saves us time and money. And we can now check back against the pretreatment mite counts to determine the efficacy of our treatments. I would never have believed it, but washing every single hive in our operation once each summer may become our new norm!
Acknowledgments
Thanks to Tara and Rachel for taking some of the photographs, and for helping me to develop a workable system.
Notes and citations
[1] Lee, K, G Reuter, M Spivak (2010) Standardized sampling plan to detect varroa density in colonies and apiaries. ABJ (Dec) 150(12): 1151-1155.
[2] https://scientificbeekeeping.com/the-varroa-problem-part-6a/
[3] https://scientificbeekeeping.com/k-i-s-s-breeding-for-varroa-resistance/
[4] Harbo, JR & JW Harris (1999) Selecting honey bees for resistance to Varroa jacobsoni. Apidologie 30: 183-196. https://www.apidologie.org/articles/apido/pdf/1999/02/Apidologie_0044-8435_1999_30_2-3_ART0008.pdf
[5] The median counts for most yards generally match the counts predicted by the model shown in Fig. 2, but not unexpectedly, I often observe higher median counts in yards that contain more hives. As an example, in one small group of such hives that I washed today (not shown), mite counts ranged from zero to a record 109 (median count of 12).
[6] Even my beloved Queen Zero washed at 27 mites today, after four years with only a single thymol treatment in her first year, and a single oxalic acid treatment last year. I’m amazed that she’s lived this long!
[7] Early in the season, alcohol washes underestimate how badly the colony is actually infested. I use my model to calculate an estimate for the actual total mite population in the hive.
[8] At a lower labor rate, the cost per hive of sampling would of course be even cheaper.
[9] https://scientificbeekeeping.com/k-i-s-s-breeding-for-varroa-resistance/
[10] I use colored vinyl tape. We tried numbering and lettering, but found that colors were far less confusing. We also tried more than 4 colors, but found that 4 colored cups was all that was necessary for 2-4 crew members. We can get it down to a minute per sample with 4 people.
[11] My current table has only 2 holes (2-7/8” dia), which works OK; 4 holes might be better.
[12] The curve of the Rubbermaid tub exactly matches that of the stainless steel measuring cup—every little detail counts for efficiency! We carry two tubs, nested. One holds all the wash cups, and slips into the clean one for taking samples below. The tubs fit crosswise into a deep super for transport (as does the mite washer). Tip: do not stack the wash cups after use—they will stick tightly together.
[13] I can walk and chew gum at the same time, but have not yet mastered walking, chewing gum, and looking for the queen simultaneously.
[14] Jozef J M van der Steen, Bram Cornelissen, Jeroen Donders, Tjeerd Blacquière & Coby van Dooremalen (2012) How honey bees of successive age classes are distributed over a one storey, ten frames hive, Journal of Apicultural Research, 51:2, 174-178, DOI: 10.3896/IBRA.1.51.2.05
[15] I’ve got 12-V motors and miscellaneous parts on hand and am currently working on a battery-powered, rechargeable portable mite washer.
[16] I tried something new as I was doing washes today—by putting a single-letter abbreviation for color (such as “G” for green) on each card, it eliminates any chance of getting cards mixed up on the way back to the hives. When I want to leave a note other than the mite count, I simply holler to my helper to write the note on the green (“G”) card in advance of sending the green cup full of bees for washing.