
Refining the Mite Wash: Part 1 – Treatment Threshold and Solutions to Use

September 10, 2020
Refining the Mite Wash
Part 1
Treatment Threshold and Solutions to Use
Randy Oliver
ScientificBeekeeping.com
First published in ABJ July 2020
Once you’ve shaken a sample of bees, you then need to separate the mites from them. There are various recommendations for using alcohol, detergent water, powdered sugar, ether, or CO2. I’ve been using inexpensive rubbing alcohol, but wondered whether the strength of the alcohol makes a difference?
But before I move on to answering that question, I need to transition from my previous article, in which I provided information on which frame to take a bee sample from, but didn’t tell you how to then handle that sample.
Tips on shaking a sample of bees
- Use an 18-quart tub and a stainless steel half cup (125 mL) measuring cup. For measuring live bees, a deep cup is more accurate than a shallow cup (I prefer the “Good Cook” brand from Ace Hardware).
- Use a snap shake to dislodge the young bees from the frame into the tub (young bees hang on tighter than do old bees).
- Wait about 30 seconds while the older bees fly off, shaking the tub, if necessary, to distribute the bees evenly. Although the flying bees have no propensity to sting, you can avoid the cloud of them returning to the hive if you don’t stand in front of the entrance.
- If more than a cup of bees still remain in the tub, scoop some of the excess bees out, otherwise it’s difficult to spot a queen.
- The young bees will generally spread out evenly over the tub, often all walking in the same direction for several seconds, at which time it’s easy to spot a queen (Figure 1).
- Tap the tub firmly to shake the bees into a pile, and tip them into the cup (rather than scooping them). You can then use your finger to level them off before dumping them into the alcohol (I never get stung when doing this).
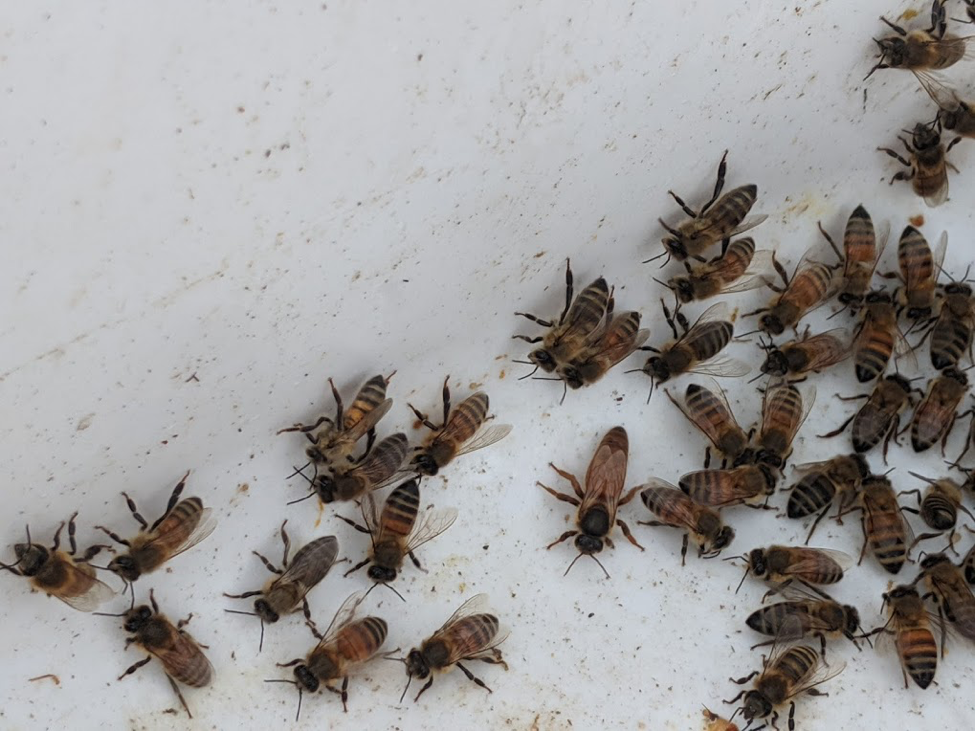
Figure 1. Most of the time, after the older bees have flown out of the tub, the remaining bees will spread out in a single layer for several seconds, often marching in the same direction. At this time a queen is easy to spot, and can be safely returned to her hive.
Determining the infestation rate
An infestation rate is the ratio of mites per worker bee (often given as a percent, meaning mites per hundred bees). But as I’ve already pointed out, a sample of only 100 bees (should you be willing to count out exactly that number) is not enough to avoid false negatives. So you really want to take a sample of a few hundred bees.
Practical application: Here’s the thing — I’m obsessed with perfecting my mite monitoring method, so that it is quick, accurate, precise, and most critically, has a high degree of “sensitivity” [[1]]. In both our selective breeding program and with early-season mite management in the rest of our operation, we want to detect infestations well before they reach the 1% level (a mite count of 3 per half cup of bees). So we want to avoid misleading “false negatives” that didn’t detect very low infestations. I want an in-field monitoring method that can consistently recover at least 95% of the mites in a sample within a minute.
Once you’ve used an alcohol wash (or other method of choice) to separate the mites from the bees, you can simply count the mites one by one (after you’ve put your reading glasses on). But then you need to know the number of bees in the sample. Ideally you’d count the number of bees in every sample, but unless you have grad students at your disposal, that gets old pretty quick. Or you can count out 100 bees, calculate the average weight per bee, and then weigh the bee sample and calculate the approximate number of bees – also tedious.
But for most purposes, that sort of accuracy is entirely unnecessary. A level half cup holds around 315 bees. So many people then calculate the approximate infestation rate to come up with a percentage, by dividing the number of mites by three (since there are approximately 300 bees in the sample). In my experience, every time a calculation is involved, there’s a chance of a mistake or confusion, plus you’re then dealing with an abstract calculated quotient, rather than what you actually observed.
So I just use actual mite counts per half cup of bees – no calculations. From this point on, if I refer to a mite count, I mean the number of mites per level half cup of bees.
Practical application: Keep it simple! Look at the simulation below (Fig. 2) to see what actual count you want to use as a treatment threshold as the season progresses. Important note: Always carefully level the cup so that you are comparing a consistent number of bees in the sample. There is no rush, since once you’ve allowed the older bees to fly off, the remaining young bees are amenable to being leveled off.
When to take action
Your colonies will be much healthier and productive if you never allow the mite infestation level to exceed 6 mites per half cup of bees. But 6 mites in May means that your colony will soon be in trouble, so better to be proactive and treat when you observe a much lower infestation rate in springtime.
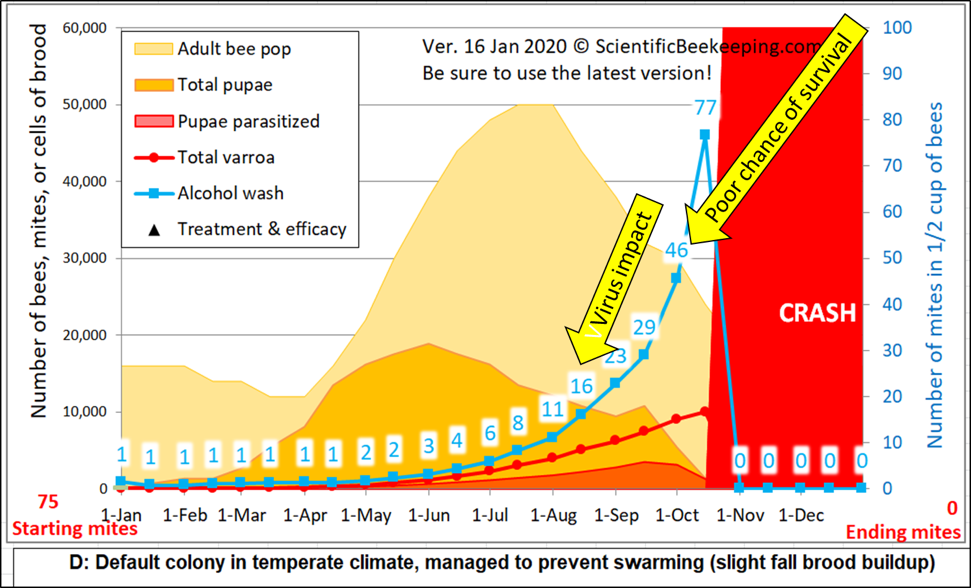
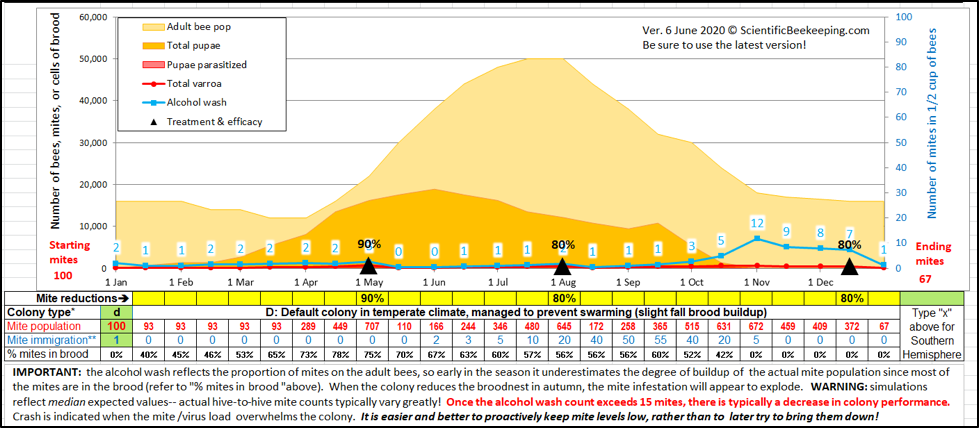
Figure 2. I adjusted the starting number of mites for the above simulation [[2]] to show a mite wash count of 1 in January (and set mite immigration to zero). At a mite count of 15 (blue numbers), viruses typically start to noticeably impact colony health, and by a count of 45 it’s generally too late to save the hive. Note how sampling underestimates mite buildup when there’s lots of brood for the mites to hide in (orange area), so a mite count of even 1 in April would be cause for treatment. For comparison, I ran a simulation (not shown) with a mite count adjusted to 6 on May 1st. It predicted that the colony would start to crash in late August, full of dying brood.
Practical application: Be proactive rather than reactive – it’s much harder to bring the mite count down than to keep it continually in check. In springtime, when 80% of the mites may be in the brood, you want to see mite counts of zero or 1. The mite count may rapidly rise in late summer/fall as the amount of brood and adult bees decreases (in addition to mite immigration from other colonies) – my sons and I don’t like to see counts rise above 10. And we always end the season with an oxalic acid treatment as winter approaches, once most of the brood has emerged.
Note: I’ve recently revised my varroa model in order to make it more user friendly. I moved the inputs for treatment, as well as other important figures, in alignment directly below the graph. Always use the latest version (you may need to hit the reload button on your browser).
So let’s get back to the alcohol wash. As I type these words, alcohol is in short supply on the shelves – I sure hope that it soon becomes more available. But which alcohol to use? The standard recommendation is to use 70% rubbing alcohol [[3]], but based upon previous findings by others, I’ve been using the cheapest 50% isopropyl alcohol from dollar stores.
Practical application: Yes, I save a few pennies by using a lower-proof alcohol. But by doing so do I sacrifice the accuracy of the mite wash? I needed to investigate.
Previous research on agitation liquids
Way back in 1982, Dr. David de Jong, concerned about a recommendation to use gasoline for mite washes (not really a good idea around lit smokers), tested a number of alcohol types and concentrations, as well as hot water, detergent and other solvents [[4]]. His data suggested that alcohol concentrations as low as 25% gave excellent mite recovery (about 95% in a 1-minute hand wash), as did detergent in water.
Then in 2004 Dr. Tom Rinderer’s team re-examined the accuracy of detergent wash compared to 70% ethyl alcohol, and found them to be roughly the same [[5]]. A few years later Dr. HR Azizi compared various methods of mite separation from bee samples [[6]]. Again, 70% alcohol, powdered sugar, and detergent scored well (Table 1), although the paper lacked experimental details.
| Table 1. Mite recovery by various methods.
After Azizi 2008. |
|
| Release/separation agent | Mite recovery |
| 70% ethanol | 95% |
| Powdered sugar | 90% |
| Hot water with detergent | 87% |
| Gasoline | 83% |
| Hot water | 69% |
| Ether roll | 58% |
| Heat | 57% |
Practical application: Gasoline is dangerous; ether roll and CO2 give unreliable results [[7], [8]]. Three methods that do provide good separation of mites from bees are alcohol and detergent-water washes, or the sugar roll (if properly performed).
My own testing
Alcohol wash
Since I’m now performing over 2000 alcohol washes a year, I wanted a field technique that would very quickly and consistently result in at least 95% separation of mites from a bee sample in the least amount of time. The 12-sample home-built mechanical agitator that I’d been using gave me confirmed 100% recovery when I allowed the wash cups to agitate for several minutes, but was cumbersome to haul around. I needed to design a smaller and quicker agitator that ran on a rechargeable battery.
I built and tested a number of prototypes, and finally arrived at a model that has worked very well for thousands of washes (Figure 3). Having a few of these identical agitators on hand allowed me to test alcohol concentrations against each other, since I could eliminate the variation inherent in hand agitations.
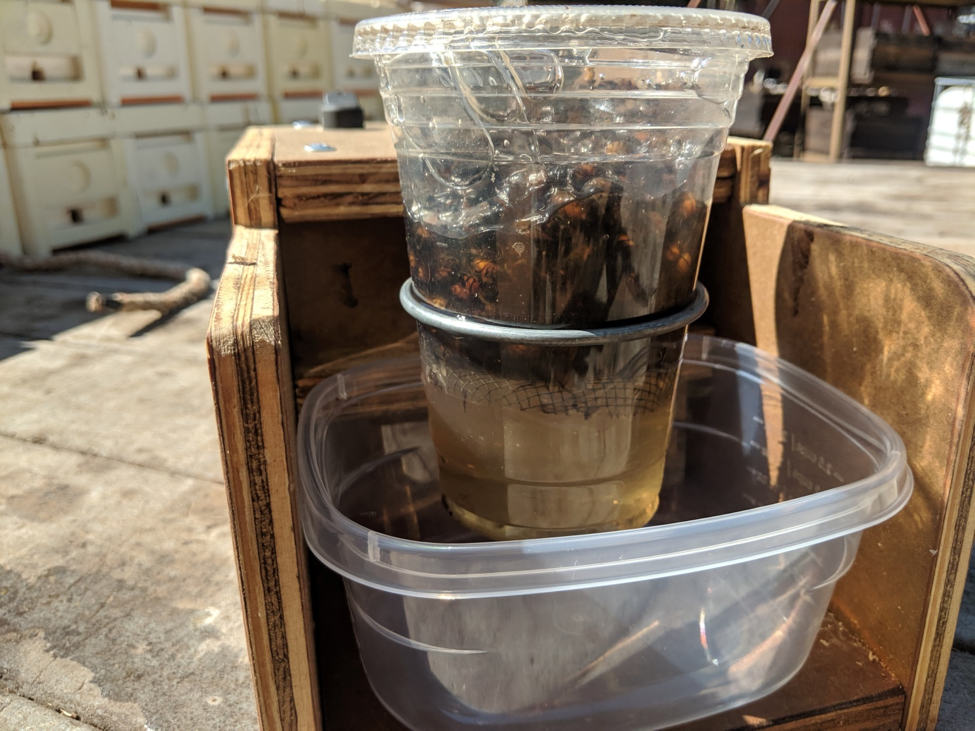
Figure 3. My portable hand agitators allowed me to perform standardized tests in the field. At the press of a button, they perform 300 swirls in 60 seconds (tumbling the bees), and then automatically shut off. We could then count the mites separated, and run additional agitations on the same bee sample until we’d recovered all the mites.
confirming the degree of mite recovery
Assisted by Brooke Molina, I went out to some high-mite hives late in the season, and collected mite recovery data on repeated washings of 69 bee samples, using either 50%, 70%, or 91% isopropyl alcohol. I made up data sheets for the field, not realizing that it would sometimes take up to 8 agitations until we got two washes in a row with zero mites, at which point we assumed complete recovery (Figure 4). I then added up all the mite counts in order to calculate the percent recovery of the first 1-minute agitation.
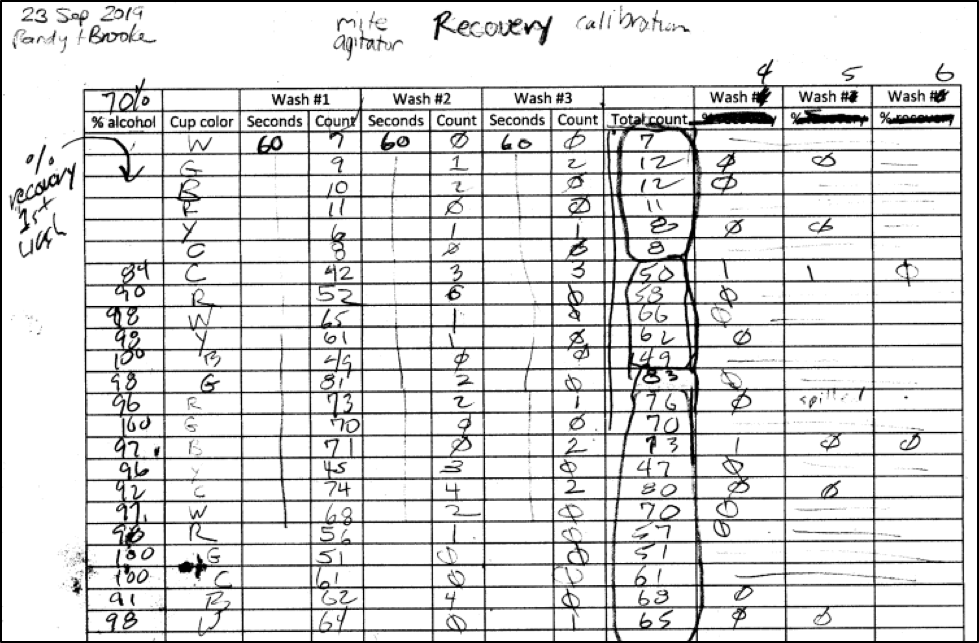
Figure 4. A shot of the top of our first field data sheet. I erroneously assumed that we’d get 100% mite recovery by the third agitation, so had to modify the sheet in order to enter counts until we got two zeroes in a row. Note in the “Total count” column that we were getting mite counts from some hives in the 50’s to 80’s (each hive’s samples are circled). I look for such high-mite hives, since bee samples from them allow for robust calculations of efficacy.
I worked up the data, and summarized it in Figure 5.
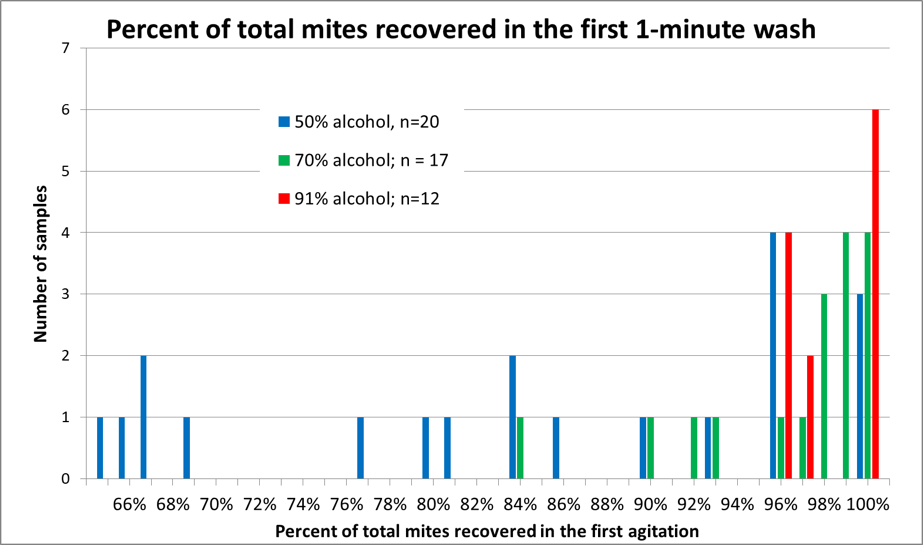
Figure 5. A histogram of mite recovery at various alcohol concentrations. Each column represents the number of samples by recovery rate and alcohol concentration. Note that in half the samples agitated in 50% alcohol (blue columns), that the recovery rate was less than 85% of the mites in the first wash, as opposed to those agitated in 91% alcohol (red columns), in which at least 96% of the mites were recovered in the first 60 seconds (with 100% recovery in half the replicates).
Practical application: The recovery with 91% isopropyl alcohol was impressive – enough for me to switch to paying a little extra for alcohol.
I wondered why higher-proof alcohol appeared to make such a difference, and I’ve discussed with Dr. de Jong plausible reasons that we got different results. In my next articles, I’ll detail how I investigated the reasons.
Issues with alcohol wash
It’s not only bees and mites in a bee sample – sometimes there are flakes of beeswax, notably when colonies are building comb during a nectar flow (Figure 6).

Figure 6. I try to avoid mite monitoring during heavy nectar flows for two reasons: (1) The shook bees get drenched with nectar, which makes it hard to scoop them into a measuring cup, and (2) they will be producing wax flakes from their wax glands. The flakes can make it difficult to count the mites.
Practical application: I noticed one minor issue when switching from 50- or 70% to 91% isopropyl – the higher proof alcohol dissolves something off the bees (perhaps wax), and gunks up the wash cups. This is no big deal – we simply wipe them clean from time to time with a paper towel. The other issue is that sometimes bees get stingy next to the agitation station. Could it be that they are smelling alarm pheromone in the recycled alcohol?
Although I’ve long favored the alcohol wash, I’m wide open to using other methods, although I find the sugar roll to be too time consuming, and requiring far too much muscular effort for the number of mite counts that we perform.
Detergent wash
I’d tried detergent wash some years ago, but had not resonated with it. But in light of the current alcohol shortage, I took a break from typing this article, went out in the rain and located a high-mite colony (~45 mites per sample), and performed several dozen mite washes to compare the efficacy of two dishwashing detergents to that of 91% isopropyl alcohol.
I tried a low-suds automatic dishwasher detergent (Cascade® Complete), and found that although it was great for dishes and less messy for mite washes, it was lousy for mite recovery – taking several repeated washings to get even most of the mites to release. The final alcohol wash of one bee sample dropped up to a third as many mites as did five previous 1-minute detergent agitations in total. Very disappointing.
So I then tried high-suds Dawn® Ultra, diluted to a bit less than de Jong’s 1% dilution of the detergent he tested, but stronger than used by Rinderer (~0.3%). It was foamy and slippery (Figure 7), but commendably worked about as well as 91% alcohol as far as mite recovery in 60 seconds of agitation (Table 2). It was a bit more difficult to count mites looking down as I usually do, but I could easily count a low number of mites by lifting out the bees and looking up from below.
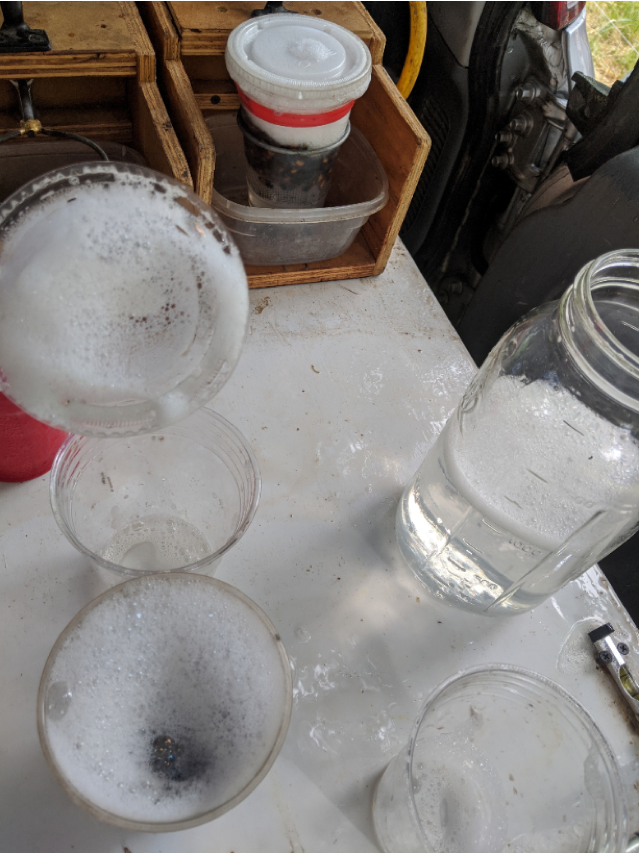
Figure 7. Bubbles, bubbles, everywhere! Although a bit foamy and slippery, Dawn Ultra quickly separated the mites from the bees, and is a good alternative to alcohol, especially if you’re only performing a few washes. And your hands wind up nice and clean.
| Table 2. Test of mite recovery with Dawn Ultra (lemon essence scent), diluted 2 tablespoons per gallon of cool water (0.8%). | ||||||||
| Mite counts per agitation | ||||||||
| Sample # | Agitation #1 | Agitation #2 | Agitation #3 | Agitation #4 | Agitation #5 | 91% alcohol | Total mites recovered | % mite recovery, first agitation |
| 1 | 29 | 0 | 0 | 0 | 0 | 0 | 29 | 100% |
| 2 | 21 | 1 | 0 | 0 | 1 | 0 | 23 | 91% |
| 3 | 52 | 1 | 0 | 0 | 0 | 0 | 53 | 98% |
| 4 | 51 | 1 | 0 | 0 | 0 | 0 | 52 | 98% |
| 5 | 55 | 8 | 1 | 2 | 0 | 0 | 66 | 83% |
I have no idea why there was poorer recovery with Sample #5, since the last three samples were shaken from the same tub of bees, and all processed at the same time.
Practical application: It’s so easy to convince yourself of something. It made total sense that a high-strength automatic dishwasher detergent would be as effective at removing mites as a gentle hand dishwashing liquid. It wasn’t. Don’t assume anything!
I’m quite impressed by the mite recovery with detergent, and plan to investigate ways to improve the method. I haven’t yet tested to determine the optimal dilution.
Discussion
Hand agitation or shaking of bee samples for varroa monitoring, either with alcohol, powdered sugar, or detergent water is tedious, and if you have a number of hives it’s really tough on the wrist and arm. Sixty seconds of rapid agitation seems like an eternity after a few samples, and I doubt that most beekeepers use a stop watch, thus adding a great deal of variability to the amount of agitation applied to each sample.
I found that having portable agitators changed everything! Performing a hundred alcohol washes after lunch is now no big deal, and has unblinded us to what is occurring in our hives. My intent was to make my portable agitators available to all, but additional findings that I will be writing about has made me rethink mite washing and agitator design and action completely – so it’s back to the drawing board and testing bench.
I’ll be madly performing more tests for inclusion in my next article. Stay tuned!
References
[1] These are all medical terms, well-explained at https://www.labtestsonline.org.au/understanding/test-accuracy-and-reliability/how-reliable-is-pathology-testing
[2] https://scientificbeekeeping.com/randys-varroa-model/
[3] Shimanuki, H; Knox, D A (2000) Diagnosis of honey bee diseases. Agriculture Handbook No. AH690. US Department of Agriculture; Beltsville, MD, USA; 53 pp.
[4] de Jong, D, et al (1982) A comparative analysis of shaking solutions for the detection of Varroa jacobsoni on adult honeybees. Apidologie 13(3): 297-306.
[5] Rinderer, TE, et al (2004) Re-examination of the accuracy of a detergent solution for varroa mite detection. American Bee Journal 144(7):560-562.
[6] Azizi, HR, et al (2008) The comparative evaluation of the laboratory methods of separation mite varroa from the mature honeybee. Research Journal of Parasitology 3(4): 123-129.
[7] Delaplane, KS & WM Hood (1997) Effects of delayed acaricide treatment in honey bee colonies parasitized by Varroa jacobsoni and a late-season treatment threshold for the south-eastern USA. Journal of Apicultural Research 36(3-4): 125-132.
[8] https://scientificbeekeeping.com/a-test-of-using-co2-for-bee-friendly-mite-monitoring/


