
The “Nosema Twins” – Part 3 Sampling

March 30, 2011
The “Nosema Twins”
Part 3 –Sampling
© Randy Oliver
ScientificBeekeeping.com
First Published in ABJ in Feb. 2008
My previous articles about Nosema ceranae may have grabbed your attention. Let me be clear that I’m not trying to be alarmist—not all operations have problems with nosema. In fact, I’ve got some colonies doing poorly despite having decent nutrition, low mite levels, low nosema counts, and (as far as I know) little pesticide exposure!
Which bees should you sample?
Older bees have higher spore counts, since nosema in the gut increases during an infected bee’s life. Bees under 8 days of age won’t have any spores—sampling them could lead to “false negatives.” Martin-Hernandez (2006) found that foragers returning to the hive can display up to 10-fold higher infection levels than interior bees, and that both interior and exterior bees had almost double the spore count when sampled at 12:30 pm rather than 8:30 am.
In light of these findings, I went out of my way to collect bees at the entrance. The best method I’ve found is to block off the entrance with a lightweight piece of wood, or a paper wedge, to cause the returning foragers to pile up, and then suck them up with a portable vacuum. The reason for a lightweight block or paper wedge is so that if you forget to remove it, you don’t kill the colony! The drawback of this method is that it is relatively time consuming. So I spent a good part of Thanksgiving Day sampling and viewing squished bees in an infected yard to see how important it was to collect returning foragers, as opposed to bees from other parts of the hive. My observations:
You can easily find high spore counts in “crawler” bees collected from the ground in front of colonies. These are bees that are too weak to fly, likely, at least in my operation, due to nosema infection! For a test of in-hive sampling, I chose a nosema-infected colony at 2:00 pm in good flight weather. There were a number of returning foragers with pollen loads in the grass in front of the colony. They had high spore counts. Then I sampled returning foragers that were flying—they had nearly as high spore counts. Next I sampled guard bees from the entrance, then plucked from the skin of my hand, and finally pulled out of my hair as the collection progressed (scientific research doesn’t always go smoothly)—also similar counts. Finally, I lifted the lid (2-story colony) and scraped some bees off the underside. Again, nearly identical spore counts as in returning foragers! My question: is it really worth the effort to collect from the entrance, as opposed to simply lifting the lid and scraping bees into a jar of alcohol, which is soooo much faster?
Answer: I’m typing this straight back from the field where I was assisted by beekeeper Zion Guinn (astute readers have likely discerned that I type these articles between visits to the beeyards—hence the stickiness of my keyboard). We took simultaneous samples from several colonies at noon—blocked-entrance samples of returning foragers taken with a vacuum, and bees brushed off the inside of the lid. We processed a slide from each sample source and compared the spore counts. In colonies with very low spore counts (We confirmed Dr. Martin-Hernandez’ finding that there are far higher nosema counts in returning foragers.
Bottom line: Scraping bees from inside the lid, directly into a bottle, is quick and easy compared to vacuuming up returning foragers. But it is only useful to confirm that a colony is already badly infected. Within-hive samples can miss incipient infections and are likely to give false negatives! I wish that I could tell you that there was an easy way to take bee samples, but if you want to catch nosema before it gets the better of your bees, you need to sample returning foragers. Here’s a tip: if you want to quickly get a feel as to whether a yard is developing a nosema problem, go out in the morning and pick up as many live crawlers as you can find from in front of the hives. Test these for spore counts. If you find a bunch of spores, then test further. If not, you’re probably O.K. for the time being.
Scraping bees off the inside of the lid. Easy, but will miss developing infections, since spore counts are low in house bees until colony infection is quite high. Samples should be taken of returning foragers if possible.
You can also sample the live or dead bees under the bee net when you move. Or perform “coprological examination” by scraping bee poop off of hive covers, the hood of your truck, or top of your helmet and dissolving it in a drop of water on a slide.

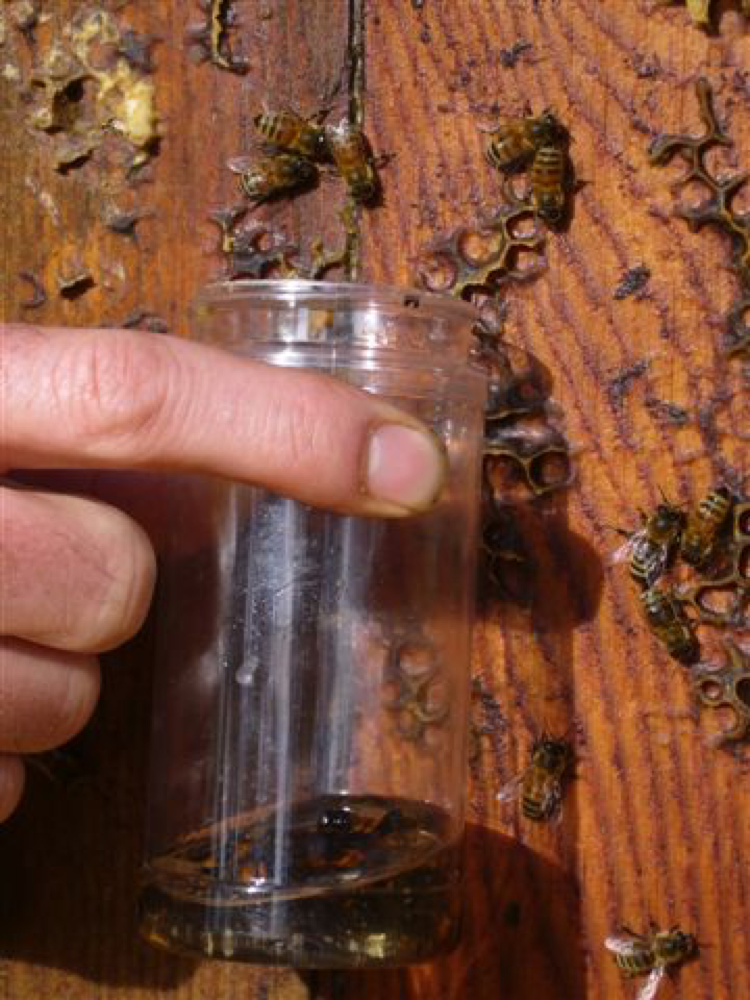
Collecting a sample of bees from the bee net after unloading. I have no supporting data, but hope that this easy method gives me an aggregate sample of forager bees from the load. Update: this is a very practical method to keep an eye on your operation!
Shimanuki (2000) suggests that queens can be tested without harm “if they are confined in small petri dishes or in glass tubes and allowed to walk freely. They usually defecate within 1 hour. Queen feces appear as drops of clear, colorless liquid, which can then be transferred to a microscope slide with a pipette or capillary tube.” I’ve yet to try this.
How many bees should it take it the sample?
Basing treatment decisions upon the typical small samples of 10 bees is like playing Russian roulette. It’s not uncommon if you test individual bees, to find several in a row with spore counts near zero, then one loaded to the gills. Based upon my observations, individual bees taken from the same colony can vary in nosema spore count by a factor of at least 300! So the question is, which bees were in the sample? If you’re lucky, you’ll get one bee with a spore count of 30 million, that when ground up in a sample with 9 other bees with no spores, would give the whole sample an average count of 3 million spores per bee. That level would definitely indicate treatment was needed!
But what if you didn’t happen to hit the one bee with a high count? “Discovery sampling” mathematics (APHIS 2007) calculate the probability of not getting an infected bee in a sample as P = (1-f)n. Fill in the frequency of infected individuals (f), and the number of bees in the sample (n) (this formula is for large populations). In the case of a colony in which only 1 out of 10 bees is highly infected, the probability of missing the infection altogether in a random sample of 10 bees would be 35%!
What does this mean to you? Let’s say that you have a colony, or yard, of bees in which nosema has developed to the point that one out of ten bees is highly infected. If a diagnostic lab performs the standard test on a sample of 10 bees, there’s a 65% chance that the result they mail back will be that you have a serious nosema problem. But there’s a 35% chance that the result they report will be that you have an insignificant spore count! So, how many of you are willing to base treatment decisions on a test that could completely miss the problem a third of the time?
The same formula says that you’d need to sample at least 22 bees to have a 90% chance of finding a 10% infection level (and about 60 bees to have a 95% chance of detecting a 5% infection). In the past few weeks, I’ve squashed a lot of bees—individually, in small groups, and by the hundreds—and counted spores. Subsamples of 25 bees at a time from a mixed jarful can vary in nosema counts by at least a factor of 10! Read the tables yourself—to me a sample size of 25 bees per colony is minimum.
The 25-bee number is supported by Fingler, et al. (1982), who found an 86% correlation between the percentage of infected bees in a 25-bee sample, and the average spore count of the sample as a whole. Their conclusion was that a 25-bee sample was “a reliable method of assessing the degree to which colonies are infected with nosema disease.”
For yard sampling, the math is even more demanding! To be 90% sure of finding out if 10% or more of your colonies are infected, you’d have to sample 22 out of 50, or 25 out of 100 colonies in a yard! Trenchant to this discussion is the tremendous colony-to-colony variability of infection levels. You can have a nosema-free colony sitting right next to one that is loaded with spores (similar to what I find with varroa). Bottom line: I doubt if most beekeepers have the time to sample enough colonies in a yard, or yards in an operation to detect a 10% infection level! So sample from as many colonies as possible.
So is it better to sample a number of bees or colonies individually, or to take the average of a bunch of bees or colonies? From a management standpoint, beekeepers will generally treat whole yards as units, so the yard average is likely most practical. I’ve discussed this question with nosema (apis) experts. The question is, what is more important, the percentage of bees infected, or the number of spores in a composite sample. The answer I got was that at low infection levels the percentage of infected bees was more predictive of later problems. At higher infection levels, the infection tends to equalize among the bees, and an average count is representative.
I guess the most practical recommendation then is to collect large yard samples composed of returning foragers gathered from as many colonies as possible, to determine yard spore count averages. Then sample more closely if you start to see more than a few spores. However, it’s hard for me to imagine finding the time to do this. I’ve tried a number of methods of nosema diagnosis these past two months. Let me share my three favorites.
The Gut Squash Method
This is a quick “heads up” test to see if nosema exists in your operation. It’s the quickest method of checking for a nascent infection, since you can target the individually most likely sick bees. It can be performed in the field if you have a portable microscope, or the bees can be dropped in 70% alcohol for later examination. Field examination has the advantage that it’s easy to get an immediate feel for what’s happening in the yard, and you can then test the whole colony or yard.
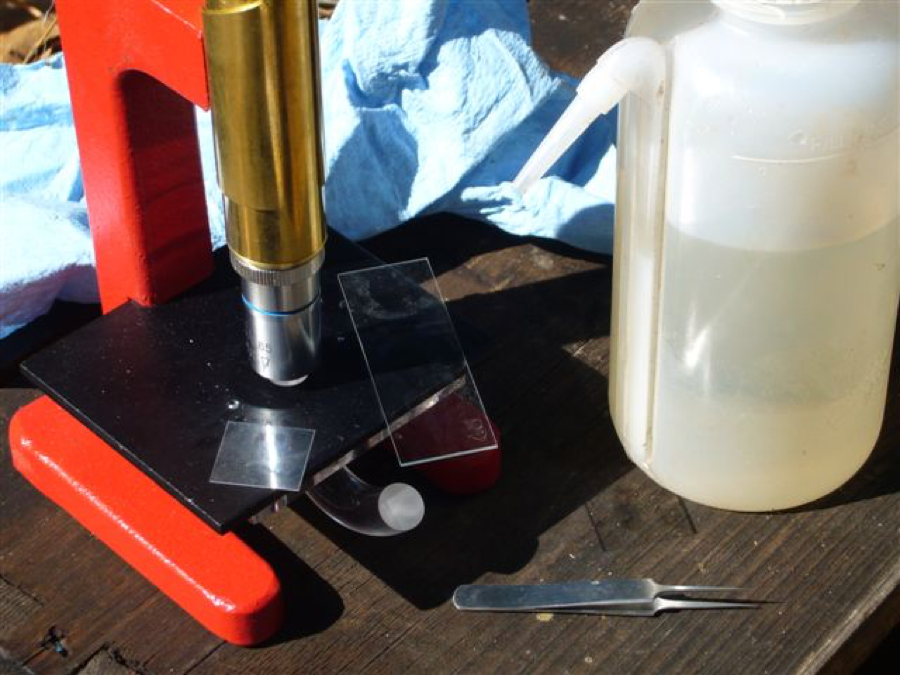
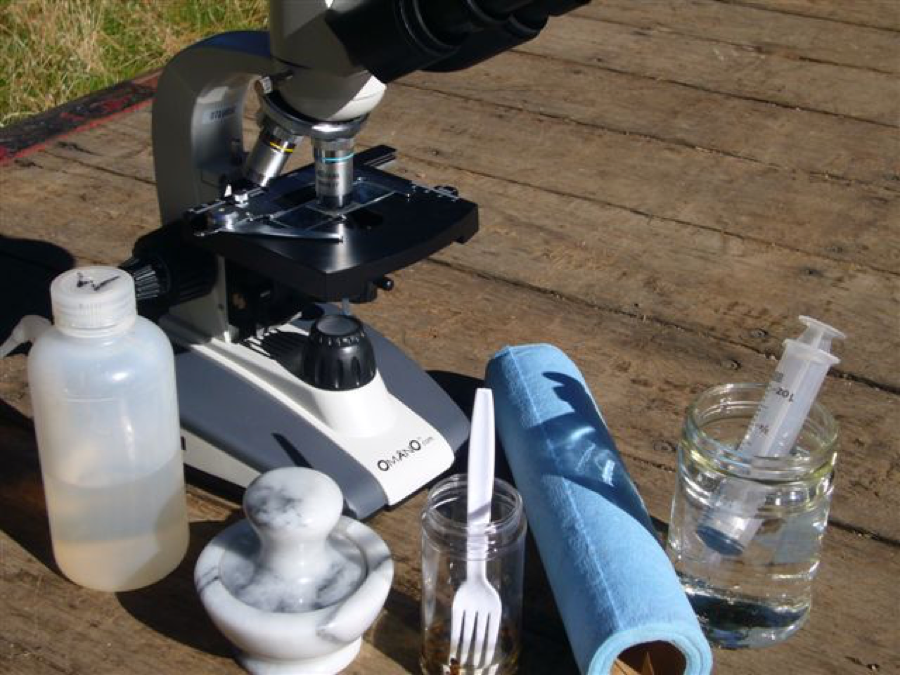
Equipment for the “gut squash” method. Tweezers, glass slide and cover slips, wash bottle, shop towels, and a portable scope. I do not recommend the illustrated scope. The shop towel and wash bottle are for cleaning the slide and cover slip between samples. This may come as a surprise to some beekeepers, but blue shop towels were originally intended to be used for cleaning and wiping!

Step 1—Pick up “crawler” bees. They are most likely to be infected with nosema. Freshly dead bees can also be tested.
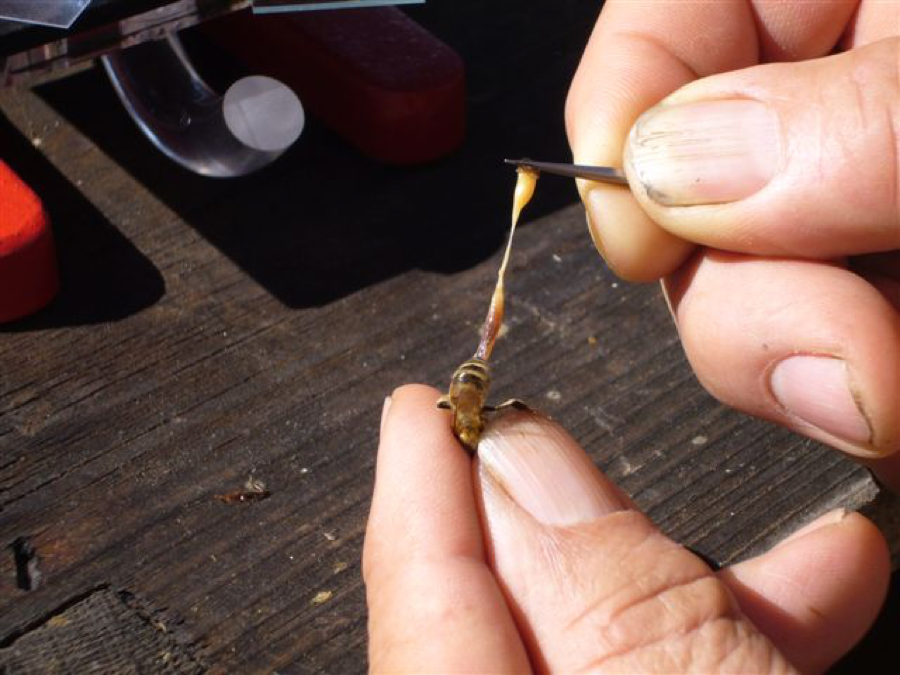
Step 2—Crush the bee’s head, then pinch the last abdominal segment and slowly pull the guts out. The hindgut is closest to the tweezers, and may be full of spores. The midgut (reddish) is closest to the bee. In a severe infection, the midgut may be white and swollen. Pull both parts out of the bee and place on a slide.
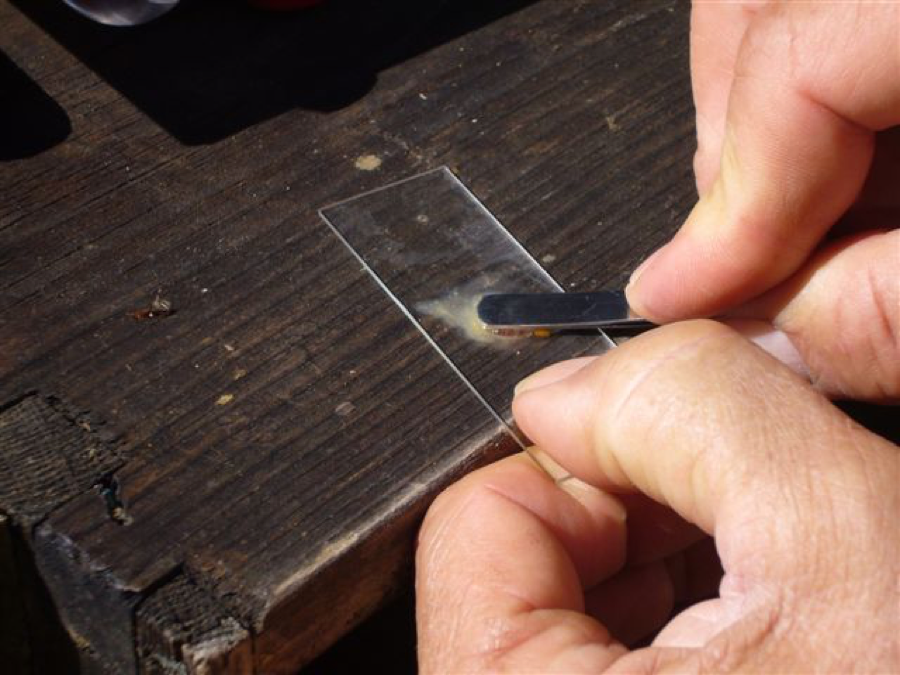
Step 3—Crush the guts in a couple of drops of water. Crush and grind until the water turns milky. Hold the slide on a flat surface so that you don’t break it!

Step 4—Place a cover slip over the milky fluid. This is a plastic slip that can be flexed to push out bubbles and bee parts. This “wet mount” should be allowed to settle for a minute, and then viewed under the microscope. Since it is a “gut-only” preparation, there will not be a lot of bee trash in the view.
This method is nonquantitative, since only a small amount of water is used. Spore counts will be higher than with diluted slurry. It is a “quick and dirty” method of checking to see if any older bees are being affected by nosema infections.
The Spice Grinder Method
Update Oct 2012 Please see https://scientificbeekeeping.com/sick-bees-part-13-simple-microscopy-of-nosema/ and https://scientificbeekeeping.com/sick-bees-part-16-the-quick-squash-method/ for more recent information.
This is my favorite method so far, especially if you have a portable scope that you can take into the field. You can carry all necessary equipment in a box. It takes me less than 3 minutes total turnaround per sample—as fast as an assistant can vacuum up the bees! (This is a literal figure—we processed over 100 samples this afternoon). The key component is a marble spice grinder from a kitchen store—it works far better and more quickly than a porcelain mortar and pestle. Take it home and smooth the turning ridges off the end of the pestle with a bench grinder or belt sander. Then put a little fine sand in the bowl, and grind by hand until the faces match evenly. Now you’re ready to grind bees! The key thing is to grind drained bees with no added liquid, then dilute the slurry when you’re done grinding.
Equipment for the Spice Grinder method. The spice grinder works far better than a standard mortar and pestle. The white tined instrument is a PF-1 multipurpose laboratory instrument. It is used for straining bees out of the alcohol, stirring, and transferring the slurry, and can also be used in a pinch for eating potato salad at a picnic. Be sure to bring gallons of water to refill the wash bottle!
It’s really handy to have a scope with a mechanical stage to move the slide around. It makes it really easy to triage “count” the spores in several fields of vision in rapid succession. With practice, however, you will rarely actually count.
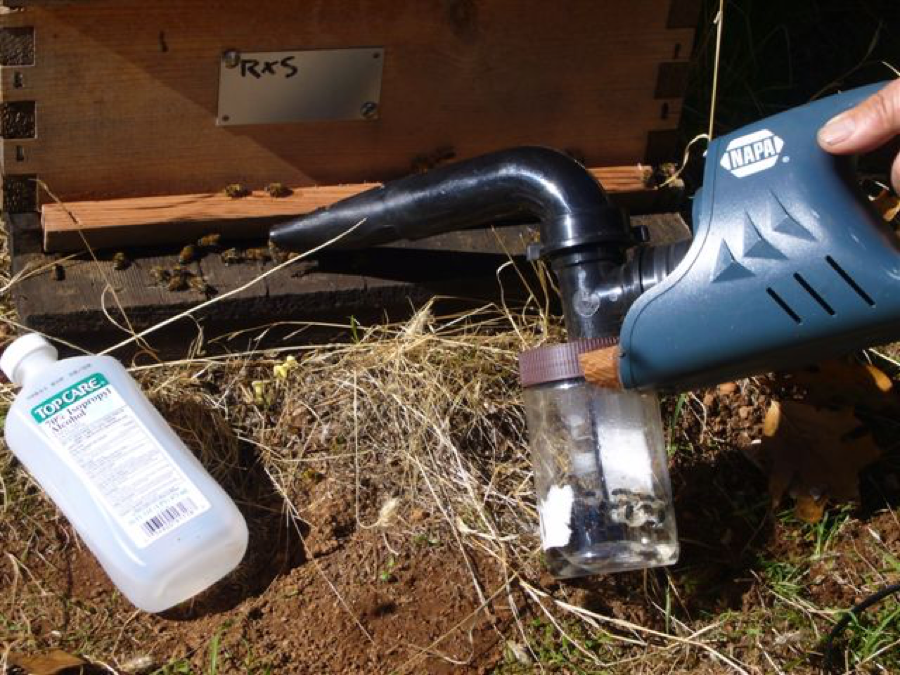
Step 1–Using the “Suck-a-Bee” portable vacuum to collect a blocked-entrance sample of returning foragers. I will publish plans for this device next month. The bees are sucked directly into 70% isopropyl alcohol—a real time saver! Sampling of returning foragers is the most accurate method I’ve found of detecting developing nosema infections.

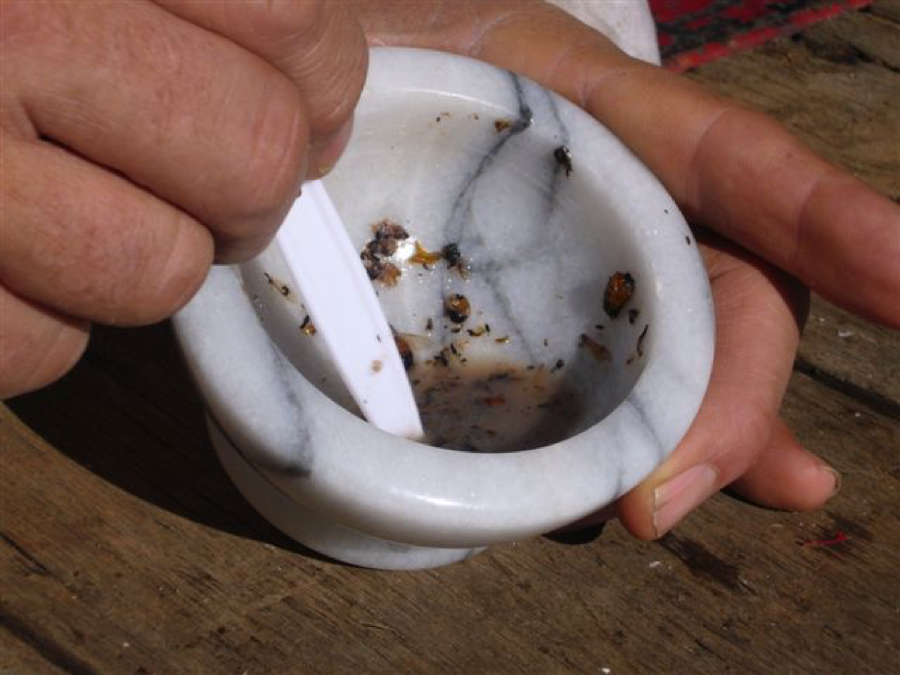
Step 2–Use the PF-1 tool to lift and drain the bees as you remove them from the alcohol. You don’t want any free liquid in the grinder, or the slurry will spill out. Count the number of bees before you grind them up! About 25 makes a good sample.
Question: can you reuse the alcohol? Answer: When I’ve checked dirty–looking alcohol for spores after reusing it for several spore-infested bee samples, I couldn’t find a spore in it. Clearly, there would be contamination if a bee defecated—use your own judgment.
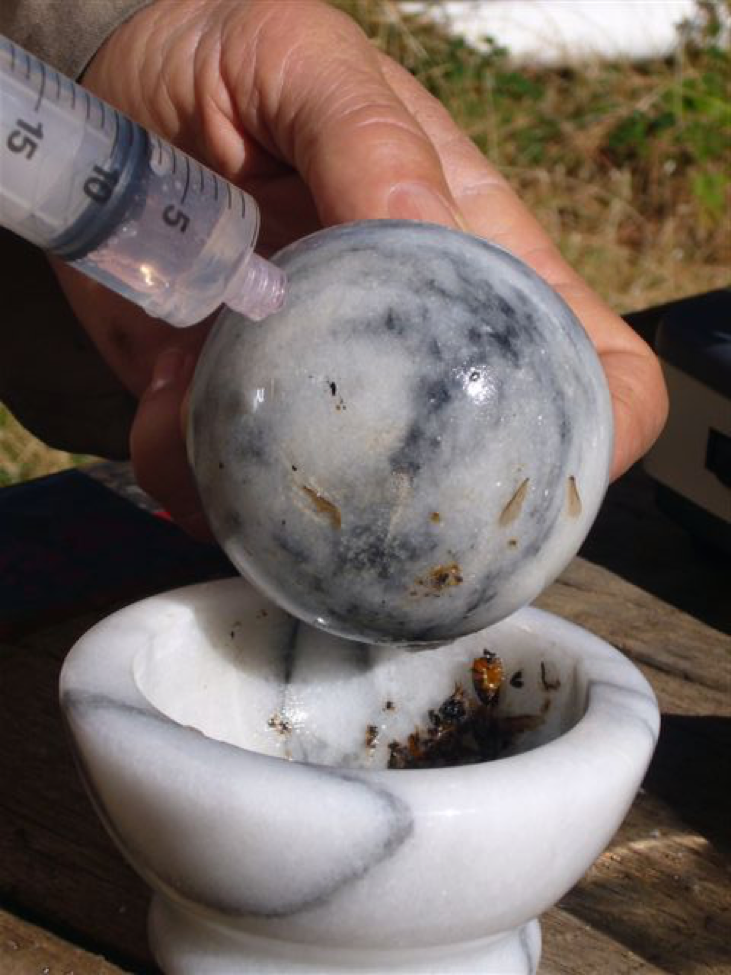
Step 3—Grind the bees HARD! You’ve got to crush the spores out of their guts. You should see a grayish slurry between the bee parts. Then use a syringe to measure out ½ 1cc (= 1 ml) per bee. E.g., for a 25-bee sample, use 25 cc to wash off the pestle. Reality—you can eyeball it with a little practice!
How well do you need to wash the spice grinder between samples, you ask? To answer that question, after processing a spore-rich sample, I gave the spice grinder bowl a quick rinse with the wash bottle and a grimy sterile finger, and wiped the pestle carefully on my dirty coveralls, and gave it a squirt. Then I added a few cc’s of clean water and ground it up until I created a milky soup. I inspected the soup under the scope. Out of 20 fields of view, there was 1 spore in one view, and 2 spores in another—the rest were zeroes. Conclusion—there is little spore contamination between normal rinses.
Reality tip: you can save time by realizing that there is little need to wash the grinder well if you didn’t find any spores. If there weren’t any spores, any residue certainly can’t contaminate the next batch appreciably! So a “half-fast” washing is often enough.
Step 4—Use the (washed clean) handle end of the PF-1 to stir the ground bees thoroughly into the wash water until it is evenly milky. If the fluid is not opaque milky, you haven’t ground hard enough. Then use the same end to dab a drop of the fluid onto a slide. Follow the microscope viewing instructions in the text.
With a little practice, it is amazing how quickly you can process samples in the field with this method!
The Blender Method
Updated 9/2/08 to double the dilution.
This method is useful for processing large yard samples for commercial beekeepers. It is useful for getting a general idea of the overall average spore count for a yard. The equipment needed are a blender that fits mason jar threads, pint mason jars, a measuring cup or wide mouth graduated cylinder, a tea strainer, and filter material. I suggest, in the interest of domestic harmony, that you go to the local thrift shop and purchase a dedicated blender for the purpose. Make sure that its blade assembly will screw onto mason jar threads.
Step 1—Take cases of pint mason jars to the field, with a means of labeling them as to yard. Also take plenty of rubbing alcohol. Use entrance blocks (if necessary) and a portable vacuum to sample field bees from as many colonies as possible. A quarter pint is about 325 bees, and is a handy sample size. Take several samples per yard.

Step 2—Pour the bees from a sample into a graduated cylinder or measuring cup. Pour off the alcohol, and tap the cup down lightly a few times to settle the bees. Bees pack to approximately 3 bees per ml. The level shown is 100 ml, so there would be 300 bees.
Step 3—pour the measured bees into a dry pint jar.
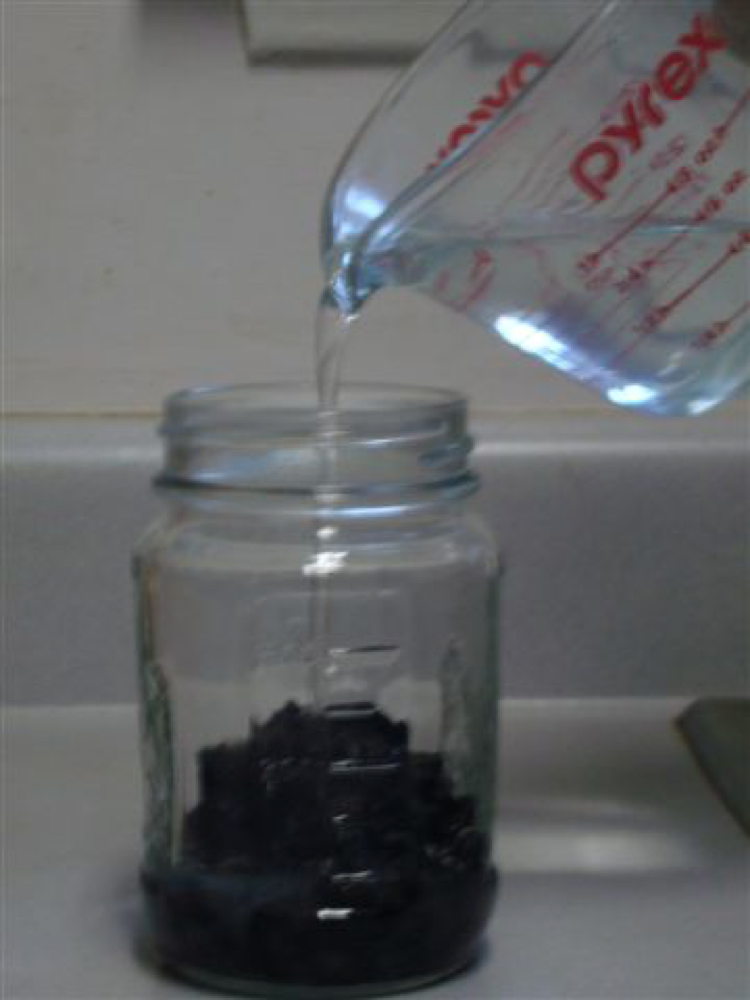
Step 4–Measure 1½ 3 times the volume of bees worth of water, in this case, 150 300 ml. This will give you a dilution rate of ½ 1ml per bee. If you have a half cup of bees, add ¾ cup 1-1/2 cups of water, etc. Pour the water into the pint jar with the drained bees.
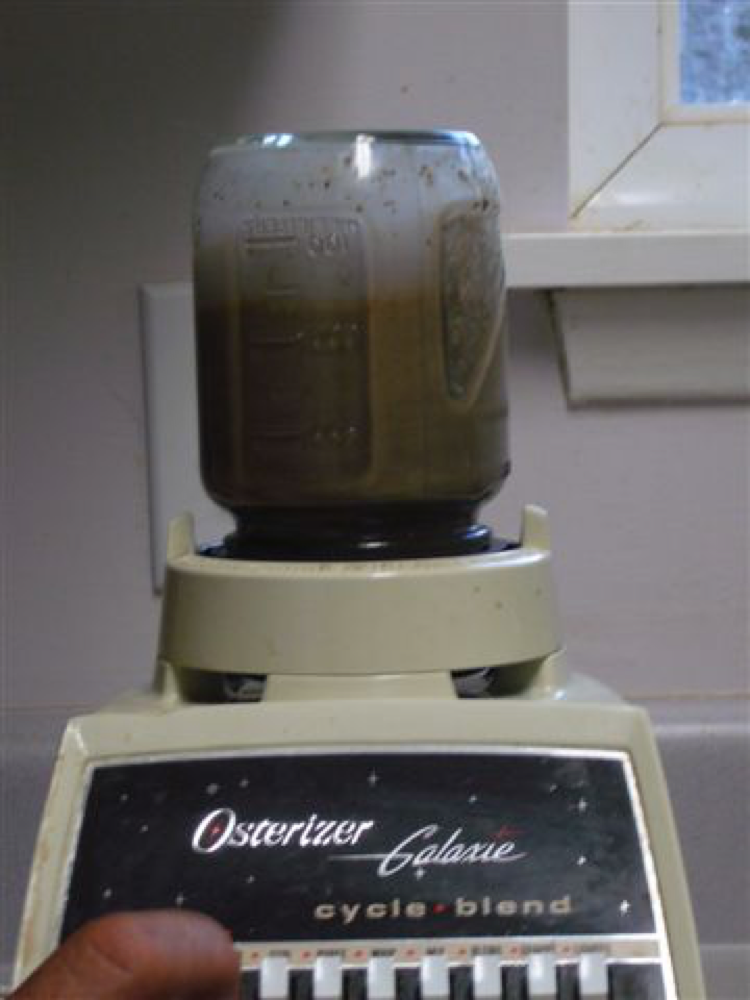
Step 5—Screw the blender blade assembly onto the pint jar of bees and water, and blend for a few seconds on the “frappe” setting. Frappe is not critical, I just like the way it sounds–blend until the bees are chopped into little pieces. Be sure to thoroughly rinse the blender blade assembly between samples.
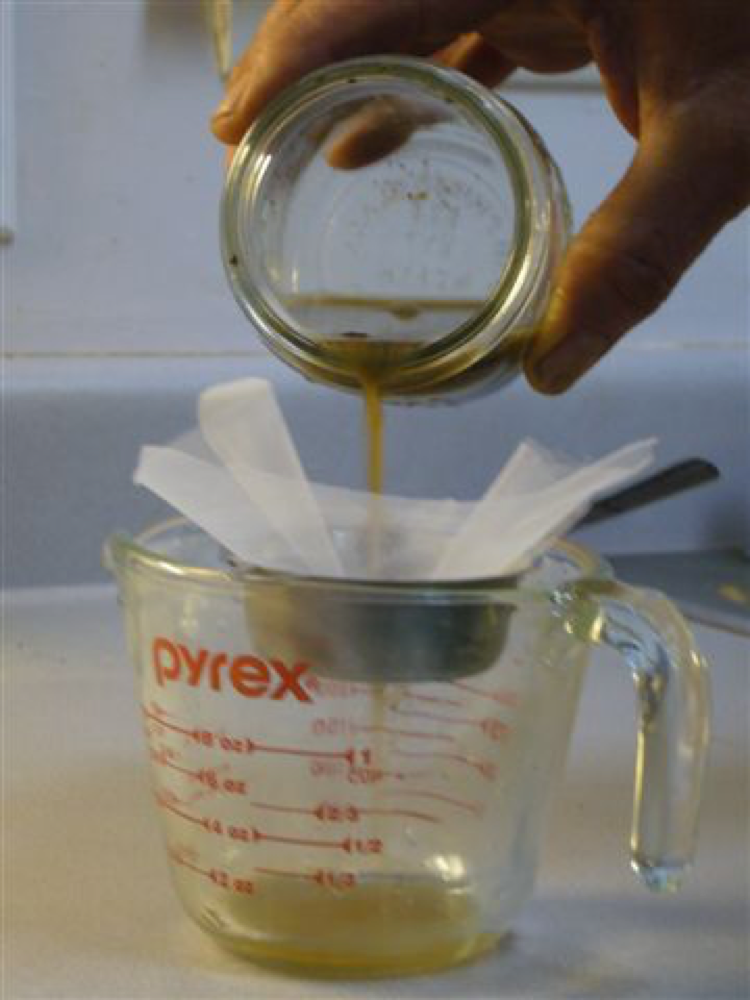
Step 6—Immediately filter some of the slurry through a disposable strainer (stir it if it has had time to settle). I’m using a piece of paint filter in a tea strainer here. Any filter material that is porous enough to easily see light through the pores will work. Doubled cheesecloth, muslin, or old bed sheet are fine, but they are all time-consuming to cut into usable pieces. Precut, prepackaged 4×4” gauze squares from the drugstore work great! Don’t reuse the cloth—it will contaminate the next sample with spores; rinse the tea strainer well between samples. Update: I find the filtering to be unnecessary.
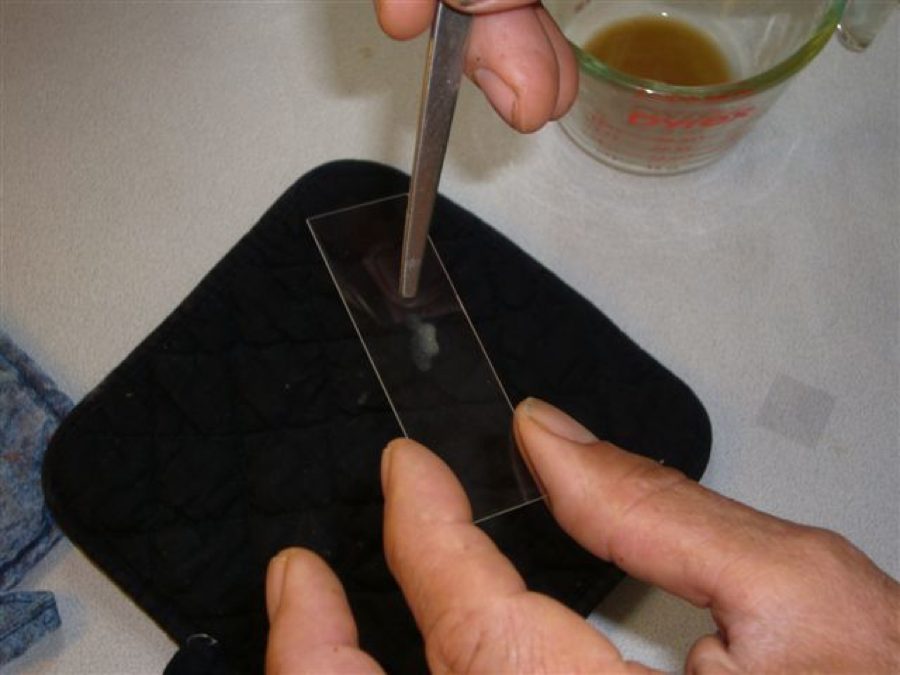
Step 7—Use the clean end of a PF-1, tableware, or swizzle stick to dab a drop of filtered slurry onto the slide. With practice, you will learn how much to put on to fill the space under the cover slip without running out the edges and getting all over the slide and microscope stage. Keep your scope clean! Slurry on the lens is a bad thing. Update: Make sure that there are no solid chunks of bee under the cover slip–they will screw up the count. Then tap the slip lightly once with your fingertip to settle it down.
Step 8—Follow previous microscope viewing instructions to check the spore concentration. Use the same triage as in the text. It’s amazing that from 300 bees you only view a tiny portion of a tiny drop of slurry!
Clever readers may already have realized that the blender method offers the opportunity for a “twofer.” When you bring those jars of bees back to process, every one is also a varroa sample, and with a few shakes, the mites will all be washed free, and can be strained from the bees for counting (before you frappe the bees). You’re going to “count” the bees anyway—100 bees fills 33ml, so it’s easy to figure your percent mite load by simple division (e.g., 4 mites per 66 ml of bees would be a 2% infestation). An alcohol wash is more accurate than ether rolls, and will only take you a few more seconds! Take a number of samples from each yard to get a good handle on the level of both pests.
There you have it! I’m sure that the methods I’ve shown can be improved upon—please let me know. I’ve looked at so many samples of late that I see spores as I’m falling asleep! I sure do not wish to burden beekeepers with yet another onerous monitoring chore, yet I don’t see any way around it for the time being. Once you get the hang of it, though, nosema testing is really a breeze. Kill two birds with one stone and check nosema when you monitor for mites. Commercial beekeepers, get a good scope, since you’re going to be using it a lot! Hobbyists, there is no reason that every bee club couldn’t get at least one member to become proficient at processing samples. Good luck to all!
Next: Prevention and Treatment
References
APHIS (2007) International Standards for Phytosanitary Measures, Sampling of Consignments. http://www.ippc.int/file_uploaded/1229532867492_ISPM31_2008_E.pdf
Fingler BG, WT Nash, and TI Szabo (1982) A comparison of two techniques for the measurement of nosema disease in honey bee colonies wintered in Alberta, Canada. ABJ 122(5):369-371.
Fries I., Martín R., Meana A., García-Palencia P., Higes M. 2006. Natural infections of Nosema ceranae in European honey bees. Journal of Apicultural Research 45, 230-232.
Martín-Hernández Raquel, Higes Mariano, Garrido M. Encarnación, Meana Aranzazu (2006) Influence of sampling in the detection of Nosema ceranae spores. . Proceedings of the Second European Conference of Apidology EurBee Prague (Czech Republic) 10-16 September 2006
Shimanuki, H and D Knox (2000) Diagnosis of Honey Bee Diseases. Agricultural Handbook 690
Topolska, G, and A Hartwig (2005) Diagnosis of Nosema apis infection by investigations of two kinds of samples: dead bees and live bees. J. Apic. Science 49(2):75-78.
Diagnostic Labs
I’ve communicated with all these fine labs. The two private labs are updating their procedures, and are ready to serve beekeepers’ needs.
Alan Butterfield– Nosema, tracheal mite, and varroa testing, plus bee weights
ID Services
12419 Lytle Ave.
McFarland, CA 9350
(661) 792-2051 – Office (661) 978-8290 cell
ids@etcrier.netThis e-mail address is being protected from spam bots, you need JavaScript enabled to view it
R.E.L. (Dick) Rogers, MSc, PAg, PhD Candidate– Can now also perform genetic analysis for Nosema ceranae at reasonable cost.
Wildwood Labs Inc
NS, Canada
Skype: wildwoodlabs
902.679.2818 (Can)
drogers@wildwoodlabs.comThis e-mail address is being protected from spam bots, you need JavaScript enabled to view it
www.wildwoodlabs.com
Bart Smith
Bee Disease Diagnosis Service
USDA ARS
Beltsville Bee Lab
Full information at:
http://www.ars.usda.gov/Services/docs.htm?docid=7472
Tips excerpted directly from Bart: Isopropyl rubbing alcohol is fine for adult bee samples. Be sure to use leak-proof containers. A secondary containment is insurance that no leakage will occur. For example, use a suitable plastic or glass jar that is placed inside a Ziploc bag. Sample containers need to be labeled with a number or yard name, etc. preferably using a pencil. I suggest adding a piece of paper directly in the sample with data written in pencil. Be sure to include a data sheet that is package separately (in a separate Ziploc bag) that includes the beekeeper’s contact information and a listing of samples submitted. I periodically receive leaking containers, marked with magic marker and data sheets written in ink that get obliterated from leaking alcohol.
Depending on the number of samples currently received at the lab, results are usually returned within 1-2 weeks or sooner. We do not determine which species of nosema is present in samples received. Please don’t quote me as saying send all the samples you can – I can’t handle that.


