
IPM 4 Fighting Varroa : Reconnaissance Mite Sampling Methods and Thresholds

February 21, 2011
Integrated Pest Management 4:
Fighting Varroa
Reconnaissance Mite Sampling Methods and Thresholds
© Randy Oliver 2006
ScientificBeekeeping.com
First Published in ABJ in March 2007
Three strategies I’ve found that always fail when battling varroa are:
1. Denial—“I haven’t seen any mites, so my mite levels must be low.”
2. Wishful thinking—“I haven’t seen very many mites, so I’m hoping and praying that my bees will be OK.”
3. Blind faith—“I used the latest snake oil mite cure, and it’s gotta work!”
Every time I’ve been “blindsided” by the mite, I was in actuality simply being blind. I either wasn’t monitoring the mite level, or was hoping that it wasn’t as bad as it looked, or was cocksure that the latest control method had worked, and that I didn’t need to confirm its efficacy by checking back.
What I’ve come to realize is that today’s beekeeper can never be complacent with regard to varroa. Time and again I’ve seen myself and others work out a treatment and management strategy that worked great for two or three years. We prided ourselves on having finally “licked” the mite. Let me warn you, that kind of hubris taunts the mite gods, and they may smite you with a vengeance the next year! Varroa is one opponent you don’t ever want to take your eyes off of.
Any general would be foolish to commence a battle without first assessing the strength of his enemy. A beekeeper practicing integrated pest management against varroa is no different. The problem with varroa is that by the time you start to notice mites on the bees during normal colony management, they may have already built up to a damaging level. That is, varroa are rather inconspicuous due to the fact that about two thirds of them are hidden in the brood, and the phoretic (hitchhiking) mites are usually hiding on the undersides of bees, where the beekeeper can’t see them. One must also add the unspoken fact that Joe beekeeper doesn’t really want to see mites, since if he doesn’t see any, he can enjoy the pleasant fantasy that they are under control.
Because of the difficulty of gauging the degree of varroa infestation during normal colony inspection, the vigilant beekeeper must sample his colonies for mites in a timely manner in order to determine what efforts he needs to be making to keep the mite population at a tolerable level. By “tolerable,” I mean below the level at which mites are likely to cause, or are on track to cause, economic injury to the colony—slower buildup, less honey production, a viral epidemic, poor wintering, or at worst, colony collapse. That level will vary greatly by time of season, as detailed in my previous article on mite population dynamics.
The term “threshold” is often used for the economic injury level. The beekeeper’s strategy is to try to manage (as opposed to “control”) the mite population to keep it below an appropriate seasonal threshold value. If the population exceeds the seasonal threshold, he would then apply some sort of treatment to reset it back to a tolerable level.
Determining the precise level of mite infestation in a colony would require sacrificing the bees and brood in order to count every mite. Since this is unrealistic in practice, what we must settle for is making an estimate of the mite population based upon a sample. And that is the gist of the next sections.
What are the best ways to monitor mite levels?
There are three main ways of sampling the mite population:
1. Natural mite fall caught on a stickyboard under a screen
2. “Jar” samples—ether roll or powdered sugar shake; alcohol or detergent wash
3. Brood sampling with a cappings fork
Each way has its own advantages and disadvantages, and is each most accurate at different times of the year.
Update 7 May 2017: My hands down favorite (and most accurate and consistent) method for mite monitoring is by the alcohol wash, using the swirl-type cups as described in Mite Washer, Still Improving. The sugar shake would be a distant second. I want to keep mite wash counts for a half cup of young bees in the 0-2 range early in the season, allowing them to climb to perhaps 6-8 in September, and then back to the 0-2 range going into winter. Depending upon how many months that the bees are rearing brood in your area, it will take one to three 95% reductions in the mite population (by whatever means) over the course of the season to maintain this low level of infestation.
Stickies
Stickyboards are generally the most accurate and consistent method of estimating the total mite population, since they monitor the entire colony, rather than just a sample of the bees.
Update March 2015: I have since found natural mite fall on sticky boards to be unreliable as an indicator of mite infestation levels. For more up to date information, please see Mite Monitoring, Improved Mite Washer, and especially Mite Management Update 2013.
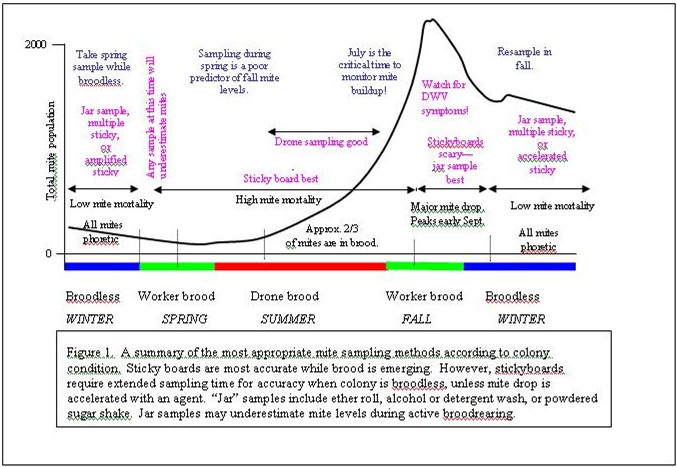
They are used to estimate the total mite population by catching the natural fall (drop) of (live and dead) mites from the bees. The natural fall is assumed to be a proportion of the total population. Therein lies the rub: the proportion of mites that fall each day depends upon whether the colony is broodless, beginning broodrearing, broodrearing in earnest, or shutting down broodrearing. According to Martin (1998), one can estimate the total mite population by multiplying the daily drop by 250-500 when the colony is broodless, or by 20-40 when brood is present. Other authors come up with a spectrum of different conversion factors. Luckily, you don’t really need to know the total mite population—you only need to know if the natural daily drop indicates that the mites are at a “tolerable” level on their growth curve. Note that stickyboard readings can be wildly inaccurate at the beginning or ending of broodrearing, as mites “transition” from the adult bees to brood, or vice versa. Stickies are the best sampling method during normal broodrearing periods while brood is emerging.
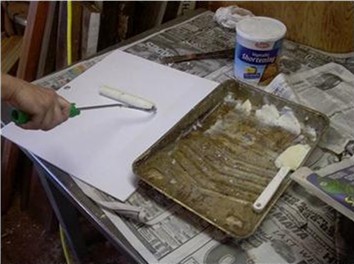
Rolling Crisco onto sticky boards. A mini paint roller works quickly. I now prefer Vaseline—it doesn’t get as gummy.

The easy way to clean stickyboards—scrape with an ice scraper! Takes only seconds, then give ‘em a quick roll again with Vaseline.
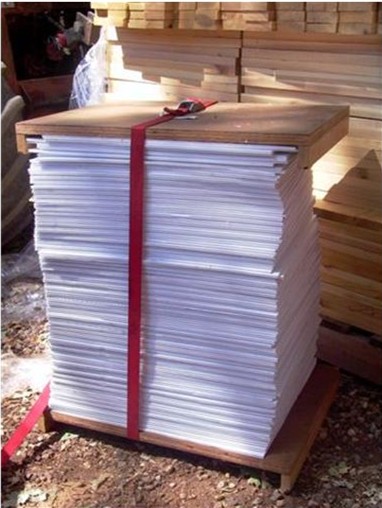
Prepared corrugated plastic sticky boards ready to go to the beeyard. They are stacked face to face in pairs.
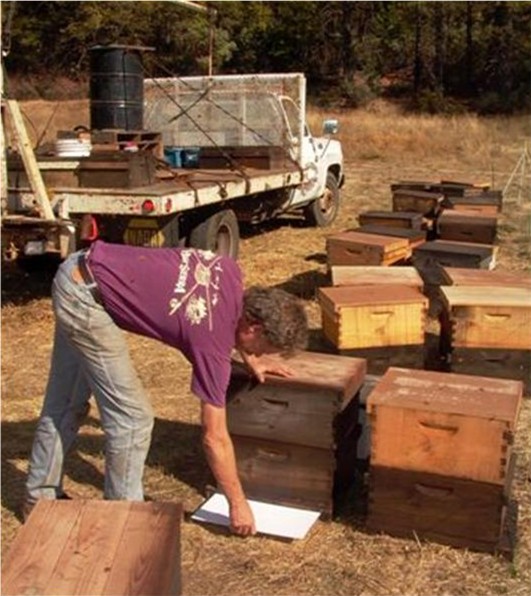
Inserting sticky boards.
Stickyboards are conceptually simple, don’t kill bees, and don’t require handling bees or disturbing the colony. Stickyboards are really easy to use if you have screened bottom boards set up for them, or can be a pain to insert if you don’t. Be aware that the sticky count may not be consistent day to day, especially when mite drop is low. Bieñkowska & Konopacka (2001) state “The data presented in this study give evidence that [a 5 – 7 day] sampling period is not sufficient, as in some of the colonies not a single dead female was found in weekly checks for natural fall.” They recommend taking samples for 3 weeks! However, in reviewing samples of daily mite count records by others, and by myself for any week, any daily count seldom differed from the weekly mean by more than 20%. Most authors recommend sample times of a few days. You may also get around this problem by sampling many colonies for a short period, rather than a few for a long period. In general, the more mites on the board, the more accurate the count.
The problem with long samples is that you get a lot of mites and hive trash! Counting itty-bitty mites is tedious drudgery (although there are a few obsessive types that revel in it), especially if you are over forty. Calderone and Lin (2003) go so far as to use a series of solvents to separate the mites from hive debris, and then weigh the pile of mites with a microbalance! Ostiguy and Sammataro (2000) developed a special grid of rectangles randomly placed on the board that allows only counting a third of the mites, however, it’s most accurate at counts of over 500 mites. A similar board is available commercially from glipm@nethawk.comThis e-mail address is being protected from spam bots, you need JavaScript enabled to view it .
Luckily, you really don’t ever need to count thousands of mites (unless you’re a researcher)! There are few thresholds of over 50 mites, and once you reach the threshold, you can stop counting. Problem is, most researchers recommend that you trap for several days. Then you’ve got a gazillion mites, plus tons of hive trash. One way to get around both of the intrinsic problems of stickyboards (the wait while trapping, and the tedious counting) is to perform an “accelerated,” rather than “natural,” mite drop test. Varroa are extremely sensitive to irritants, and drop off the bees at the slightest whiff. You can greatly increase the mite drop by several methods: smoking with natural smoke or even more so with tobacco, grapefruit, or other aromatic leaves; fumigating with menthol, thymol, or formic acid; dribbling oxalic acid; or giving the colony a powdered sugar dusting (I hesitate to recommend Apistan or Checkmite due to issues of comb contamination). Any of these will cause a large proportion of phoretic mites to drop quickly. (Note that it’s important not to smoke or disturb the colony when obtaining a “natural” mite drop, since smoke will skew the mite number higher).
Shoot first; ask questions later
By using an accelerator, you can get a whole lot of mites fast! In fact, it’s like killing two birds with one stone—you’re giving the colony a “flash” treatment to kill a portion of the mites, plus getting an accelerated whole-colony sample at the same time. I call it “Shoot first, and ask questions later.” In an experiment I recently ran, I dusted a single-story colony with powdered sugar, collected the mite drop for 1 hour, then killed all the bees, washed the mites from them, and counted ‘em all. During that hour, 34% of the phoretic mites fell onto the sticky—in one hour, I collected as many mites as I would have in nearly 6 days of “natural” mite drop!
What I like to do is to take accelerated sticky counts of an entire yard at a time. Then I do a “triage” sorting without counting individual mites—I just see if the stickyboard is white, “gray,” or “black” with mites. Depending on the season, stickies that have very few mites indicate the colony is handling mites well, and may have breeder potential; stickies with moderate mite loads are marked for further monitoring; stickies that are dark with mites are treated immediately! Unfortunately, I have little data yet as to how accelerated sticky counts relate to natural counts. But we can approximate. If we assume that 2/3 of the mites are in the brood, and that your enhancer causes half the phoretic mites to drop in 24 hours, you’d be catching 1/6th of the total mite population. So 200 mites on the board would indicate a total population in the ballpark of 1200 mites—OK for the September peak, but too many for July.
You can purchase stickyboards from several sources, or make your own. The basic concept is to get a white sheet that covers the entire bottom board (although few mites fall at the side edges or back). Use any nonabsorbent sheet—waxed cardboard, plastic, or corrugated plastic signboard (my favorite). Single 8½x11 mailing labels (stickum side up) work well in a pinch. Cover the sheet with a sticky substance, so any live mites can’t crawl away—petroleum jelly, Crisco®, or proprietary insect trap resin. Pam® and shelf paper are not sticky enough. You can tell that your stickum is strong enough if the mites stay stuck in rows where they dropped from between the frames (although ants may carry mites away!). I find that the fastest way to apply the stickum is with a mini paint roller. The corrugated plastic boards are reusable–both petroleum jelly and shortening wash off easily with soap and water. Stickyboards must be covered by 1/8” hardware cloth held at least ¼” above the board so the bees don’t chew off the stickum and the mites don’t crawl back up onto the bees.
One last point about stickies—they give you the opportunity to screen your colonies for the bees’ mite-crushing behavior. If you have a dissecting scope or strong hand lens, you can inspect the fallen mites to see if they have been damaged by the bees. You can view photos of typical damage in Stanimirovic (2005). However, Aumeier (2001), who watched the grooming responses during 226 mite/Africanized bee encounters, found that “even extensive [and vigorous] grooming behavior never resulted in damage or death of the mite.” As I pointed out in my previous article, there are likely different aspects of grooming behavior to breed for—crushed mites is not the only one.
Jar samples
Stickyboards have drawbacks at certain times of the year (Figure 1). In order to obtain reliable estimates when there is no broodrearing in the colony, natural mite drop sticky counts must be taken for unreasonably long times, or multiple samples should be taken. Sticky counts are also skewed during the September “turnover” as mites are forced to move from brood onto adult bees. During those times of year, another way of monitoring is to put a sample of adult bees into a jar, and dislodge the mites for counting. “Jar” samples are generally a more accurate method in the short term than natural mite drop, except when there is broodrearing in earnest. Jar samples have the added benefit of being very quick, and require little special equipment.
Jar samples give you an estimate of the percent mite infestation of the adult bees by phoretic mites (number of mites hitchhiking on a hundred bees). For example: if you obtain 3 mites from a 300-bee sample, you’d divide 3 by 300 to get the percent infestation—in this case 1%. The inherent weakness of jar samples is that you’re only sampling a small subset of the bees, the count may vary quite a bit from sample to sample from the same colony, the count will depend upon the part of the hive that you take the bees from (nurse bees carry the most mites), you need to open the colony and brush or shake bees, and you may inadvertently kill the queen.
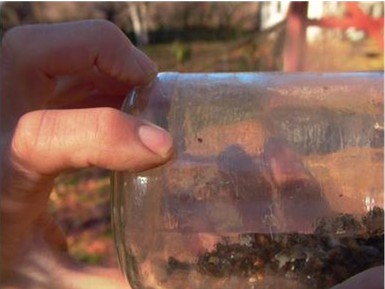
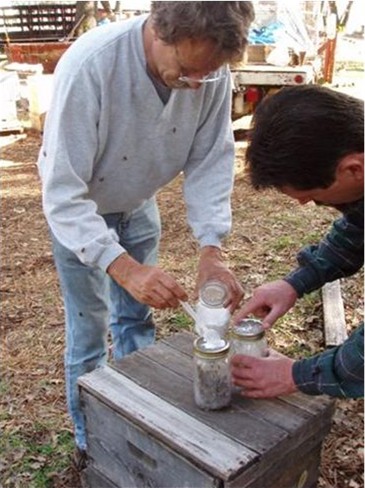
There are three basic types of jar samples—I will describe them from quickest to slowest (although none take more than about three minutes once you have the hive opened. Note that all samples are taken from the broodnest (where the most mites are). You can alternatively take them from under the lid, but mite counts will be lower—meaning that you must adjust the result for comparison to threshold values. I generally just tip the upper brood chamber back and brush bees from the bottom bars into the jar. Tip: a giant wide-throat funnel helps. If you prefer to lift and shake frames (after checking for the queen), fabricate a shaking funnel out of sheet metal on a stand that holds it over the jar. One good shake of a frame will give you plenty of bees—dump the excess out until you level them to a mark that you’ve made on the jar. All jar sample numbers in this article assume a 300-bee sample (exactly 3/4” of bees in a quart Mason jar—count ‘em once, and mark the jar). Do not take larger samples because the mites get caught in the tangle of bee bodies.
Ether roll
The ether roll is very quick, and therefore commonly used by commercial beekeepers. Shake 300 bees from the brood nest into a jar (best with a jar that has an opening large enough for your hand, so you can wipe out the mites between tests). Spray automotive starter fluid ether into the jar for 1-2 seconds. Screw on the lid and shake the jar top to bottom for a few seconds, then roll the jar for 10-30 seconds. The bees will disgorge nectar, and the mites will stick to the sides of the jar (wet the jar with a little syrup if there’s no nectar flow) where you can count them. This method recovers only 50-75% of the mites if done carefully, and can vary wildly test to test for the same colony! A single test can easily miss low infestation levels. Therefore, take a lot of samples from a beeyard. Note: if you dump the bees out quickly, some may recover!

Spraying starter fluid for an ether roll sample. Note wide mouth of jar so you can wipe it clean.
Rolling the ether roll.
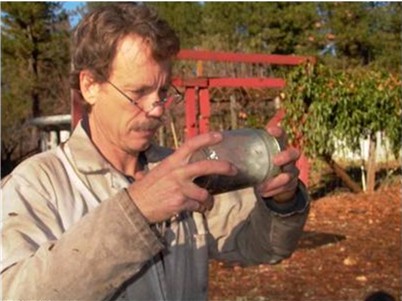
Mites stuck to side of jar.
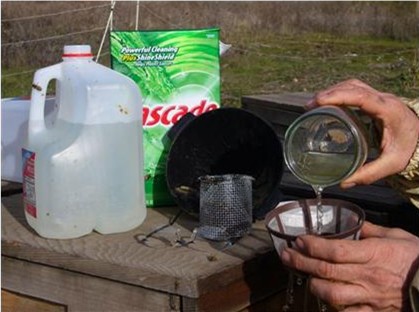
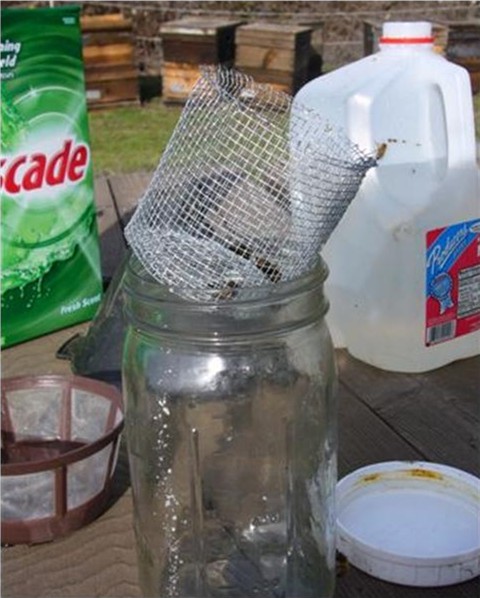
Alcohol or detergent wash
The Cadillac jar sample is the alcohol or detergent wash. It gets all the mites off the bees. For a detergent wash, cut a piece of 1/8″ screen to fit into the lid of a 1 qt Mason jar. Shake 300 bees from the broodnest into the jar and fill the jar halfway with water with ¼ tsp of granular automatic dishwasher detergent added (handwashing dish liquid makes too much foam!). Update May 2020: I performed a test to compare mite recovery with granular vs. hand dishwashing liquid. The granular did not work well, so I do not recommend! Dawn Ultra, 2 Tbl/gal worked well.
A strong detergent solution works better than a weak one (Fakhinmzadeh 2000). Tip: premix your solution in a gallon milk jug—5-6 tsp detergent per gallon (the solution should feel slippery). Swirl/shake the jar sample vigorously for a full minute to dislodge the mites (they will sink). Then dump the liquid through the screened lid into a reusable coffee filter (any cloth or fine screen will work). Add more liquid to the jar and repeat until no more mites come out. Count the mites on the filter. See the accompanying photos for a time-saving improvement: the “Oliver Easy-Wash Jar.” For an alcohol wash, use 70% alcohol (rubbing alcohol is fine) and wash the bees in a basket in a tub of alcohol (see www.capabees.ca/eil.htm). For you commercial guys, Medhat Nasr recommends taking a case of a dozen jars to each yard, collecting the bee samples, and then taking them home to be washed and counted in the kitchen or shop.
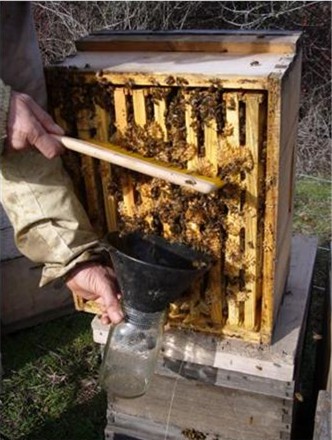
Brushing bees from the broodnest into a jar for a detergent wash. Using a widemouth funnel helps greatly.
Shaking the bees in detergent water to dislodge mites. The bees remain in the screen cylinder, the mites wash free and sink.
Pouring the water and mites through a reusable coffee filter for counting. The washed bees remain in the screen cylinder. All required field materials are shown. Don’t forget the reading glasses!
Close up of the Oliver Easy Wash jar. This greatly speeds mite sampling.
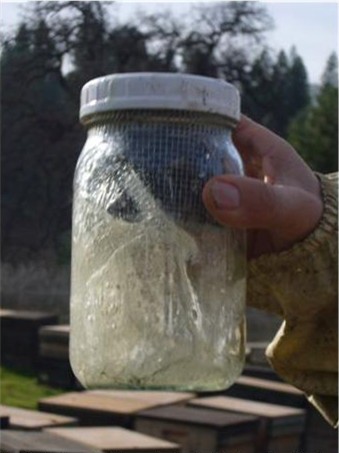
Powdered sugar shake
The above two methods have the drawback of killing the bees, and possibly the queen if you’re not sharp eyed. Paula Macedo and Marion Ellis came up with a bee-friendly jar test (Macedo & Ellis 2001). Set up a jar as for alcohol wash, with a 1/8” screened lid. Shake in 300 bees from the broodnest, put on the lid, and sift 1 rounded tsp of powdered sugar through the lid onto the bees. Roll the jar until the bees are all white, then let ‘em sit for a minute. After one minute, invert the jar over a white surface (or better yet, a white pan of water so wind doesn’t blow the mites away), and shake the sugar and mites out for a full minute (continue if mites keep falling). Macedo recovered about 80-90% of the mites; in my own tests, we recovered about 65-70%. The bees can be returned to the hive unhappy but unharmed.
Preparing powdered sugar shake samples.

Shaking out the mites onto a white surface. Shake for at least one minute.
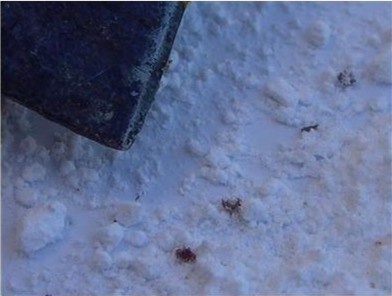
Hive tool pointing to mites in the powdered sugar.
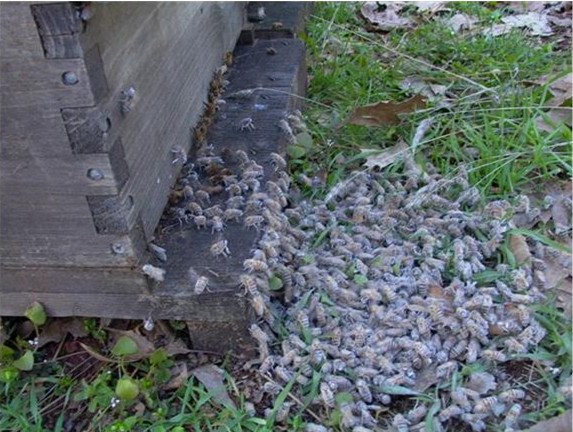
Unharmed bees returning to the hive after a powdered sugar shake.
Brood sampling
Varroa prefer drone brood to worker by a ratio of about 10:1, so if mites are in the brood, drone brood is where to look! The easiest place to check is in the broken drone cells exposed on the top bars when you split the brood chambers in the spring. But look quickly, since the mites hide in several seconds! Otherwise, use an uncapping fork (or a hair pick, which is easier to carry). Flip some caps off of drone pupae, and look for some in the pink-eyed stage (younger ones are too soft), then skewer about 20 sideways through the thorax and pull them out for inspection (see photo). Then tap the frame over a white surface to dislodge mites remaining in the cells. This method is somewhat unreliable, since mites will not be evenly distributed, so you must sample several patches. You must inspect at least 100 pupae from various areas—more is better. Don’t forget that drone brood is a delicacy in many cultures!
However, meticulous researchers have found that sampling of drone brood is an unreliable indicator of total mite population. Charriere, et al (2003) state: “Our results showed that it is not possible to calculate the size of the varroa population parasitising a colony simply by examining the infestation rate of drone brood….The parasite load of drone cells was seen to vary from one- to six- times in the space of a week, without any relation to the actual varroa population.” Other researchers (Wilkinson and Smith, 2002), based upon computer modeling, suggest that one must treat at 15% drone infestation to avoid reaching excessive mite levels.
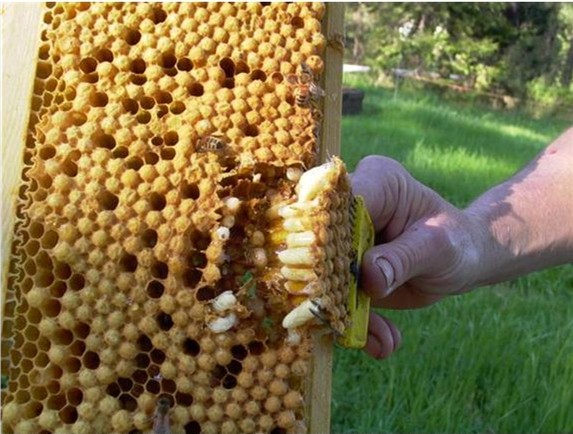
Taking a drone brood sample from a drone trap frame. We’re using a common hair pick.
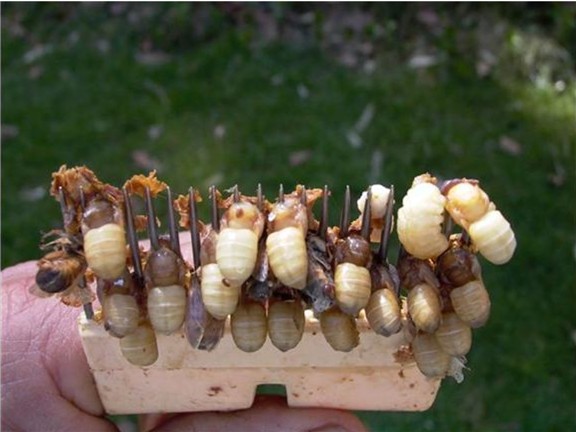
Mites on drone brood. At least 12 mites in this photo.
VISUAL MONITORING
Keep a close eye on your bees! Be aware of any colony that is not thriving, has spotty brood, or does not gain weight. If you’re seeing mites on the bees, you’ve probably already got a problem! The bees in badly infested colonies look dull, listless, and demoralized (how’s that for some scientific terms?). Tip the brood combs up and look for the mites’ bright white guanine deposits on the cell ceilings (your back to the sun, frame horizontal, top bar away from you). Watch for disease or stress symptoms. Especially watch for any sign of “curlywing” virus (DWV) in late summer—look for bees crawling on the ground, or on the combs, with deformed wings. At the first sign of DWV, get the mite level down!
To summarize sampling methods, the more mites obtained in the sample, the more reliable the count. Therefore:
§ Use natural mite drop on stickies when there’s brood emerging
§ Use jar samples or accelerated stickies when colonies are broodless
Neither method is good during spring “turnover” when mites are first entering brood cells. Stickies can be especially misleading during the fall turnover, when mites are shifting out of brood– jar samples are best at that time. Ideally, one would sample each colony. Larger beekeepers should take multiple samples from each yard—there may be large yard-to-yard differences in mite levels, for various reasons, but often due to mite immigration from the collapse of surrounding colonies.
What times of year should I sample?
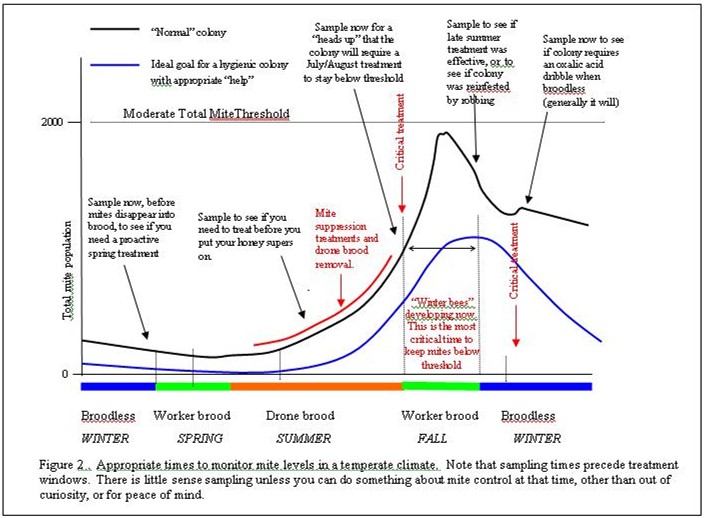
Now that you know what sampling methods work best at what times, the question remains of how often to sample? Sampling gets old really fast, so there’s no sense wasting your time unless you can act upon the results. So what are the minimum sampling “windows”? This decision depends largely upon your control and treatment strategy. If you want to manage mite levels all season, sample early in the spring, then again well before you put your honey supers on, again in early August just before mite peak, then again before winter (Figure 2). Monitoring also depends a great deal upon your exposure to mite immigration from nearby collapsing colonies (generally in spring or fall). Sample more often when there’s robbing going on. Wilkinson (2002) states: “it is very important for beekeepers to remain vigilant, as re-invasion of hives with mites from nearby colonies can quickly reverse any effective control.” If you’re an isolated hobbyist, sampling two or three times a year might be enough. If you’re a commercial beekeeper in Florida or California, more often would be appropriate. Just ask yourself this question: How much do I like surprises? If you don’t care for surprises, keep an eye on the mite.
What is a threshold level of mites that I can tolerate?
At what mite population level should I take action? That depends upon your strategy:
Strategy 1—“manage” the mites by taking action throughout the buildup, and use a treatment any time that sampling indicates that the mites are on track to reach an infestation level that you are not comfortable with.
Strategy 2—let the mite population build until it reaches a recommended “economic injury threshold” level, then treat.
It should be apparent by now that I favor Strategy 1. However, there has been quite a bit of research to determine threshold numbers for Strategy 2. Threshold numbers have been published for specific seasons in specific geographical areas. As long as the mite population stays below those levels, you can more or less not worry about it. If your sample numbers go above the seasonal threshold, you’d better take action, or your colony is not likely to survive until next year.
Just what those numbers are, is a devilish question to answer, so I won’t! As Bill Truesdell reminds us, “all beekeeping is local.” So I’m going to let the local experts do it, and you can help by reporting to them if they need to adjust their recommendations! Let me first discuss some general points, and then I’ll summarize local recommendations in Figure 3 and Table 1.
“There is no clear harmful threshold at which a mite population suddenly causes harm. A mite population that causes no obvious damage to one colony may prove very damaging to another” (from Managing Varroa). Well spoken! Most of us have a hodgepodge of bee genetics in our apiaries, and every colony has a unique combination of genes involved in mite resistance, and susceptibility to viruses and other diseases. This variability “problem” will likely decrease as we continue selecting for robust and resistant queenlines. You already know what I’m going to say: Don’t coddle wimpy bees!
Some colonies in some areas will collapse once the total mite population gets much over 1000. Other colonies in other areas can handle 4000 to 5000 mites, and a few have survived 10,000! You can use the U.K. interactive varroa calculator to estimate your total mite population based upon stickyboard counts (Broken Link!) http://www.csl.gov.uk/science/organ/environ/bee/diseases/varroa/varroacalculator.cfm. You will notice that they are extremely conservative, and recommend keeping the mite population below 1000.
One problem with giving fixed threshold numbers are that the compounding factors of diseases and stress from combs contaminated with residues of miticides (either legal or illegal). Mite-hammered or chemically stressed bees are far more susceptible to diseases! As a rule of thumb: If at any time your colonies show evidence of viruses, tracheal mite, or nosema, your acceptable threshold levels must be greatly reduced.
It appears that the best time to do mite control is in winter and spring to nip the exponential growth of mites in the bud. The gist of the European literature supports this, with recommendations to keep mite levels below seasonal thresholds by the use of oxalic acid dribble on the broodless winter cluster, and drone brood removal throughout spring buildup (I’ll cover this in my next article). Colonies are monitored in August to see if they need a summer treatment.
VarroaPop modeling suggests that that the critical time for last-ditch mite treatment is August 15th (DeGrandi-Hoffman & Curry 2005). Waiting until September 15th results in a winter cluster of only half the size (18,000 vs. 35,000 bees). This means that the beekeeper has a very narrow window in which to initiate effective mite treatment! If you delay, your bees will pay. My own treatment records confirm this point—yards that I treat in mid August go into winter strong and healthy. Yards that I delay treatment by a month are puny. You may have to pull off honey supers and treat if you want the colony to survive the winter! California beekeepers, due to lack of pollen in late summer and fall, will likely want to give their colonies pollen supplement in late summer to promote broodrearing, and to “fatten” up their bees after the August treatment.
Rather than thinking of when to apply your last-ditch treatment in late summer, perhaps you should be thinking about the effects of mites hammering your bees earlier in the season—that is, during the buildup and honeyflow. Currie & Gatien (2006) compared honey production in Manitoba between colonies that received spring mite treatment vs. those that didn’t. Colonies with 2% mite infestation in spring (mid April to mid May in Manitoba) produced only half the honey one year, and only 1/37th as much another year, as did those that received treatment! Not only that, but increased mite levels also increase the transmission rate of viruses between bees within a hive, potentially leading to an irreversible epidemic later in the season. It would be wise for the beekeeper to concentrate upon reining in varroa in the springtime.
Diana Sammataro (2002) says: “ Determining a treatment threshold will also depend on your willingness to use a miticide. For example, if you have a low tolerance for colony loss (and are willing to use a miticide) we suggest a threshold of 20 mites per day. If you have a high tolerance for colony loss (and are reluctant to use a miticide), use 100 mites per day as your treatment threshold.” It is unlikely that any commercial beekeeper will intentionally tolerate the kind of loss associated with the higher threshold.
Below are two visual aids to help you make decisions. Table 1 is a compilation of published thresholds by various authorities. Figure 3 shows four different stickyboard count curves from various authorities, ranging from conservative to very liberal. I prefer to give you the information, and to let you make your own decisions as to how to use it.
|
Region |
Authority |
Spring |
Summer |
Fall |
|
General temperate |
Summary of various |
Jar: 1-3 Sticky: 3-5 |
Jar: 4-5 Sticky: 10-25 |
Jar: 5-20 Sticky not recommended |
|
Delaware |
Dewey Caron |
Jar: 30-45 Sticky: 43-60 |
||
|
Georgia |
Keith Delaplane |
Jar: 7-19 Sticky: 59-187 |
||
|
Maine |
Tony Jadczak |
Drones: 20% infested |
||
|
Northeast |
Nick Calderone |
Late summer Jar: 3 |
Early fall Jar: 2 |
|
|
Pennsylvania |
Sammataro, et al |
Sticky: 20-100 |
||
|
Florida |
Jerry Hayes |
Commercial, jar: 2 Hobbyist, jar: 20 |
||
|
Midwest |
Macedo & Ellis |
Jar (broodless): 36 Jar (w/ brood): 9 |
||
|
Washington & Northwest |
Strange & Sheppard |
April Jar: 3 Sticky: 24 |
August Jar: 14 Sticky: 46 |
October Jar: 3 |
|
Michigan |
Zachary Huang |
Sticky: 30 |
||
|
California |
No recommendations. U.C. Davis will be restarting its research program soon. |
|||
|
Various states |
Jar: range of 2 – 15 |
|||
|
Virus threshold |
Sumner & Martin |
Jar: 18 |
Jar: 9 |
|
|
Manitoba |
Currie & Gatien |
Jar: 3 6 = honey loss |
Sept 1st jar: 9 Sticky: 18 |
Oct jar: 30 Sticky: ~50 |
|
England |
Morton, et al |
May sticky: 6 |
July sticky: 16 |
Aug sticky: 33 Sept sticky: 20 |
|
Anton Imdorf |
Switzerland |
Sticky: 3 |
Sticky: 10 Over 30, death |
Sept 1st sticky: 1 |
|
Bieñkowska |
Poland |
June sticky: 6 |
Aug 1st sticky: 10 |
|
|
Table 1. Simplified economic threshold levels for various sampling methods for different geographical regions. Jar numbers have been adjusted for a 300-bee (3/4” in a qt. Mason jar) ether roll or powdered sugar sample—if you use a wash method, multiply the numbers given by half again (x 1.5). Note that the stickyboard values assume 24-hr natural drop from full-strength colonies. Therefore, weak colonies would have lower stickyboard thresholds. E.g., in a half-strength colony, the same level of infestation would yield only about half as many mites. Please refer to your state apiculturist, or the original authors, for detailed recommendations for your area. |
||||
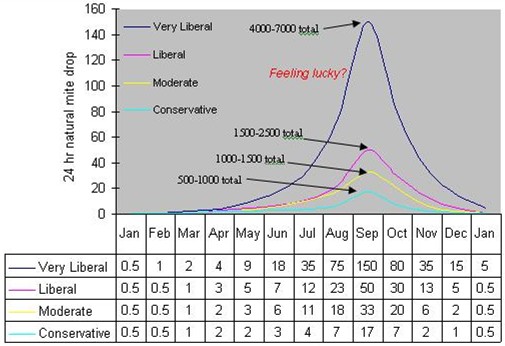
Figure 3. Recommended threshold levels of natural 24-hr mite drop onto sticky boards, ranging from conservative to very liberal as far as allowable mite levels. The dates are for a mid-latitude temperate climate. Note that these curves do not show the total mite population, but rather natural mite drop. I’ve indicated the approximate total mite population relative to the peak drop about the first week of September. The “very liberal” colony could still survive if virus levels stay low. Mite levels above a curve indicate that the colony requires treatment. Data compiled and extrapolated, with liberties, from various researchers.
How do I apply this information?
First thing, we fear the unknown. I see large beekeepers in fear of their livelihood because they don’t know where they stand with varroa. We all need to accept the fact that we now have an extra member of the family—the mite—and it’s here to stay. As a beekeeper, you may understand bees well; you now need to do the same with regard to the varroa mite.
Admit that the only way for the mite to sneak up on you, is if you’re not watching. That’s why we sample—to avoid surprises. The concept to grasp is that varroa populations do not really “explode” (except by robbing of collapsing colonies). The population actually grows steadily, just like compound interest in a bank account. The growth rate is about 2½% per day. Your best strategy is to retard their growth by various methods during spring buildup, to avoid them ever reaching high populations. Sample during buildup to make sure levels are low before you put your honey supers on.
Unchecked, the mite population will double roughly every month during broodrearing. Understand the concept of doubling. If the mite population doubles from 200 to 400 in May, the colony will barely notice; doubling from 400 to 800 in June will start to stress the bees. The July mite population doubles again from 800 to 1600, and now the bees are definitely stressed, honey production is hurt, and viruses start to spread. What you’re most concerned with, is any further doubling once the total mite population passes the 1000 mark (a daily sticky count of around 25, or 4-5 mites in a 300-bee jar sample). Once they pass this level, they appear to explode. If you reach this level in mid August, just before the mite population peaks, no problem. But if you reach it in early July, you’d better pull your honey supers and knock ‘em back!
Come mid August, get mite levels down so that the colony can rear healthy “winter” bees. Then sample again in fall to see if mite reinfestation has taken place. Once the colonies have gone broodless, you can greatly reduce the population of overwintering phoretic mites with powdered sugar dusting or oxalic acid dribble (where it’s legal).
Update 3/15/08
I have found that the quickest, easiest, and most accurate sampling method is the accelerated mite drop with powdered sugar over a dry (no Vaseline) board (easiest if you have screened bottoms). The 1-hour count is quite accurate, the 10-minute count is adequate, and what I currently use.
In light of current virus issues, I’d disregard most threshold values cited above. The current level of viruses in bees will often lead to a colony collapse at a total mite level of only 1000 mites. In general, commercial beekeepers are finding that you must get mite levels down quite low from August 15th on in order to give the bees a good chance at winter survival.
Based upon the fact that mite-tolerant races of bees rarely allow varroa to exceed a 2% infestation, my current recommendation is :
As a general goal, try to keep the mite level below a 1% infestation of adult bee at any time–
24-hr natural sticky fall—about 10 mites
Ether roll or sugar shake of 300 bees— about 3 mites
10-min sugar dust drop—about 5-10 mites
Resources for Information
ATTENTION RESEARCHERS: it would sure help us beekeepers if you would all have pdf links on your homepages to all your publications! Thank you to those of you who already do.
General IPM guides
Calderone, Nicholas Integrated Pest Management Varroa destructor in the Northeastern United States Using Drone Brood Removal and Formic Acid http://www.masterbeekeeper.org/pdf/varroa_drone_removal.pdf
Delaplane, K.S., J.A. Berry, J.A. Skinner, J.P. Parkman, & W.M. Hood. 2005. Integrated pest management against Varroa destructor reduces colony mite levels and delays economic threshold. Journal of Apicultural Research 44(4): 117-122.
Imdorf and Charriere 2006 Alternative Varroa Control (Broken Link!) http://www.alp.admin.ch/themen/00502/00515/00516/index.html?lang=en
Literature Cited
Branco, Manuela R., R. Kidd and Robert S. Pickard 2006 A comparative evaluation of sampling methods for Varroa destructor (Acari: Varroidae) population estimation Apidologie 37: 452-461
Calderone N. W. and Lin S. (2003) Rapid determination of the numbers of Varroa destructor (Acari: Varroidae), a parasitic mite of the honey bee, Apis mellifera L. (Hymenoptera: Apidae), on sticky-board collection devices. Apidologie 34: 11-17.
Charriere, JD, A. imdorf, B. Bachofen, and A. Tschan 2003 The removal of capped drone brood: an effective means of reducing the infestation of varroa in honey bee colonies. Bee World 84 (3): 117-124.
Fakhimzadeh, K 2000 A rapid field and laboratory method to detect Varroa jacobsoni in the honey bee (Apis mellifera) http://www.beekeeping.com/articles/us/detection_varroa.htm
Macedo, P.A. and M.D. Ellis. 2002. Using inert dusts to detect and access Varroa infestations in honey bee colonies. J. Apic. Res. 40(1-2): 3-7.
Ostiguy N, Sammataro D. 2000. A Simplified Technique for Counting Varroa Sticky Boards, Apidologie 31:707-716.
Sammataro D, N Ostiguy & M. Frazier. 2002. How to use a PSU/ IPM Varroa board. Amer. Bee J. 142: 363-366.
Stanimirovic, Jevrosima & Cirkivic 2005 Behavioural defenses of the honey bee ecotype from Sjenica-Pester against Varroa destructor Acto Veterinaria 55 (1): 69-82. (Broken Link!) http://www.doiserbia.nbs.bg.ac.yu/img/DOI/0s567-8315/2005/0567-83150501069S.pdf
Strange, J. P., and W. S. Sheppard. 2001. Treatment thresholds and timing for the control of
Varroa destructor in honey bee colonies in Washington State. J. Econ. Entomol. 94(6): 1324-1331.
Wilkinson, D & G. Smith 2002 Modeling the efficiency of sampling and trapping Varroa destructor in the drone brood of honey bees (Apis mellifera) ABJ March 2002: 209-212


