
Queens For Pennies

March 8, 2014
Queens for Pennies
Originally published in ABJ March 2014
Randy Oliver
ScientificBeekeeping.com
I’ve been encouraged in recent years by the number of beekeepers who appear to be successfully keeping locally-adapted stocks of bees without treatment for varroa. I am a strong supporter of their efforts, and see them as the wave of the future.
But First A Rant
Unfortunately, there is also a great deal of confusion as to what “treatment free” beekeeping really means. Allow me to use an analogy to explain:
Dairymen prefer to keep Holstein cattle. Holsteins are thin-skinned, thoroughly domesticated cattle selected solely for milk production. Their normal care requires shelter, supplemental feeding, routine vaccinations, and treatment with antibiotics. If a dairyman turned his Holsteins out on the range to fend for themselves without care, and half of them died each year, he would be accused of having committed animal neglect—“the failure to provide the basic care required for an animal to thrive.”
Yet this is exactly what thousands of recreational beekeepers do every year. Under the misconception that they are practicing “treatment free” beekeeping, they are in actuality simply neglecting their domesticated animals. The reason for this is that they are starting with commercial package bees—bees akin to Holstein cattle, in that they are bred for high brood and honey production under standard management practices (notably mite management, but also supplemental feeding or antibiotic treatment if indicated). Most commercial bee stocks should be considered as domesticated animals. There is absolutely no reason to expect that your wishful thinking will miraculously transform your newly-purchased “domesticated” bees into hardy survivor stock able to survive as wild animals without standard care and treatment.
Now don’t get me wrong, I am no more criticizing the commercial queen producers than I would criticize the dedicated breeders of Holstein cattle. The queen breeders are producing the best breeds for beekeepers willing to provide their colonies with the “standard” degree of husbandry (which includes at this time, treatment(s) of some sort for varroa). I have no problem whatsoever with that; but my crystal ball says that someday the market will dwindle for bees that require regular treatment for mites.
Do not delude yourself. Allowing domesticated package colonies to die year after year is not in any way, shape, or form a contribution to the breeding of mite-resistant stocks. There is a vast difference between breeding for survivor stock and simply allowing commercial bees to die from neglect! By introducing commercial bees year after year into an area, and then allowing those package colonies to first produce drones and then to later die from varroa, these well-meaning but misguided beekeepers screw up any evolutionary progress that the local feral populations might be making towards developing natural resistance to varroa. Not only that, but those collapsing “mite bombs” create problems for your neighbors. Referring to yourself as a bee-keeper confers upon you a responsibility to the local beekeeping community. Allowing hives to collapse from AFB or varroa makes you a disease-spreading nuisance!
Update April 15, 2014: I’ve received a great deal of positive feedback from experienced beekeepers who have been frustrated by all the well-intentioned, but sadly misguided, feel-good dreamers who don’t understand the difference between working with nature to promote varroa-resistant bee stocks, versus neglecting livestock that you have taken under your care. I like Rusty Burlew’s blog ““Let the bees be bees” Really?”
A Solution
Enough scolding. I strongly support those willing to actually practice selective breeding for treatment-free (or minimal treatment) locally-adapted stocks of bees. But let me be frank (try to stop me); if you start your hive with commercial stock, then by all means care for them as domesticated animals! If you want to go treatment free, then start with survivor stock bred to be naturally resistant to mites and viruses, such as VSH, Russian, or locally-adapted ferals. Do not kid yourself into thinking that allowing innocent domesticated bees to die a slow and ugly death is the same thing as breeding for survivor stock—“breeding” instead means the propagation of bees that don’t die [1]—the key word being propagation. And this is a frustration for many well-intentioned beginners—no one in their area is propagating survivor stock for sale. That is why I wrote this article.
To me, it is a crime against nature not to breed daughters from that fantastic survivor colony. But most beekeepers think that it is beyond their scope of ability to raise queens. Nonsense! Let me show you how to raise about 10 queens at a time for pennies apiece. This is not the way we do it commercially, but this method can be easily practiced by most anyone.
A Simple Method
I’m going show you step by step how to raise about 10 queen cells in a simple queenless cell builder. Here’s a list of everything that you’ll need:
- A chosen breeder queen hive.
- A strong, healthy donor colony from which to make the cell builder hive.
- An empty brood box with a bottom board and cover to use for the cell builder hive.
- If there is no nectar flow occurring, a syrup feeder.
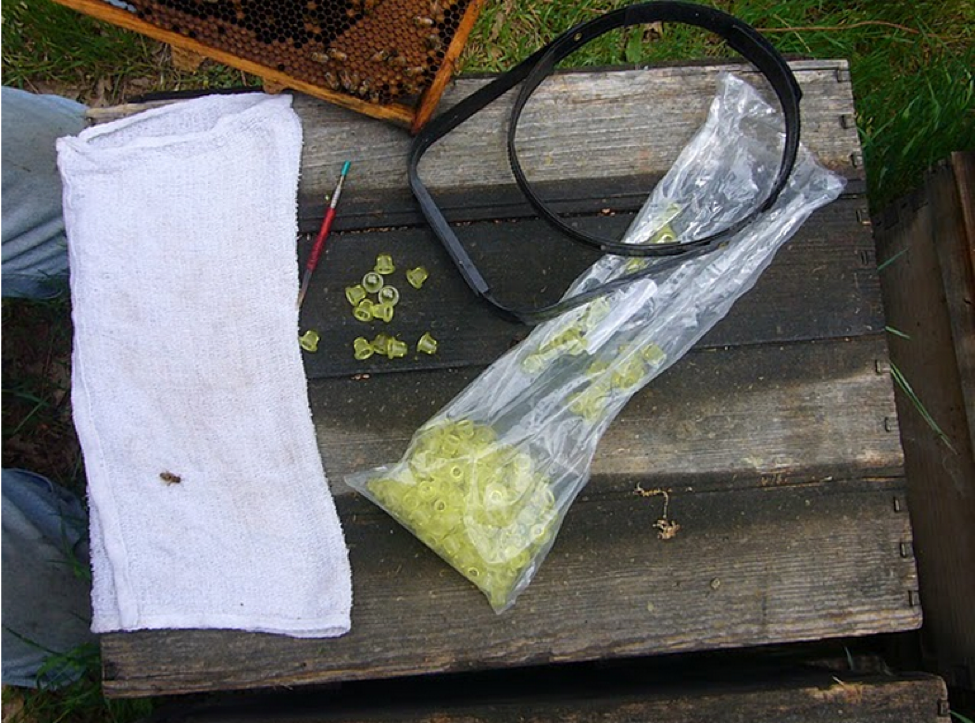
- If you’re over 40, a lighted magnifying headband [2].
- A few Chinese grafting tools [3].
- JZ’s BZ’s plastic cell cups [4].
- A damp towel
- Any sort of nuc boxes or divided hive bodies in which to mate out the queens.
Timing: It’s easiest, and you’ll get the best queens, by raising them during swarming season. Look for when your colonies start building queen cells on the bottom bars, or when they are full of emerged drones.
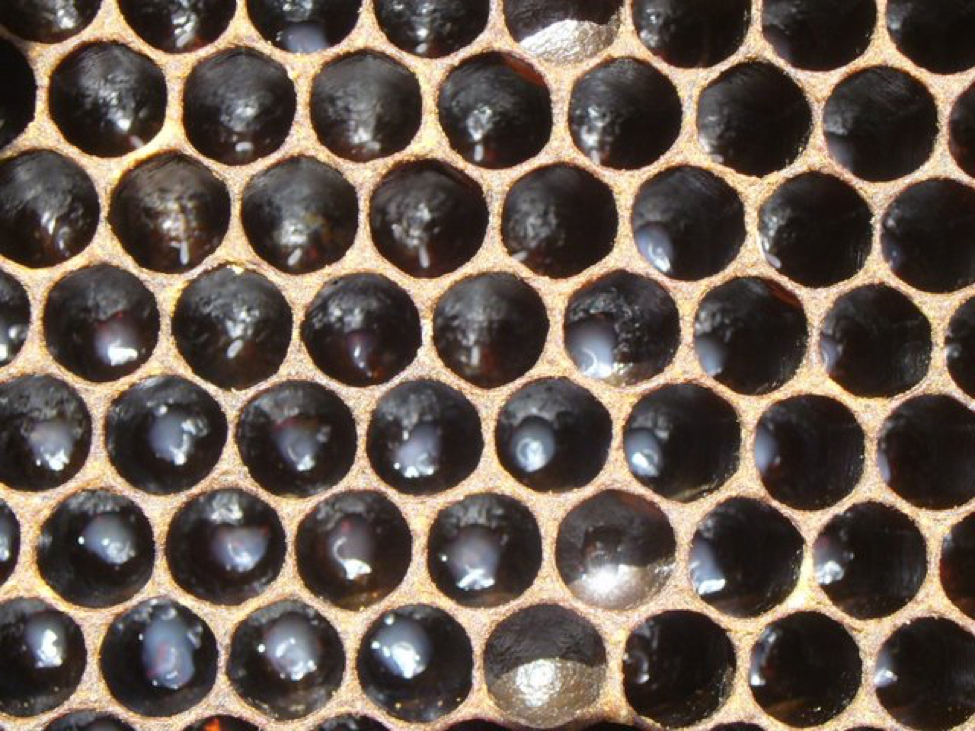
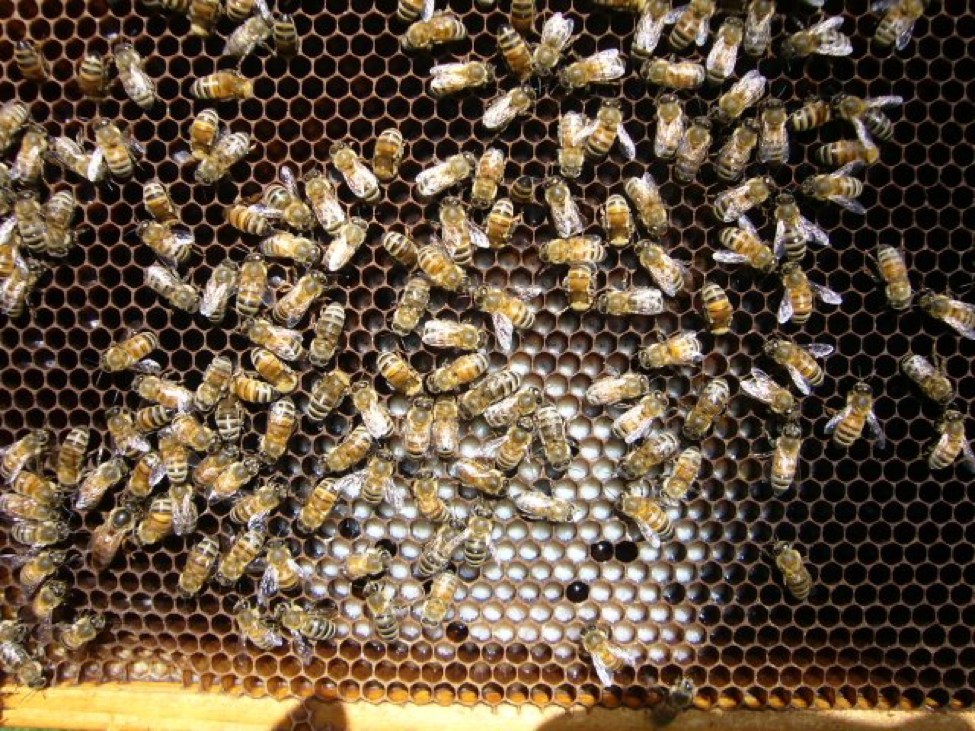
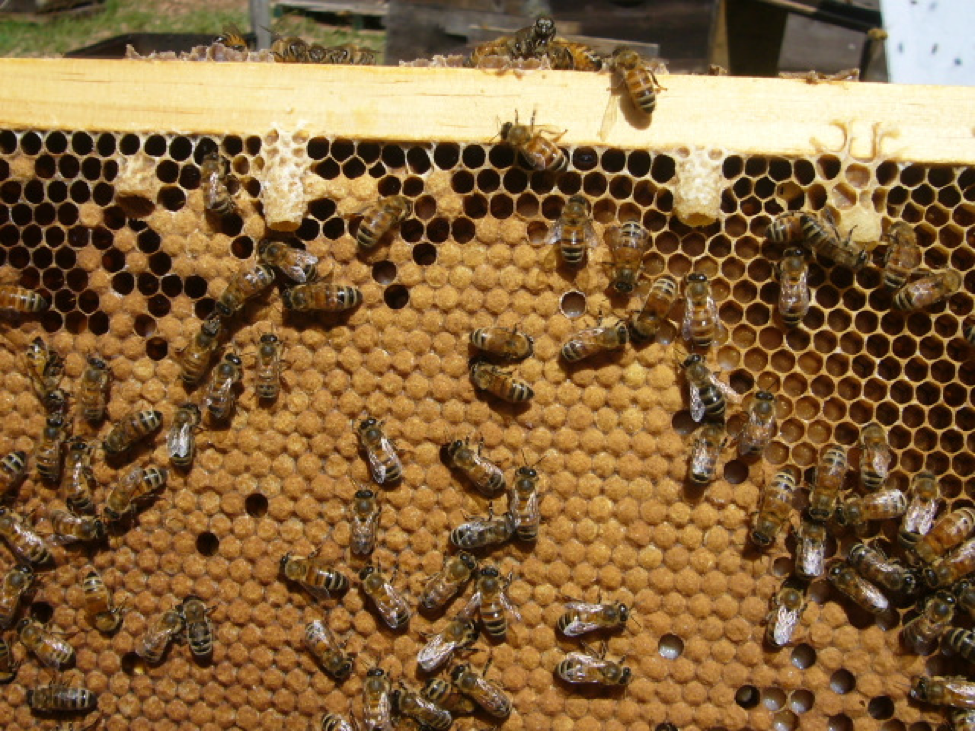
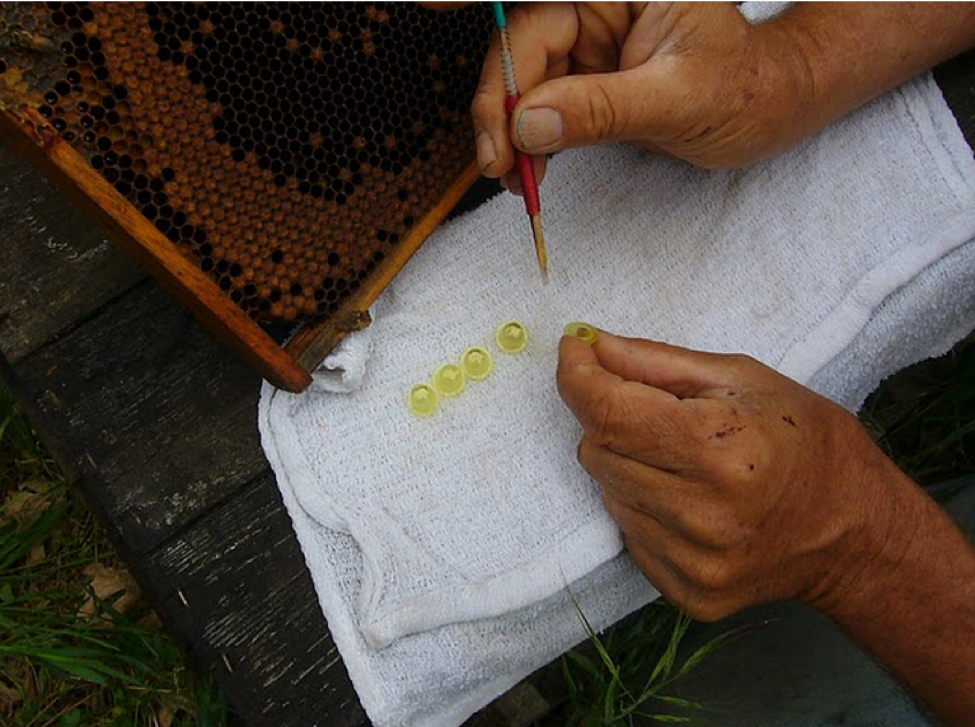
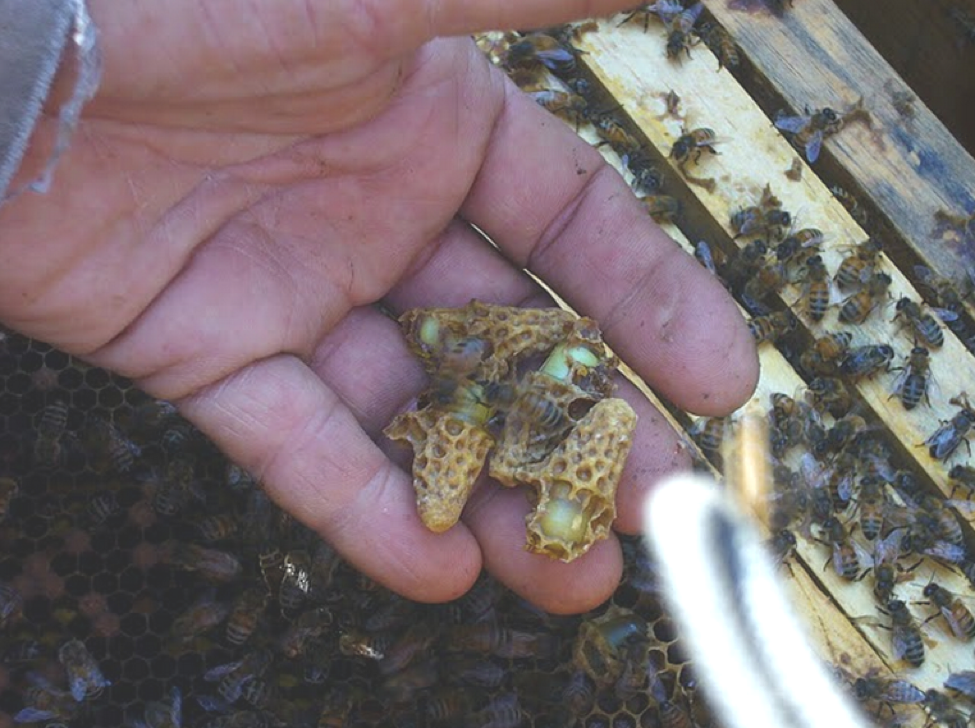
Day 0—Locate the future queen larvae: Before you start setting up the cell builder, first make sure that you can find larvae of the right age from your chosen breeder queen [5]. Go into her colony and make sure that there’s an older, dark frame containing well-fed freshly-hatched larvae [6]. Mark this frame for later recovery and put it back into the hive. You want to graft from the youngest larvae possible—when they are still the size of an egg, and just starting to curl (as in the photo above).
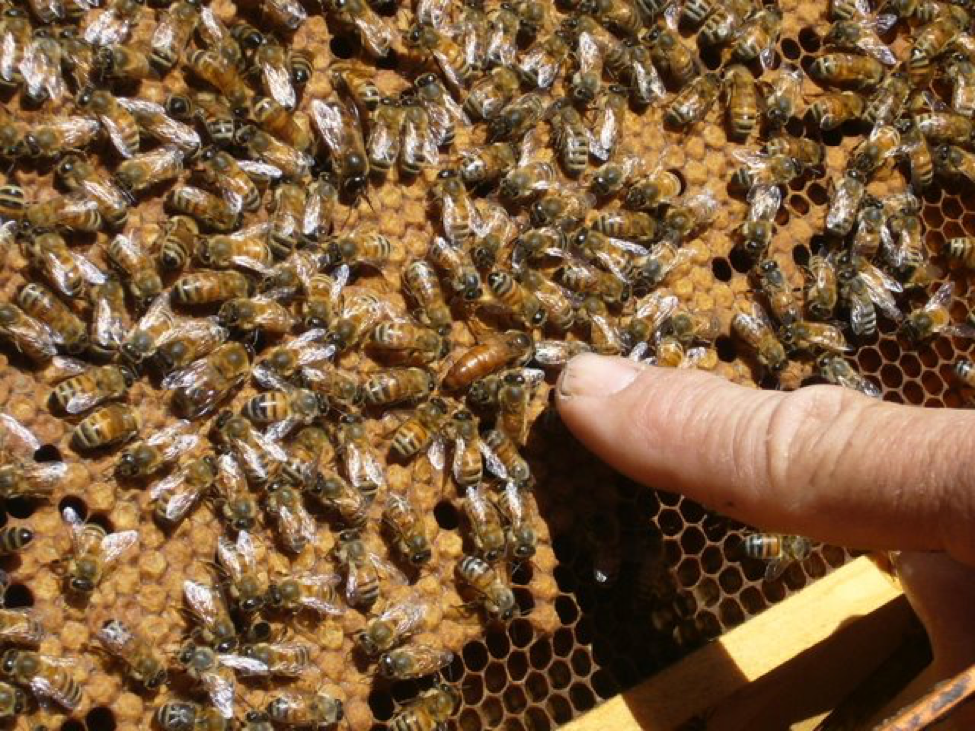
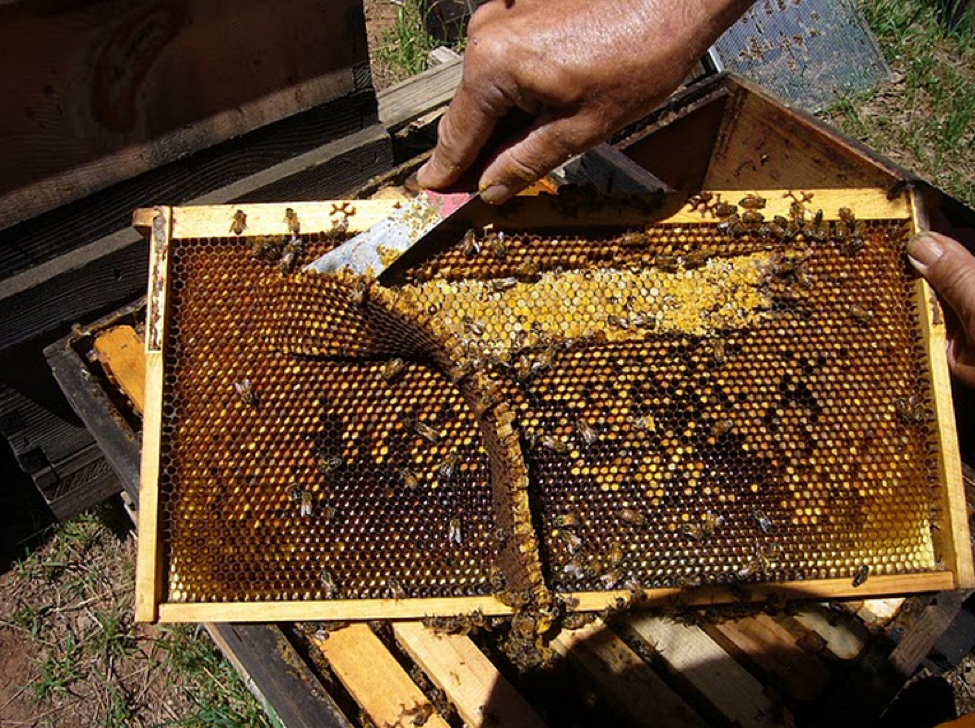
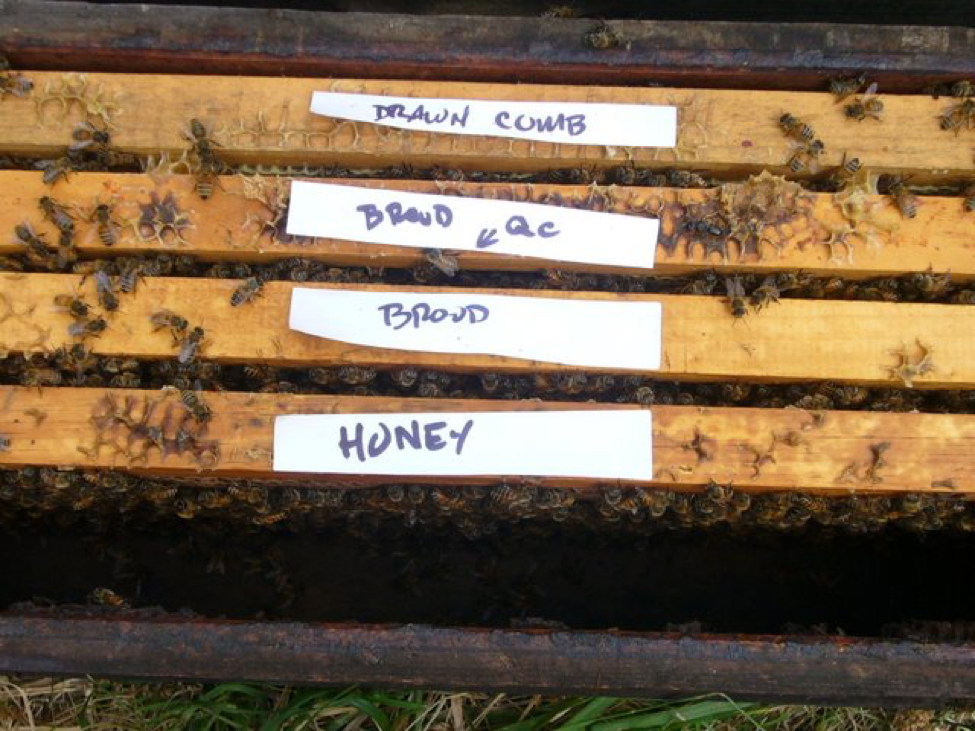
Choose a donor colony: This is the colony (or colonies) from which you will steal nurse bees to make up your cell builder [7]. It must be healthy, full of brood, and the larvae should be well fed with jelly as an indicator of the nurses being in a good state of nutrition [8]. Locate the queen of your donor colony and temporarily set her and the frame she’s on aside in a nuc box for safekeeping [9].
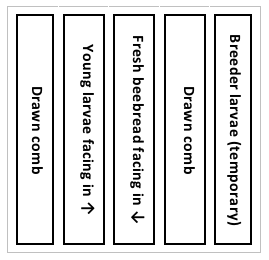
A comb of open larvae: Start with a comb containing some open brood and eggs . This will be the core of the cell builder, around which the nurse bees will cluster. You don’t want a solid frame of young brood competing with the queen cells for feeding—just a patch of young larvae emerging over the next few days to stimulate the nurse bees to produce an abundance of royal jelly. The rest of the frame can be sealed brood, beebread, or whatever.
Cut a channel the width of a hive tool: parallel to the top bar, at least midway up the frame, in either the pollen frame or open brood frame as shown. Scrape out the comb right down to the foundation [11].
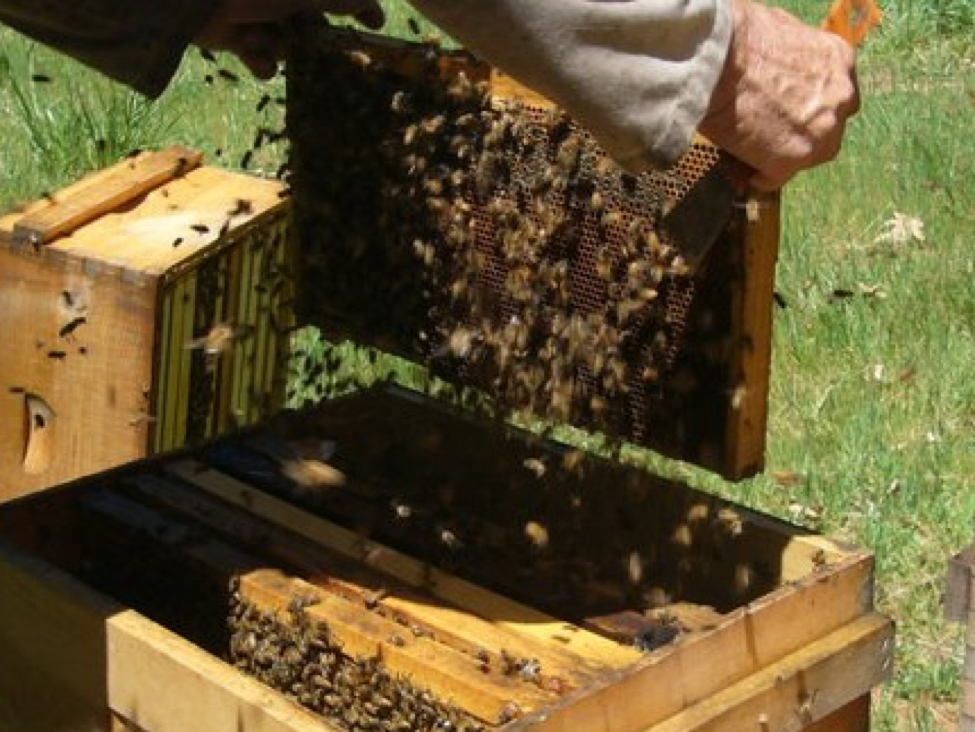
Add the nurse bees: Now shake all the bees from all the frames of the donor hive (other than the one that the queen was on) into the cell builder hive [12]. The older bees will quickly fly back to the donor hive [13], leaving your cell builder full of young nurse bees. You have now created a free-flying queenless cell builder colony. At this time you can temporarily add the frame of larvae to be grafted [14].
As you were shaking bees, if there was nectar shaking from the combs, the bees do not need to be fed. If not, then lightly drench all the bees with 1:1 syrup and add a quart of syrup in a top feeder jar. Put a cover on the cell builder and check back in an hour.
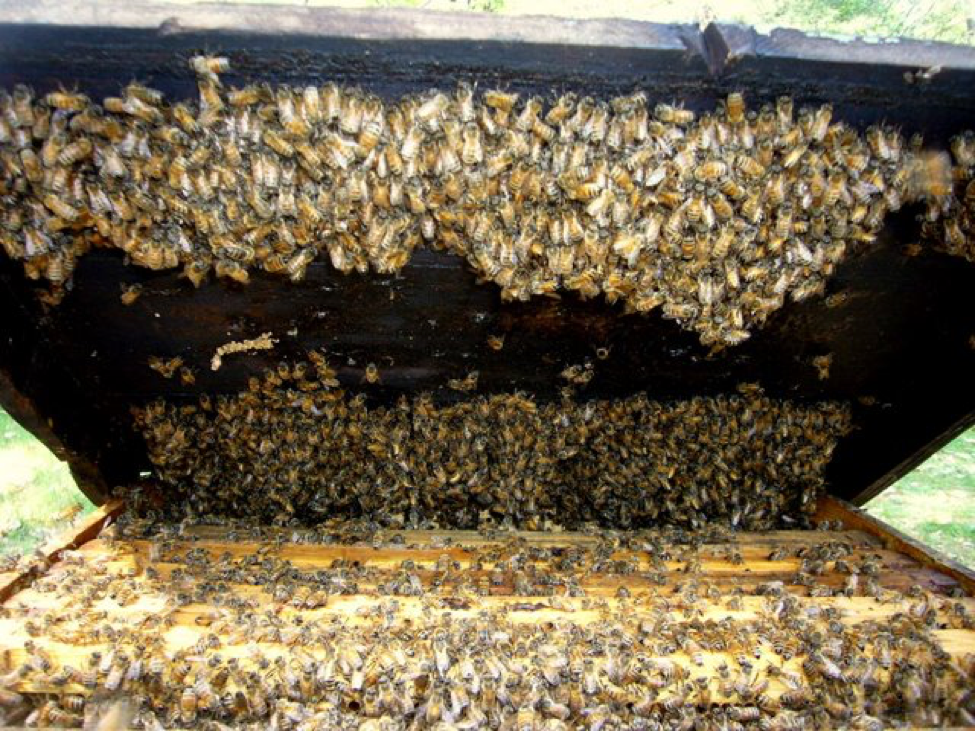
One-hour check back for strength: After an hour, your cell builder should look like this—bees covering the frames and hanging from the lid. If there are not this many bees, then shake additional bees (through a sieve box) off of brood combs from other donor colonies. A strong starter like this can rear up to 50 queen cells, even in a snowstorm [15].
Now wait a few to several hours. It takes a few hours for the bees to recognize that they are queenless, and to be ready to start building emergency queen cells. What you are going to now do is to give them chosen larvae from which to rear those cells.
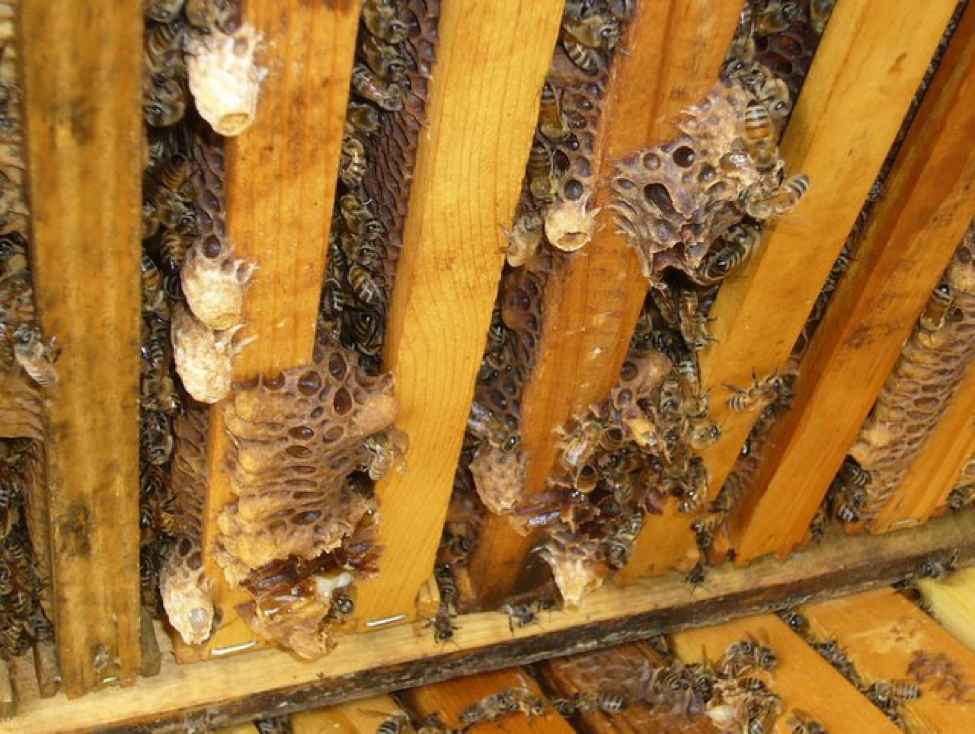
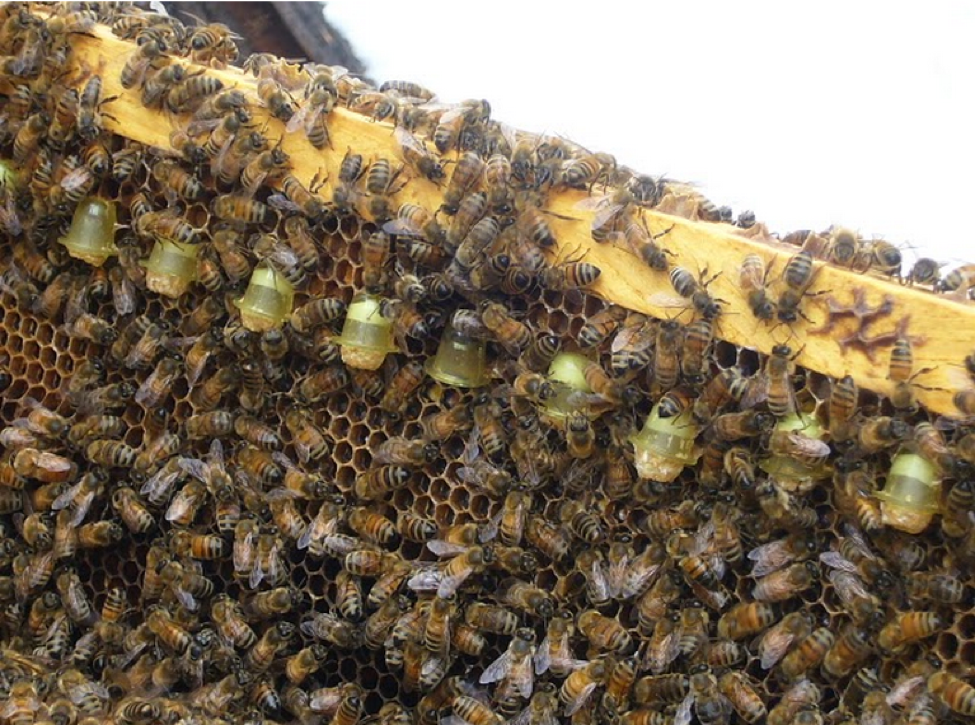
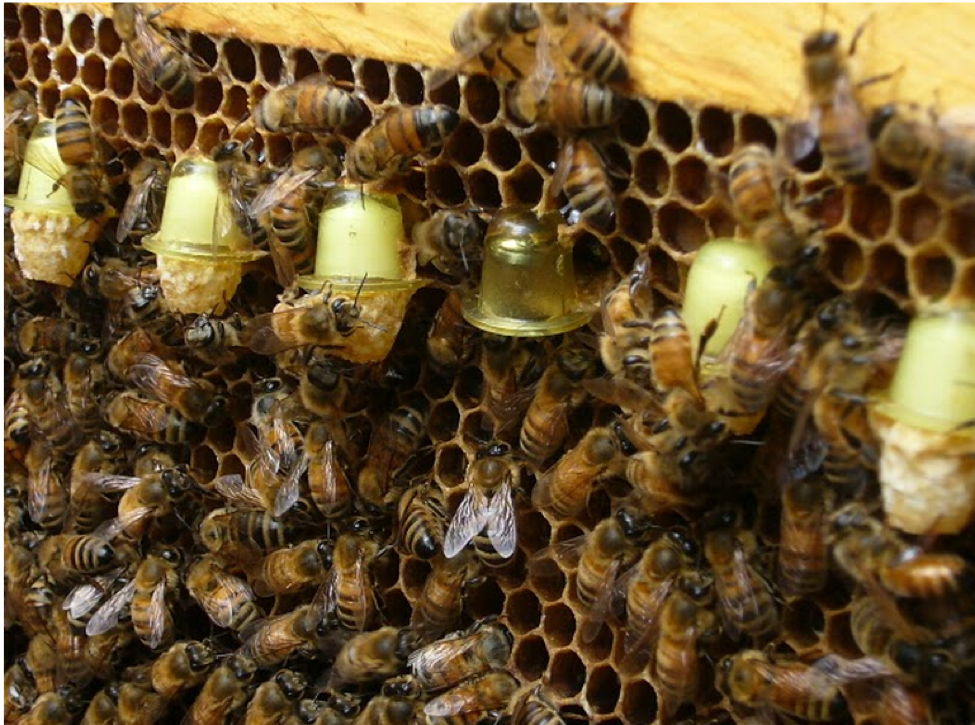
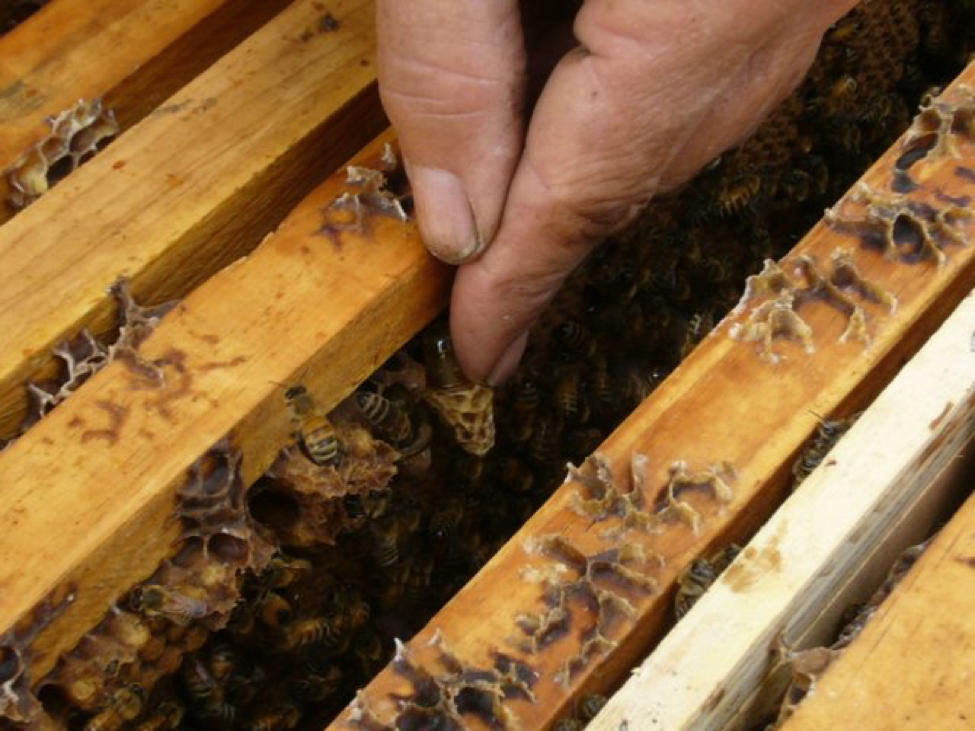
I got the idea for this method from observing my bees building queen cells as in the photo above. It occurred to me that we could duplicate the process with prepared queen cups, thus avoiding the need for the recreational beekeeper to use cell bars to hold the queen cells (commercial guys typically put about 50 grafted cells distributed on 3 cell bars into a special frame).
Down to the nitty gritty—grafting. Yes, I said “grafting.” Don’t have a heart attack–if you are manually adept enough to trim your nose hair, you can use a Chinese grafting tool!
Cell cups: bees love JZ’s BZ’s cell cups, and they eliminate the chance of using contaminated wax. Try ‘em!
A damp towel: To keep the grafted larvae from drying out.
Magnifying head lamp: If you’re over 40, use it! Big tip: graft in a completely dark room (give your eyes a few minutes to adjust). It is a hundred times easier to see what you’re doing. Get a comfortable chair and a table in front of you. Tip up a stand (like a hive cover) to angle the grafting frame perpendicular to your line of sight.
The grafting frame: Now go pull the grafting frame of breeder larvae from the cell builder. At this point, all the old bees should have flown home, so any bees remaining in the cell builder should be gentle as pussycats; so don’t use any smoke–you don’t want to disturb the bees now that they’ve rearranged themselves. Gently brush the bees from the frame (don’t shake it [16]), and wrap it in a damp towel to keep the larvae from drying. Go to the darkroom, set the frame up in front of you, put on your magnifier, turn on the headlamp, and grab your Chinese grafting tool. Take a deep breath and relax.
How to use the Chinese grafting tool: I drew some pictures below. Moisten the blade of the tool; if you’ve used it previously, it will likely be stuck to the plunger. Most graftpersons just lick the tool to keep it clean [17]. Read the instructions below. Practice on a few larger larvae until you get the hang of it. You will see that some of the larvae on the frame have been given extra jelly—these are the ones that you want to graft (since they’ve already been chosen by the bees). The extra jelly makes grafting really easy. With a bit of practice, you’ll be able to transfer a larva in a couple of seconds.
| Step 1: Quickly slide the tool straight down the cell wall so that the blade approaches the larva from the outside of its body curve. Do not push down on the plunger at this time. | Step 2. The blade will follow the curve on the rounded bottom of the cell and scoot under the jelly without disturbing the larva. | Step 3. Now pull the tool straight up. The jelly (and larva) will stick like glue to the blade. | Step 4. Hold a plastic cell cup in the fingers of your other hand. Push the tool down into the center of the cup until the blade is slightly bent. Now you push down on the plunger with your index finger to push the jelly (and undisturbed larva) off into the cell cup. With practice, you’ll pull up slightly on the tool at the same time. Easy! |
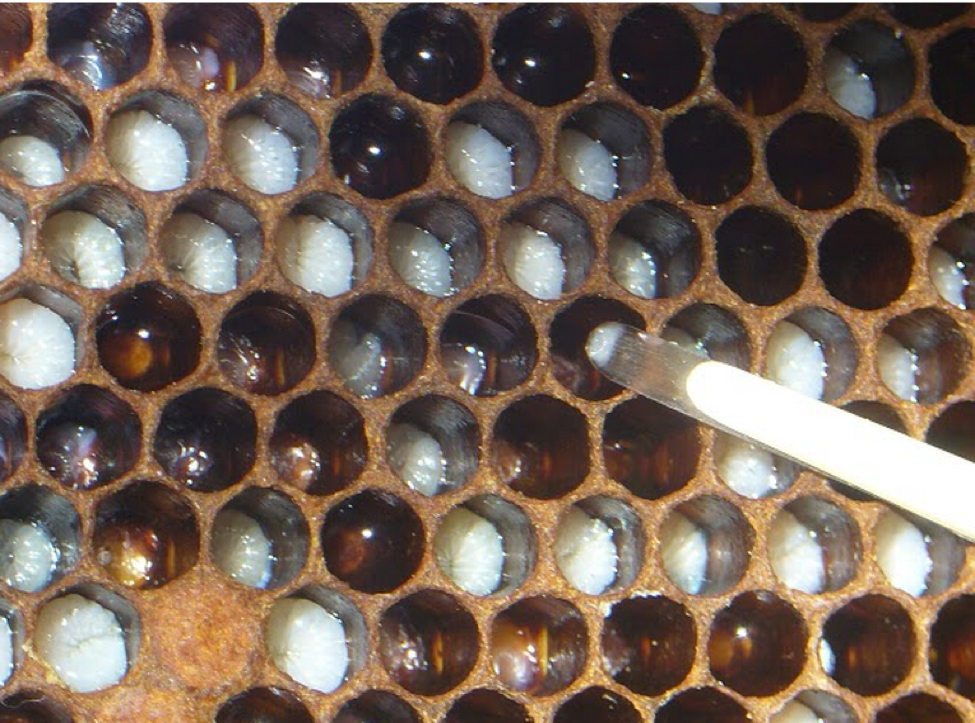
This is what it looks like: Here’s a photo of a larva and jelly on the end of a grafting tool. In this frame, I used the “hunt” method to search for larvae of the right age. If you hold a breeder queen in a small colony to keep her from swarming, she will put eggs into any available empty cell, and the larval ages will be scattered.

Grafting in the field: In this photo I’m showing off to a class, demonstrating how one can graft (if necessary) out in daylight; but it’s much easier in the dark.
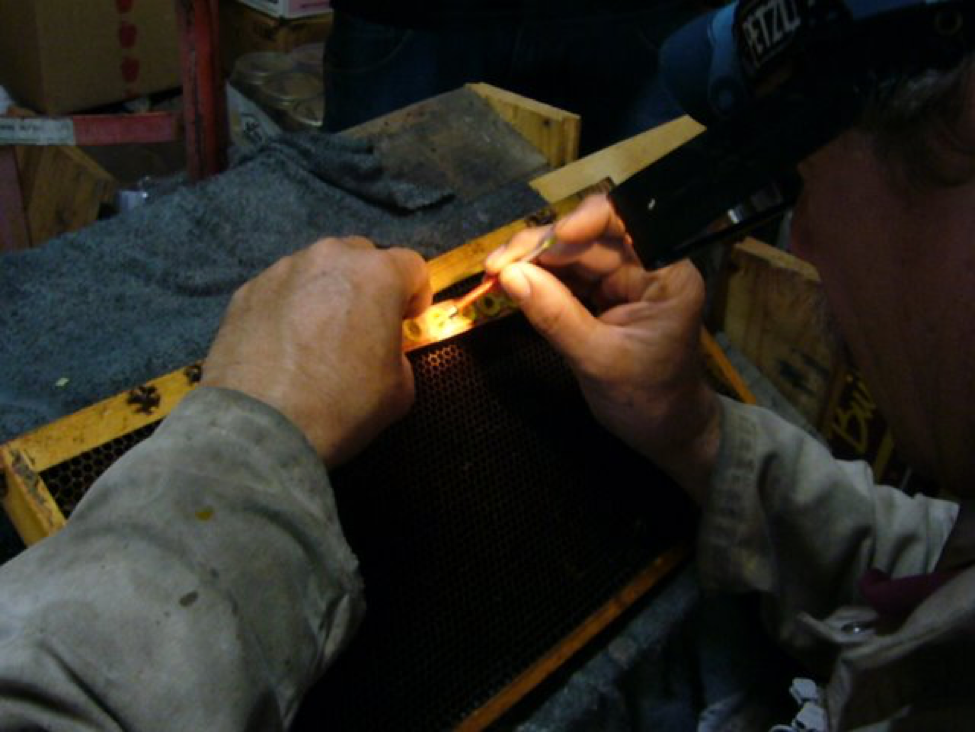
This is better! In this photo I’m using a headlamp in a dark room while I graft into a cell bar. Note that sterile technique is not necessary.
Don’t let them dry out! Place the cups face down on a damp towel after you graft each one. This keeps the larvae from drying out.
Push the grafted cells into the top of the channel. Now pull the frame in which you scraped the channel out of the cell builder, and gently push the grafted cells into the comb—they will stick to the warm wax (the cup openings must face downward). Space the cell cups as close as ¾” on center. The channel allows the nurse bees access around the open end of the cup in order to build the queen cell.
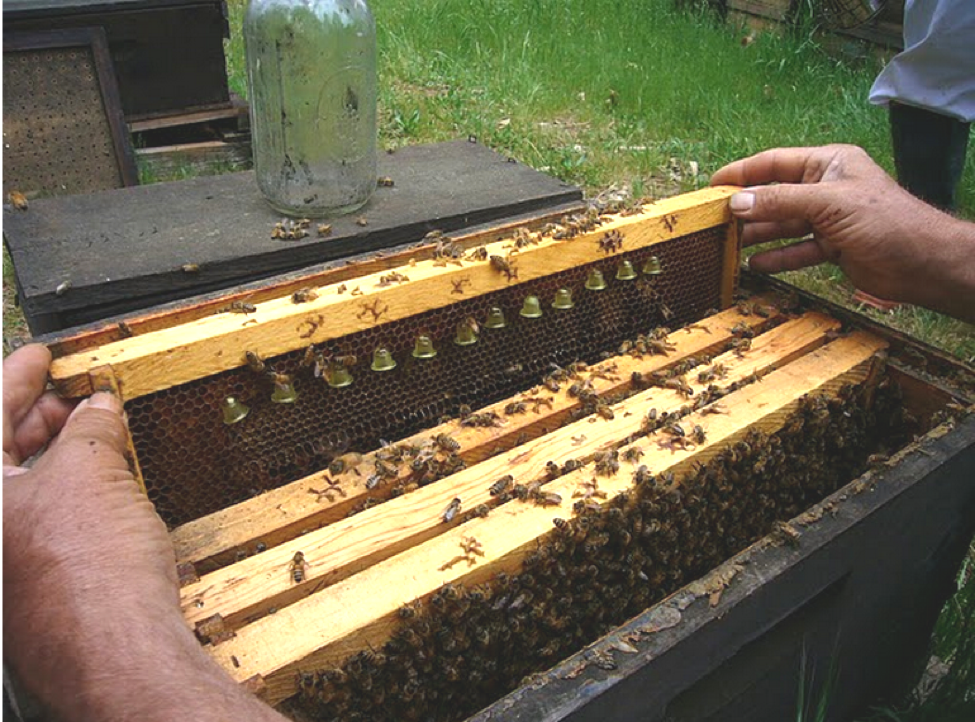
Put them back into the cell builder: Now put the frame with the cell cups back into the cell builder; if the cups are on the pollen frame, face them toward the frame of open brood (or vice versa). Replace the lid and put on a syrup feeder if there is no nectar flow. Allow the bees to fly freely out the entrance (use a robbing reducer if indicated).
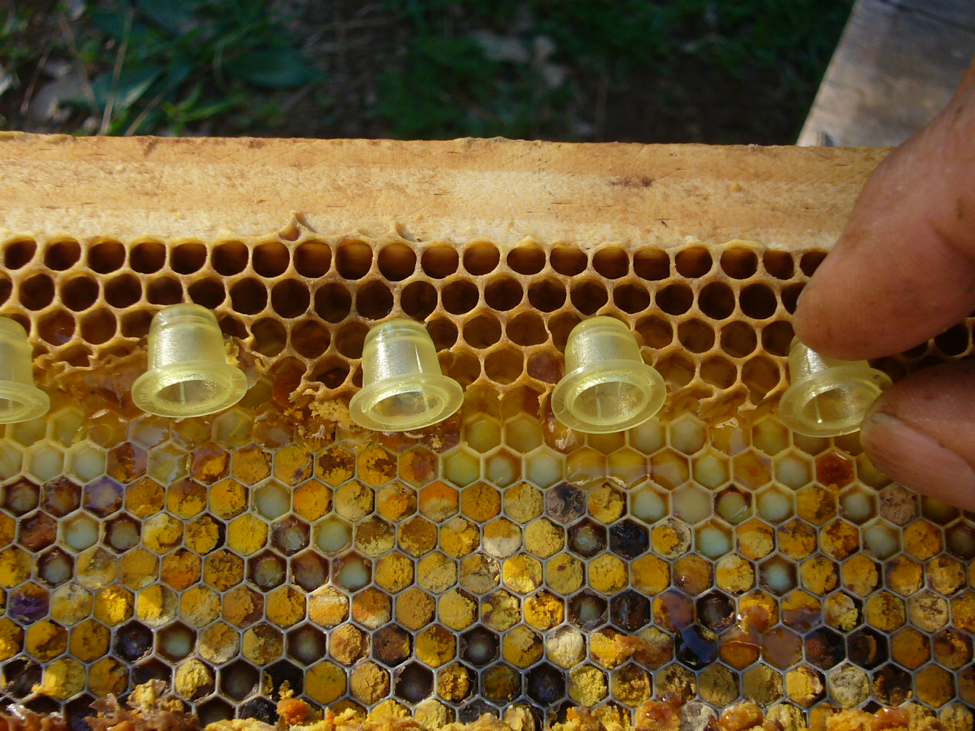
Allow the bees to build the cells: You really don’t need to open the cell builder for another 11-12 days, but you’ll probably be curious. It’s OK to inspect progress [18]. Again, you shouldn’t need to use any smoke. Here’s what the cells will look like after 24 hours—half full of jelly with a bit of cell wall built. If there is no nectar flow, you should feed the colony with a cup or so of 1:1 syrup each day—you don’t want to overfeed, or the bees will build comb between the queen cells.
Two days later: The cells should be full of jelly, and the queen cells well drawn. The cell in the middle didn’t take. Note that most of the feeding of a queen larva occurs in the first 2-3 days.
Top monitoring: With the clear plastic cell cups you can monitor success by simply looking down from the top. If the cell is full of white jelly, there is a larva being fed.

Now how hard was that? By about Day 4 after grafting, the bees will have completed feeding the larvae, and will cap the cells. Obviously, optimal nutrition is critical for the cell builder for the first days! The queens will typically emerge on Day 11 or 12 after grafting.
Day 9 – 10—make up your mating nucs: I usually make up queenless mating nucs on Day 9 after grafting, usually with 4 frames in a 5-frame nuc box (add another frame of foundation if there is a flow on). For best acceptance, allow the nucs sit for a day or two before inserting a queen cell. I rarely feed my nucs.
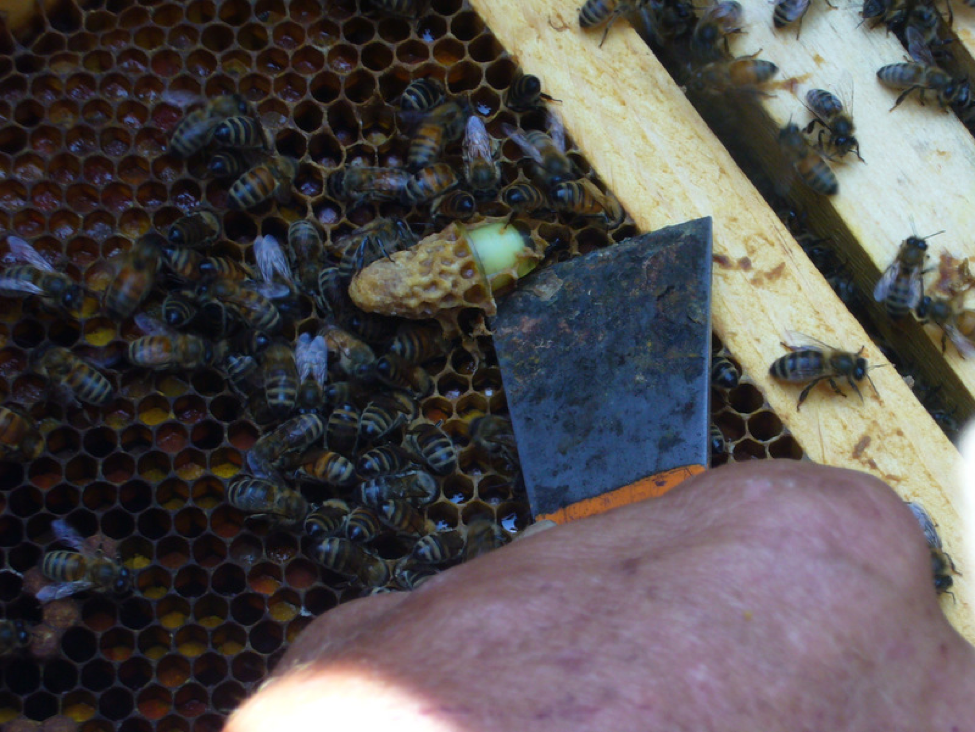
Day 10 – 12: Pry out the ripe cells with your hive tool, being careful to only touch the plastic cup! Well-fed ripe queen cells should have plenty of uneaten jelly visible in the plastic cup.
Handle these precious cells gently: Keep the cells at body temperature, and don’t drop or jar them.
Insert the ripe cells into nucs: Spread the two brood frames in the nuc slightly and push the cell gently into the comb, cup end up. Press only on the plastic cup [19]. In cold weather, make sure that the cell is hanging over brood, so that the bees will keep it warm. Pry the frames back together.
Two weeks later—check for mate out: (Up to three weeks if there wasn’t good mating weather). In good flight weather the queens will emerge, mate, and then start laying eggs anywhere from 8-12 days after putting in a ripe queen cell. Look for where the bees have prepared a cleaned brood area— if you’ve got a laying queen, there will be evenly laid eggs in every cell. This is my favorite part of beekeeping—every beautiful new queen is like a daughter to me! Typically, about 4 out of 5 have successfully mated out, so I then take the frames from the dinks and use them to make up the missing frame in the successful nucs.
Now share them! There are pockets of mite-resistant survivor bees naturally evolving in feral populations all over the country. These are an invaluable resource; we need to propagate them! This can be done most effectively away from areas with a large influx of “domesticated” bees, creating an opportunity for the recreational beekeepers of local clubs to work together with each other and with nature to facilitate this natural evolutionary process. I will write more about this subject in the future, but for now, if you have a hive that has indeed survived in good health without mite treatment for more than two seasons, PLEASE raise queens from that bloodline and sell or share them around your local beekeeping community!
More photos and details on the Web: In the interest of space, I kept this article minimally short and sweet. I’ve posted a more expanded, downloadable Powerpoint version, with more details, and the photos at full size to Queens for Pennies .
For sideliners wishing to rear a greater number of queens at a time, see Small Scale Queenrearing.
Footnotes, Tips, and Tricks
1 A colony that has not survived for at least 2 years in good health, without treatment, cannot be considered to be “survivor stock.”
2 Jeweler’s 2.0x headband magnifier Models change regularly—I use an older unlighted one with a backpacker’s headlamp strapped to the headband. You want to be able to focus the light directly into the cell from which you are grafting. I recently tested several models available from Amazon and was quite pleased with the:
Carson Pro Series MagniVisor Deluxe Head-Worn LED Lighted Magnifier with 4 Different Lenses (1.5x, 2x, 2.5x, 3x) (CP-60)
This magnifier costs a bit more, but is comfortable, easily adjustable, has a bright adjustable lamp that runs on AAA batteries, and comes with 4 lenses. The focal length of the 2.0x lens is about 6 inches, meaning that you’ll hold your eyes about 7″ from the grafting frame.
3 There is lots of variation between even those from the same manufacturer, so get more than one; plus you may damage your first in learning to use it. I prefer those with a bamboo plunger, e.g., Mann Lake HD-390). You can use other tools, but I find the Chinese style to be the easiest and quickest once you get the hang of it.
4 E.g., Dadant M00663; Mann Lake QC400
5 A trick is to place a clean, dark drawn comb into the center of your breeder queen colony 4 or 5 days before Day 0. Four days later, it will be full of larvae the right age for grafting.
6 Do not try to graft from a frame that is not darkened from several generations of brood—otherwise the bottoms of the cells will not be rounded enough for the use of a Chinese grafting tool.
7 This can be your breeder colony if you wish. There may actually be an advantage to using nurse bees from the breeder colony, in order to pass on the best gut flora, immune factors, and epigenetic regulators to the queens that you are about to rear.
8 You can feed this colony in advance to prepare it.
9 Believe me, putting her frame aside in a nuc box really helps in keeping track of her! If you have trouble spotting queens, then do this (you can do the previous day):
How to harvest queenless nurse bees without ever spotting the queen: Move the donor colony to the side, and put a bottom board and empty hive body down in its place. From the donor colony, put a couple of frames of brood into the center of the hive body, and then fill it out with drawn comb and honey. Then place another empty box on top to act as a funnel. Shake all the bees off the remaining combs into the “funnel.” When you’re done shaking, gently brush the bees down off the sides of the funnel box, using very gentle smoke wafted above them to guide them. The point of this is to make sure that you’ve gotten the queen into the bottom box.
Once you’ve got all the bees into the bottom box, then put a queen excluder over it, and stack the rest of the combs back over it. The nurse bees will quickly move up through the excluder to cover the brood. In an hour, it will be easy to harvest queenless nurse bees from the upper boxes, and the older bees will return to the lower box to take care of the queen and brood. After harvesting the nurse bees, you can add the combs to other hives.
10 This arrangement is for a basic cell starter. The number of frames is not critical—all that you need is some young brood to stimulate jelly production in the nurses, beebread for them to eat, and empty comb in which they can store incoming nectar.
11 If you’re using wax foundation or foundationless combs, just figure it out! You can place the scraped beebread back on the top bars and the bees will readily consume it.
12 If you have any reason to suspect that there may be a second queen (or virgin) in the donor hive, shake the bees through a “sieve box”—a medium super with a queen excluder screwed to the bottom. It happens!
13 Return the queen to the donor hive. The donor hive will now consist of only a couple of frames of brood and older bees, and will lose any swarm impulse. If you use your breeder hive as the donor, this will keep you from losing your breeder queen to a swarm.
14 This is not necessary, but adding the larvae to be grafted at this time is a trick I use to get a jump on the queen differentiation process. While you leave the bees to recognize their queenlessness, they will start preferentially feeding some young larvae extra jelly in preparation for making them into emergency queens. When you later pull this frame for grafting, you can then use the larvae that the bees have already chosen and started to prepare as royalty.
15 In order to raise only 10 cells, the cell builder could actually be considerably weaker. But no matter, since you can later leave one queen cell in the cell builder to create a kick-ass nuc.
16 Shaking the frame will shift the larvae to the sides of the cells and make grafting more difficult.
17 You’ll wind up eating plenty of royal jelly, so forewarn your spouse, in case it has an aphrodisiacal effect on you.
18 It’s also a good idea to check the brood frame for any volunteer cells, which could theoretically emerge prior to your cells and kill them. Cut out any volunteer cells.
19 Do this bare handed or wearing thin latex gloves. Do not try while wearing clumbsy leather gloves.


