
The Learning Curve – Part 3: The Natural Miticides

February 20, 2011
The Learning Curve: Part 3
Randy Oliver
ScientificBeekeeping.com
First Published in ABJ in July 2009
I added a number of updates on May 2015, marking 15 years of successful commercial beekeeping in my operation without the use of synthetic miticides.
“It is not the strongest of the species that survives, nor the most intelligent that survives. It is the one that is the most adaptable to change”—Charles Darwin. And changes have been the name of the game lately. The varroa mite has clearly demonstrated its adaptability to change—now it’s time for beekeepers to do the same.
I hear that the betting has been on for how long I could keep doing research and pumping out articles while concurrently run a beekeeping business. Last month the answer was clear—the intensity of the swarm impulse consumed my time—there simply weren’t enough hours in the day! It is so easy to think that one can continue doing things the same way (such as writing yet another dang article), but in reality we must be ready to adapt to circumstances to survive.
In the beekeeping community, there is often “disagreement” (I’ll use a gentle term) between commercial and small beekeepers about best management practices. In general, commercial beekeepers follow the Big Ag model of cost-effective chemotherapy and semi feedlot methods, whereas small beekeepers often experiment with labor-intensive “alternative” techniques. Some on each side are judgmental, and either finger-wagging or dismissive. I personally follow the philosophy of the Reverend Billy C Wirtz: “Never criticize a man until you’ve walked a mile in his shoes. That way, you’ve got a mile head start, plus you’ve got his shoes.”
Seriously, there is a continuum of successful beekeeping methods, and there is no one particular brush with which to paint all operations. The key words are change and adaptation. Allow me to quote from a Farm Bureau interview with California wine grape grower Steve McIntyre:
“I see farming as a self-correcting discipline. We aren’t always going to be farming the way we are doing now. It is already a lot different than it was when my dad was farming and when I started farming. But even with that, there is a lot of room for new innovations.”
“I look at farming like I do science. If something comes along organically that becomes a best management practice, like composting for example, it eventually gets adopted into conventional farming, if you have any experience at all.”
Steve feels that there are too many “rules” in strict organic or biodynamic farming, and that you get stuck in a “box.” Although he is proud to use “sustainable” farming practices, he uses the latest and best science to farm successfully.
The reason that I included his views, is that the same appears to happen in beekeeping—commercial beekeepers are incredibly innovative at coming up with cost-effective methods for keeping healthy colonies, whereas hobbyists and sideliners tend to disdain chemical treatments, in favor of more “natural” methods. However, the ideal would be to keep an open mind, and utilize the best for your particular operation.
In general, there is a flow of innovation from both groups, and beekeeping as a whole evolves. Yesterday’s “alternative” or “off the wall” methods may well be the norm tomorrow. However, any change must generally overcome the inertia of resistance, following the axiom that “any new technology must be ten times as good as the thing it seeks to replace.”
I’m seeing a tremendous dynamism currently as we start to get serious about alternative methods of varroa management. Many beekeepers are eschewing synthetic miticides, or at least experimenting with alternate methods, should the available miticides fail. Varroa management is a work in progress, as we slowly develop mite-adapted bee stocks, which are clearly the long-term goal.
In my last article I spoke about the problems of comb contamination from miticides and pesticides. Therefore, I’ll continue this status report on the state of varroa management with a review of the alternatives to the synthetic miticides. These are sometimes called “soft” treatments, but in reality there is nothing soft about them for the bees. I’d rather call them “natural” miticides, since they are naturally found in bee colonies, and don’t tend to leave persistent residues in the combs.
The “Natural” Miticides
Oxalic Acid
Update May 2015: After 15 years’ worth of experience, we love the oxalic dribble. We now use it at two times of the year–in the spring when we make nucs (Simple early treatment of nucs), and in late fall at the initiation of the brood break (or the least amount of brood for the season). It can also be used during an “induced” brood break–see Oxalic dribble tips
(Please refer to Oxalic Acid: Questions, Answers, and More Questions for my original article on oxalic acid.)
Varroa mites have been found to be far more susceptible to acids than are honey bees. Of the organic acids, formic, lactic, and oxalic can be used as “natural” treatments in the hive, as they are all naturally found in honey. Lactic acid is used to some extent in Europe, but oxalic acid, due to its greater “activity” (dissociation constant) is used extensively worldwide (reviewed by Rademacher 2006, Nanetti 2003, Oliver 2006).
Oxalic acid is a two-edged sword, and can cut both the mites and the bees. The trick is to apply just enough to kill an adequate percentage of mites, while doing minimal damage to the bees. Don’t use oxalic if following directions accurately is not your forte!
The positive side of oxalic is that it is extremely cheap (pennies per treatment), easy and safe to apply, very effective against mites, and leaves no appreciable residue in the honey. A number of small-scale beekeepers use a single oxalic treatment each fall as their sole mite control measure, since it can essentially give the bees a “clean start” each season.
The down side is that oxalic dribble in syrup is absorbed through the bees’ chitin exoskeleton and also ingested to some extent—both routes may cause some degree of temporary or permanent tissue damage. Some brood may be killed (Gregorc 2006) and brood development may be retarded for a couple of months (Hatjina 2005; Higes 1999). Some adult bee mortality may also take place, with foragers being more susceptible than nurse bees, with more mortality in cooler weather (Martín- Hernández 2004).
The brood and adult bee mortality are not always noticeable. Any adult bee mortality is generally low (~20 bees per day in Martín- Hernández’ study), and I have personally only observed dead bees in front of the occasional colony. Several researchers, including myself and Dr. Marion Ellis, have not noticed any substantial negative effects in the colonies, even after repeated late-summer or fall dribbles. Bacandritsos (2007) did not observe any depressed colony growth even after four successive fall applications.
Anecdotally, most beekeepers who have reported problems with oxalic to me simply did not measure the dose accurately. I’ve noticed that the tendency is to over apply if one uses a garden sprayer.
However, those who can accurately apply the proper dose can obtain good mite control with oxalic dribble either with a single dribble when the colony is broodless (either due to season, or shook swarm, or in mating nucs), or by three multiple treatments a week apart when the colony contains brood (Sammataro 2008). Martín-Hernández (2007) got good varroa control with two dribbles 23 days apart in fall. Treatment is generally in fall or winter, but I’m going to try it next season prior to swarm season, when any suppression of broodrearing might actually be of benefit!
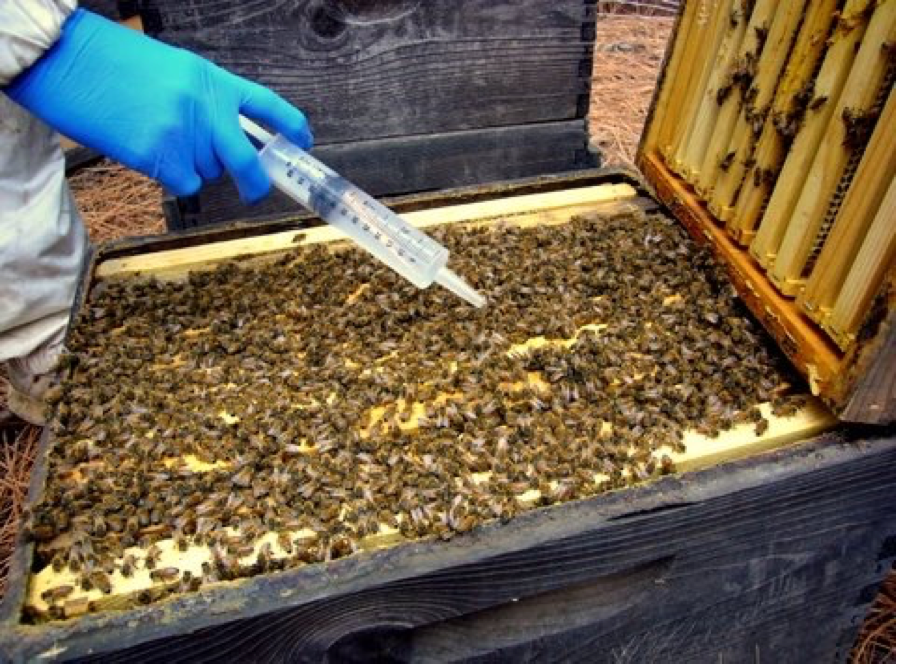
Apply oxalic acid dribble accurately! Use 5ml per “seam” of bees, generally 50ml maximum per colony. I haven’t been able to find a livestock drench gun that does the job without hand fatigue, but a 60ml syringe (available at any feed store) will work fine for those with a few colonies.
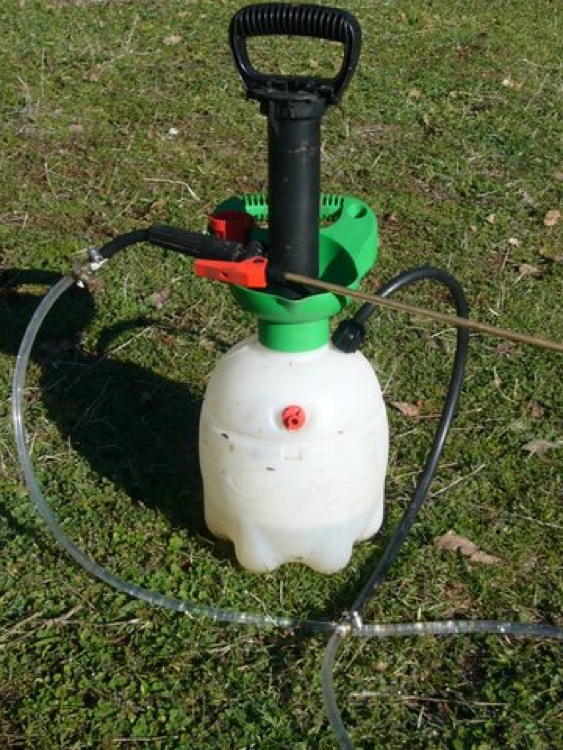
If you use a garden sprayer (adjusted to shoot a soft stream, rather than a spray), make sure that you calibrate the output accurately, using a graduated cylinder while you count off the seconds as you pull the trigger. I find that an output of 5ml per second is easy to produce once you learn to adjust the pressure and observe the stream. In this photo, I’ve added four feet of clear vinyl tubing, which allows you to set the sprayer tank down while you treat several colonies. I’ve also upgraded to the brass wand, which helps to steady the stream.
Update 12/14/09 I suggest that you put a piece of filter cloth over the end of the intake tube, so that sugar crystals don’t clog the valve and tip. If you calibrate the sprayer to put out 50ml in 10 seconds, then you can simply move the wand up and down the frames for the count of 10 without taking your finger off the trigger, for a total of 50ml.
Oxalic dribble can be applied quite quickly. Bacandritsos (2007) reports that “the trickling method using an automatic-filling syringe seems to be a very quick way for applying oxalic acid in large apiaries (approximately 150hives/h).” I personally find that we can treat at a similar rate with two people working together—one tipping up brood chambers, the other dribbling. I need to do more research as to the importance of hitting both brood chambers, and whether we should stop at 50ml when we have colonies that cover 20-30 frames (so far, I haven’t noticed a problem when we go over 50ml total).
Concentration of Solution
O.K., there’s a lot of confusion as to how one defines the solution strength. Some use weight to weight (w:w), some weight to volume (w:v), some calculate based upon the weight of the oxalic dihydrate crystals found at the hardware store as wood bleach, whereas others determine the percentage of pure oxalic acid. And then some use a simple ratio of ingredients (e.g., 1:10:10). So I made up the following table, so that we’re all speaking the same language.
Update: “OA crystals” refers to regular wood bleach (oxalic acid dihydrate). Sucrose is table sugar. Distilled water is only necessary if you have “hard” water–you can tell if a cloudy white insoluble precipitate of calcium oxalate forms. Note that a liter of dry table sugar weighs about 1000g so you can measure the sugar by either weight or volume (600ml would be about 600g). You should not need to adjust the formulas! It works best to dissolve the acid first into hot water. If you are mixing in a jar with a lid, stir, rather than shake to dissolve the crystals, since shaking the hot water will cause the acid solution to build up pressure, which can squirt into your eyes.
Update 3/13/2012: See https://scientificbeekeeping.com/oxalic-acid-treatment-table/ for any updates to this table. Correction: 1000gsugar + 1000ml water makes 1620 ml 1:1 syrup.
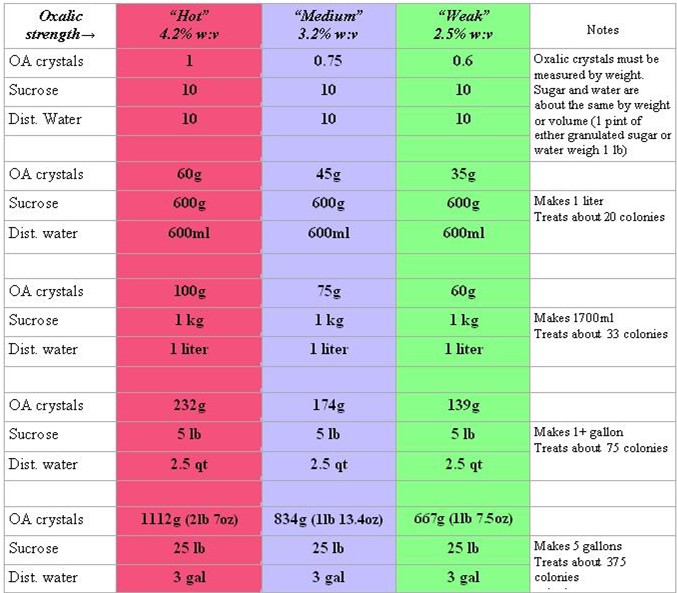
Table of oxalic acid concentrations. OA crystals (common oxalic acid dihydrate, sold as wood bleach) must be measured by weight. Sucrose is table sugar, which may be measured by either weight or volume. The concentrations in the first row are of actual oxalic acid content, not the dihydrate (note that 35g OA crystals in a liter of syrup would give a 3.5% w:w solution, but a 2.5% w:v). You do not need to adjust the formulas if you are using regular wood bleach (oxalic acid dihydrate).
Update 11/09
Dr. Nanetti recommends not applying more than 50ml total solution per colony. However, that works out to only 10 seams of bees worth, and some colonies have far more bees.
So what I do is to focus on treating the box with the most bees (top or bottom). If there are a lot of frames with bees, I simply move the wand faster to try to distribute the solution over more frames. I often apply more than 50ml total, with no apparent ill effect. Nick Aliano’s research indicates that the bees will distribute the acid throughout the colony (at least in the nucs that he tested), but beekeeper anecdotes suggest that hitting all the seams works best.
If you use water with a high calcium content (hard water), the calcium will react with the oxalic acid, and create a white precipitate of calcium oxalate. If this occurs (test in a clear jar), then use distilled water. For easiest mixing, dissolve the oxalic crystals (common oxalic acid dihydrate) into warm water first, and then add the sugar.
The solution is safe to handle (rinse spills off your skin with water), but you should wear nitrile gloves and eye protection when measuring the crystals (don’t get ‘em in your eyes!) and a glove on your trigger hand. Caution: the mixed sugar/acid solution will undergo a chemical reaction in warm weather that produces bee-toxic hydroxymethylfurfural (HMF)—use it within a day unless it can be kept cool. However, it will safely store for at least a month when refrigerated.
Dr. Antonio Nanetti in Italy is a leading researcher on oxalic dribble, and feels that in Italy, a 4.2% w:v solution gives the best mite control (pers comm). This is stronger than that found to be effective by Dr. Marion Ellis in Nebraska, or than Canadian or North European recommendations. I asked Dr. Medhat Nasr about the differences. It appears that it has to do with winter temperatures and the duration of the winter cluster period. In colder climates, such as Canada or northern Europe, the “weak” solution in the table above should be used, or the colony may suffer from bee mortality during the long winter. In moderate climates, use the “medium” strength, and in warm climates, use the “hot” mix.
In California, I tried the “medium” strength this winter (for January 1st treatment), as opposed to the “weak” mixture that I’ve used the past few years, and got good mite control, with no apparent bee toxicity. However, I need to do a trial with more control groups next year, since some colonies that I treated for comparison with MitawayII formic pads, later looked stronger than oxalic treated colonies in the same yard. I don’t know if it was due to a positive effect of formic, or a negative effect of oxalic, or something else.
Update 12/12/09 A number of beekeepers have used a cattle drench gun to apply the 5ml dose per frame. These guns are available from any livestock supply. They have a hand trigger like a caulking gun, and a vinyl tube that goes to the solution. The advantage is that they can be set to accurately apply 5ml per squirt. The disadvantage is that if you have very many colonies, that your hand will cramp up from squeezing the trigger. In cold weather, it may be difficult to squirt 50% sugar syrup. Dr. Medhat Nasr tried 30% sugar syrup, and got good results.
Pros of oxalic dribble:
1. Good to very good mite kill.
2. Safe to mix and handle.
3. Extremely inexpensive.
4. No residues in honey.
5. Quick to apply. No follow up trip to the yard to remove strips or rims.
6. Good for accelerated sticky board mite monitoring.
Cons:
1. Requires broodless colonies for best mite control; efficacy less when brood is present.
2. Must be applied accurately!
3. May cause brood rearing suppression; and some adult bee stress or minor mortality.
4. Shouldn’t be used more than once in fall or winter.
Legality
Update May 2015: oxalic acid has now been registered by EPA for use in bee hives. Individual states are now going through the paperwork. Hooray! There are a number of other updates to oxalic dribble on this site.
Oxalic dribble is legal in some countries, but unfortunately not registered as a mite control agent the U.S.. Dr. Marion Ellis and Troy Fore have worked to get it registered in the U.S., but the process went dead in the water. No one was eager to step up to the plate to register OA for varroa mite control, since its widespread availability and low cost make potential registrants doubt that they would be able to recoup the costs of registration.
Breaking news! Dr. Ellis reports that Heather Duncan, EPA region 7 administrator, has taken a leadership role in working to make OA available to beekeepers. She is working with a U.S. company that already has ties to the beekeeping industry to register a packaged product that is labeled for use in beehives to suppress Varroa mites.
In the interim, oxalic acid it is approved as a wood bleaching agent, it can technically be used in beehives to brighten up one’s top bars (hey, there’s nothing like having bright top bars, huh?). It’s only illegal if your intended use is for it to kill mites!
Oxalic Acid Vaporization
Oxalic acid can also be applied by vaporization. See my review (Oliver 2006b; or at my website). Vaporization has the advantages of not needing to open the hive, and the ability to apply during very cold weather. It also appears to be less toxic to the bees, since they may ingest less due to the lack of sugar syrup. However, the vapors are extremely irritating to human eyes and lungs, which is a legitimate safety concern.
I recently had the pleasure to visit Alberta, Canada, where I spent time with Dr. Medhat Nasr, who has done extensive and excellent research on varroa control. In Canada, winter can come on quickly following the honey flow, and beekeepers may not have time to use oxalic dribble. In such cold climates in Canada and Europe, beekeepers may use heat vaporizers to apply the acid to broodless clusters.
Several vaporizers are on the European market, and in the U.S., Cowen Manufacturing has a new stainless steel vaporizer [2]. Dr. Nasr has developed an innovative oxalic vaporizer that uses pressed, accurately measured pellets of OA and a fan to disperse the vapor in the hive. He found that efficacy is greatly increased by the stream of heated air, which helps to allow the acid vapor to penetrate the cluster of bees.
Formic Acid
Update May 2015: We are now using formic acid regularly, both as MAQS and experimenting with the “flash treatment” and other methods. Formic has several things going for it: a natural product and natural component of honey, it penetrates the brood cappings to kill varroa inside, it leaves no residues, and it can be used when honey supers are on. The downside is that if it is not carefully applied, you can kill the queen (it can be used effectively to eliminate substandard queens, since they appear to me more adversely affected than good queens).
Formic acid has been a mainstay for mite control in Germany for years (see Kirsten Traynor’s excellent articles; e.g., Boecking and Traynor 2007), and is one of the most tested and proven varroa control measures. It also has the great advantage that it evaporates completely, and leaves no residues in the combs, plus it has the added bonus in that formic vapors kill tracheal mites
Formic acid can be applied in ways too numerous to elaborate. In North America, it is generally applied either in the form of meat pads soaked with formic acid (“mite wipes”), in a “flash treatment,” or in a slow-release pad (Miteaway II). However, the Miteaway II pad is the only registered and legal use in the U.S.
“Mite Wipes”
Mite wipes are quick, cheap, and widely used. They generally require multiple treatments for good mite kill, which requires substantial labor. Butchers absorbent meat pads are soaked in diluted formic acid (generally 65%). Each pad should contain 35 ml of the solution. The pads may be refrigerated prior to use, and taken to the yards in an ice chest. This serves both to reduce the amount of fumes inhaled by the applicator, and to retard the initial blast of vapors in the hive. The pads are placed on the top bars. A mite wipe “flash” treatment is good for accelerated sticky board mite monitoring.
The official Ontario recommendations [3] state “Apply 6 applications, 4 days apart. This treatment is good for both HBTM and varroa mites. Note: For Mite-Wipe pads to be effective on varroa, they must be put on every four days.” Six applications every four days! This is a lot of danged labor and trips to the yards for effective control, which may be why many do not complete a full course of treatment, and may not get their mite levels down enough.
The “Flash” Treatment
Update May 2015: Search this site for “flash” for updates on this method.
An excellent (and still evolving) “flash” treatment has been developed by Dr. James Amrine and Bob Noel (Amrine and Noel 2006). They found that that by using a 50% solution, applied from the top by a full-sized pad in hot weather, that excellent mite kill could be obtained, even of mites in the sealed brood! Their results have been confirmed by vanEnglesdorp, et al (2008).
Amrine recommends the simultaneous but separate application of HoneyBHealthy to avoid queen mortality, but vanEnglesdorp did not find this to be necessary.
The flash treatment (which I have not yet tried) has several huge advantages:
1. It only takes hours (generally overnight).
2. The applicator pad is reusable, so no waste materials are generated,
3. It is inexpensive,
4. It can be used in hot weather,
5. It gets the mites in the brood.
6. It can be performed during a honey flow.
The downsides are that it is currently illegal, one needs to handle liquid formic acid, one needs to cut and store the pads and/or a fumigator lid, and that there is some brood kill. The safety issue can be mitigated with protective gear, and the use of a livestock drench gun for application of the premixed liquid.
I’ve seen Jim Amrine’s presentation on the method, and am very impressed by its potential. Having a short-term mite treatment that can be used in hot weather during a honeyflow, and that kills mites in the brood, but leaves no residue is pretty attractive! I’m imagining something like a fume board that could be inserted under the honey supers for a day—ingenious beekeepers, please let me know what you come up with!
An alternative flash treatment developed by Jean-Pierre Chapleau [4] uses a pad on the bottom board of the hive. This method has an advantage that I have not seen previously discussed—with all other methods, the bees are able to some extent to divert the formic fumes by directing hive ventilation. However, if the acid is applied so that any intake air for colony ventilation must pass over a fumigation pad, then all the air in the hive will get treated, despite the bees’ best efforts (it also means that the exhaust air will blow out some fumes before they reach the bees—the dose of acid may need to be adjusted appropriately).
I would greatly appreciate hearing from beekeepers who are successfully using flash treatments for varroa control.
Slow-Release Formic Pads
Update May 2015: Please note that Miteaway II pads have been superseded by Miteaway Quick Strips (MAQS). I suggest that you search the site for “MAQS” for more recent information.
Due to the safety risks involved in handling liquid formic acid, Dr. Medhat Nasr developed a single-application formic pad, later improved, registered, and marketed by Ontario beekeeper David Vander Dussen as Mite AwayII™.
These pads are registered in the U.S. and easy to use. The main drawback is the necessity of using a “rim” to create an air space around the pad. I suggest that you purchase precut rims, rather than waste your time and fingers in trying to cut them from old supers.
In the U.S., the law says that you must wear a respirator, which is silly if you are outdoors. A trick is to freeze the pads the night before use, and then carry them to the outyards in an ice chest. The pads must be used at temperatures below 80ºF (for at least the first week), and remain on the hives for 21 days. Mite Away should only be used on strong colonies (the manufacturer says at least six frames of bees). Strong colonies may tolerate the fumes in weather above 80ºF, but be careful in hot weather with colonies of less than 10-frame strength!

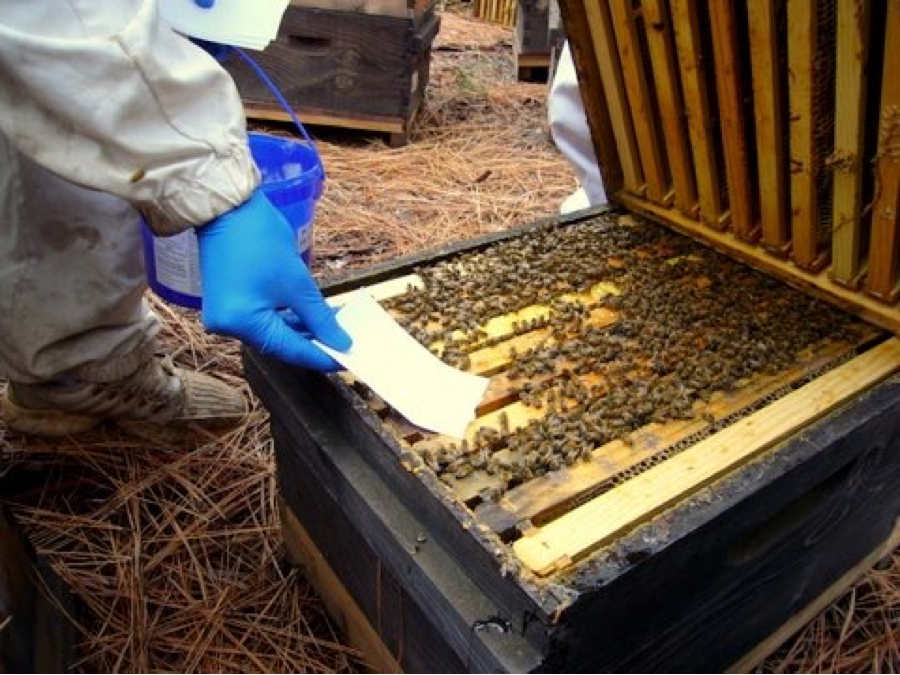
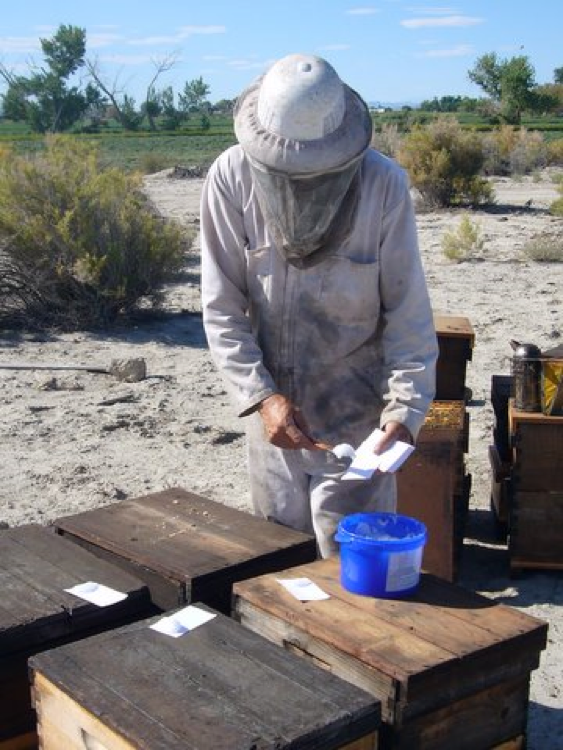
The author applying Mite AwayII pads. The rims behind me are placed under the hive cover to hold the pads and allow for proper distribution of the fumes. Since I am in the U.S., I must wear a respirator, but I removed it momentarily for the photo to illustrate the lack of need for one.
It is normal for queens to stop egglaying the first few days after application of the pads, then to resume, but I notice a huge colony-to-colony variation. Strong colonies appear to virtually ignore the fumes (even though the entrance exhaust air will make your eyes and lungs burn). Weaker colonies may appear to go queenless, although the queen is still there. She will later resume egglaying, sometimes in an outer frame.
The colony-to-colony variation also applies to efficacy at mite kill. You will likely see a substantial variability in results (as you do with most “natural” treatments). However, Mite AwayII can be used in spring (such as when you’re moving into pollination) or fall (when you pull honey) to good effect as part of an overall varroa IPM program.
The positive aspects of Mite AwayII are:
1. Good to very good mite kill.
2. It’s a single treatment (a second trip to the yard may be necessary to remove the rim, unless you use their special cover design).
3. You don’t have to handle or measure liquid formic acid.
4. No residue in combs or honey (may leave a temporary residue in honey).
5. The pads can be used for accelerated sticky board monitoring.
Negatives are:
1. They cost a bit, although that is mitigated somewhat by the single treatment.
2. The need for the danged rims.
3. Must not be used on weak colonies.
4. May cause temporary suspension of egglaying.
5. The silly U.S. requirement for a respirator (for your employees).
6. The hot weather limitation.
7. Formic vapors are corrosive to steel.
.
I would be remiss not to mention another slow-release pad, MiteGone™, developed by innovative beekeeper Bill Ruzicka, who is happy to converse with you “in English, Spanish, or Czech.” Bill is a dynamic and knowledgeable guy who has been a great promoter of liquid formic acid. His MiteGone pads contain what appears to be florist’s foam wrapped in plastic. They are soaked by the beekeeper in liquid formic acid in the field. His website [Mitegone pads] contains a wealth of information on formic acid application.
Thymol
There are two registered thymol products in the U.S., and a multitude of homebrew grease patty/thymol/essential oil recipes.
The original product, Apilife VAR is sold by Brushy Mountain, has a proven record of efficacy, and has a strong following. Unfortunately, I have nothing to add about this product above that which is already on my website.
I’ve also previously reported on Apiguard thymol gel. On my website I have graphic photos of killed brood that occurred when the product was applied at 50g under the lid, as per the original product instructions. Since then, we’ve learned that in hot weather, application of two doses of 25g in between the brood chambers, timed about 10-14 days apart works much better! You only get minimal brood damage, if any, and the bees tolerate the thymol much better.
I don’t much care for the foil-backed cards that come with the product, since the bees chew the paper off and leave the foil. I wind up stuffing the foil pieces in my pocket during the next inspection, and then the next thing I know, my ear is burning from residual thymol that got onto my cell phone!
So now we simply use plain 3×5 cards, and practice until we can measure out 25g with a hive tool. We adjust the dosage in the field, depending upon colony strength. Since the gel is applied right in the middle of the brood nest, it is held at a relatively constant temperature, rather than the wild temperature swings that it experiences under the lid.
Applying Apiguard thymol gel on a 3×5 card between the brood boxes, at the back of the hive.
Update: May 2015 be sure to place the gel in a “lump” on the card, as opposed to spreading it over the card. If spread out, it “flashes” off too quickly and kills too much brood. We’ve now used this product with great success for over a decade, and love it.
We prefer using heavy duty index cards to those supplied with the product, since they are completely removed by the bees after the gel is dispensed.
In order to confirm that you used the appropriate dose (roughly 25 g for a strong colony in warm weather), check the bottom board early the next morning. If the dose was right, you’ll see a small handful of white chewed-out pupae, indicating that the thymol penetrated the cappings. If you see more removed pupae than that, cut back on the dose; if you don’t see any killed pupae, increase the dose. We use a larger amount on the strongest colonies, and much less on weaker colonies. Use less in very hot weather. You will need to experiment in order to get a feel for the product.
During hot weather, Apiguard gel in the tub may separate into a clear liquid and white waxy semisolid. I asked Dr. Max Watkins (Technical Director of Vita Europe) about this, and also about using Apiguard with screened bottoms. His reply:
“Apiguard will work with screened bottom boards but we have seen improved efficacy where the bottoms are closed off during Apiguard treatment. This is probably because gel worked by the bees can be lost from the hive, falling out of the bottom screens whereas with closed floors, the bees have to take the gel right down to the hive entrance to get rid of it. Thymol vapour is heavier than air and with the air currents circulating in the hive it could be that thymol vapour is lost more readily through the screen. The difference in keeping screens on open or closed during Apiguard treatment is not huge and indeed may not be significant but we and many of our users believe that the mite kill is more effective with the floor closed off. It’s a matter of choice.
“If Apiguard is stored above 38ºC – 40ºC, (100.4ºF – 104ºF) the gel matrix separates into aqueous and solid phases, irreversibly. While the thymol is still active and useful, the gel structure will be changed. Apiguard really has to be stored and transported at temperatures below 100ºF.”
Pre-measuring Apiguard with a hive tool (Nevada irrigated alfalfa). The upper boxes can then be quickly lifted and the paper cards slipped in. Treat again in 10-14 days if necessary. The product is safe and easy to use.
Pros of Apiguard (which generally apply to other thymol products):
1. Good to very good mite kill.
2. Safe and easy to apply (generally two treatments for Apiguard; no special equipment). No follow up trip necessary if paper cards are used.
3. Relatively inexpensive, especially in the bulk tub.
4. Is a general sterilant, and may help to control tracheal mite or other diseases.
5. No lasting residue or honey issues.
Cons:
1. Occasional minor brood kill.
2. Some fumigant stress on the bees; may cause some suppression of egglaying.
I thank Dr. Watkins for a fine product, and hope that my graphic photos don’t discourage any from trying it. In my opinion, a bit of brood kill is a small price to pay for good varroa control! My son Ian, who works the operation with me, and who is my harshest critic for all the time I “waste” at experimenting in beekeeping methods, gives Apiguard a two thumbs up! It’s quick, easy, effective over a wide range of temperatures (the manufacturer recommends that it be used at 59ºF or above), can be repeated as needed, and is reasonable as to cost.
Coming Up
The synthetic miticides, and the effect of climate change on beekeeping issues.
References
Amrine, JW and R Noel (2006) Formic acid fumigator for controlling varroa mites in honey bee hives. Intemat. J. Acarol. 32(2): 115-124. www.wvu.edu/~agexten/varroa/FormicAcid.pdf
Bacandritsos, N, J Papanastasiou, C Santanis, A Nanetti, E Roinioti (2007) Efficacy of repeated trickle applications of oxalic acid in syrup for varroosis control in Apis mellifera: Influence of meteorological conditions and presence of brood. Vet Parasitol. 148(2): 174-178.
Boecking, O and K Traynor (2007) Varroa biology and methods of control. ABJ 147(12): 1059-1069).
Gregorc, A (2006) Brood and worker bee viability and cellular responses after acaracide applications in honeybee colonies. In Eurbee 2006.
Hatjina, F and L Haristos (2005) Indirect effects of oxalic acid administered by trickling method on honey bee brood. Journal of Apicultural Research 44 (4): 172 – 174.
Higes, M, A Meana, M Suárez, J Llorente (1999) Negative long-term effects on bee colonies treated with oxalic acid against Varroa jacobsoni Oud. Apidologie 30(4): 289-292.
Higes Pascual, M, R. Martín , Mª.J. Nozal Nalda , J.L. Bernal Yagüe, A. Ruiz García (2004) Systemic action of oxalic acid in the control of Varroa destructor. In: First European Conference of Apidology, Udine 19-23 September 2004.
Martín- Hernández, R and Mariano Higes Pascual (2004) Factors governing the laboratory toxicity of oxalic acid in Apis mellifera iberica. In: First European Conference of Apidology, Udine 19-23 September 2004.
Martín-Hernández, R, M. Higes, JL Pérez, MJ Nozal, L Gómez, and A. Meana (2007) Short term negative effect of oxalic acid in Apis mellifera iberiensis. Spanish Journal of Agricultural Research 5(4): 474-480.
Nanetti, A., R. Buchler, J. D. Charriere, I. Fires, S. Helland, A. Imdorf, S. Korpela, and P. Kristiansen. 2003. Oxalic acid treatments for varroa control (review). Apiacta 38: 81-87.
Oliver, R (2006a) Oxalic acid: questions, answers, and more questions. ABJ 146(12): 1043-1048.
Oliver, R (2006b) Oxalic acid: heat vaporization and other methods. ABJ 147(1): 59-61.
Rademacher and Harz (2006) Effectiveness of Oxalic Acid for Controlling the Varroa Mite. ABJ 146(7): 614-617. (Excellent review of the literature)
Sammataro, D, J Finley, and R Underwood (2008) Comparing Oxalic Acid and Sucrocide Treatments for Varroa destructor (Acari: Varroidae) Control Under Desert Conditions. J. Econ. Entomol. 101(4): 1057-1061.
vanEngelsdorp D, Underwood RM, Cox-Foster DL. (2008) Short-term fumigation of honey bee (Hymenoptera: Apidae) colonies with formic and acetic acids for the control of Varroa destructor (Acari: Varroidae). Journal of Economic Entomology 101(2):256-264.
[1] Adler, S (2009) Winegrape grower approaches farming like evolving science. Ag Alert April 15, 2009, pp. 3, 15.
[2] (Broken Link!) http://www.cowenmfg.com/pages.asp?pageid=77541
[3] (Broken Link!) http://www.omafra.gov.on.ca/english/food/inspection/bees/disease_2007.htm#4
[4] http://www.reineschapleau.wd1.net/articles/flash.en.html


