


Selective Breeding for Mite Resistance Part 4: How We Do It

December 29, 2025
Contents
NOTE TO OUR COUNTRY’S QUEEN PRODUCERS 2
PICKING OUR QUEENS TO BREED FROM 3
ELIMINATING UNWANTED ALLELES WHILE MAINTAINING GENETIC DIVERSITY 4
FINAL ASSESSMENT AND SELECTION 14
Selective Breeding for Mite Resistance
Part 4: How We Do It
First Published in ABJ December 2025
Randy Oliver
ScientificBeekeeping.com
In the words of Nelson Mandela, “It always seems impossible until it’s done.” Well, here’s how we do it!
NOTE TO OUR COUNTRY’S QUEEN PRODUCERS
I’m writing this series mainly for the benefit of our queen producers (since they are the ones who can get the genetics for resistance into the managed honey bee populations worldwide), but also for others who wish to engage in a successful breeding program for mite-resistant bees.
Many queen producers bring in breeder queens from others, so don’t really qualify as “breeders,” since they and mate them out to their own drone pool. They may bring in resistant bloodlines, but unless they also manage the drone pool, they will not be able to propagate the desired traits. This occurred with the USDA bee lab’s original release of Russian stock in 2000 [[1]], and SMR stock in 2002 [[2]]. Beekeepers found that after a generation of outmating, the traits were largely lost (and in the case of the Russians, outbreeding sometimes resulted in some spicy colonies.
Practical application: To maintain desired traits, you need to ensure that the drone pool carries the same genetics as do the queens that you’re grafting from.
IT’S NOT A “ONE AND DONE”
What I want to share is not only how we’ve bred for mite resistance, but also what a queen producer would need to do in order to maintain the genetics of a mite-resistant stock, whether purchased or developed from their own stock.
HOW WE DO IT
I put the key points for a workable breeding program in a Powerpoint slide (Figure 1).
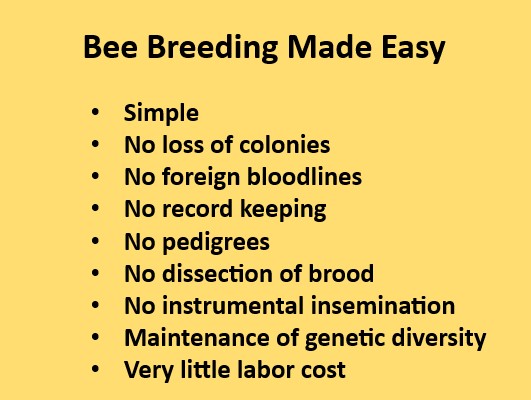
Fig. 1 Beekeepers (and researchers) have a propensity to make things more complicated, costly, and labor-intensive than necessary. I suggest keeping it simple and cheap.
PICKING OUR QUEENS TO BREED FROM
Let’s begin by how we choose our breeder queens. There’s no sense in producing a resistant stock that nobody would want to keep! So our primary selection criteria are gentleness and productivity. I suggest that for any bee breeding program, limit the number of selection criteria. Anything over three criteria will severely reduce the number of queens that “make grade.” In our own program, our criteria, in order of importance, are:
- Gentle stock – we don’t like to wear veils or gloves, and dislike working pissy bees!
- Productivity – we breed only from colonies that are above yard average for honey production, survive the winter and build up well for almonds, and don’t exhibit signs of brood disease.
- (Only after meeting the above criteria): minimal mite wash counts (we generally reject counts above 1). Note: If you select for other resistance metrics (e.g., VSH, SMR, or genetic markers), you’re telling the bees how to do their job, and perhaps inadvertently excluding those colonies that used other useful mechanisms for resistance.
Practical application: Just define the job objective (no mites), and select solely for their performance at getting that job done!
A Tip: We intentionally do not select for color, instead using the diversity of colors and markings of our queens as a proxy for genetic diversity (our stock ranges from golden to black, with all sorts of abdominal patterns that come and go over the years).
ELIMINATING UNWANTED ALLELES WHILE MAINTAINING GENETIC DIVERSITY
In any selective breeding program, you’re not creating any new alleles, but rather trying to eliminate (bottleneck) the undesirable alleles of the few specific genes involved in mite resistance, while at the same time maintaining the genetic diversity of your gene pool as a whole (genetic diversity from their many fathers makes for a better “team” of workers, resulting in better-performing and healthier colonies).
So it’s not like you can start solely with a single founder queen — even though that queen likely mated with a diversity of drones, you want to ensure that your breeder pool carries the genetic diversity of a “breeding population.”
Practical application: In order to maintain genetic diversity, we breed from around thirty carefully-selected breeder queens (labeled A – Z, then AA on). That’s less than 2% of our two thousand colonies, but this appears to be enough to maintain genetic diversity [[3]]. Keep in mind that there is always some small (and likely beneficial) influx of diversity from escaped swarms or other ferals (fortunately, we can count on our friend varroa to eliminate any non-resistant ones over winter, so any drones produced by the survivors should be OK).
PROPAGATING OUR BREEDERS
We graft a bunch of daughters from each of our chosen breeders (Figure 2).
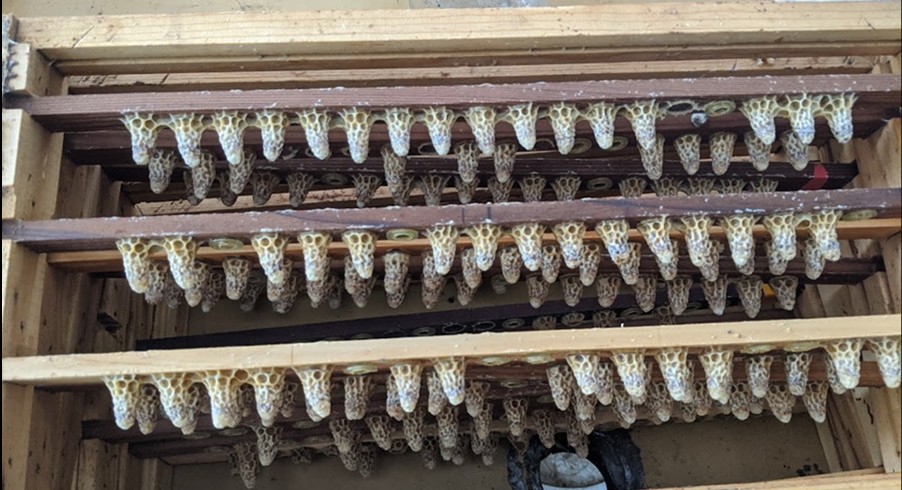
Fig. 2 No matter her genetics, a good queen requires proper feeding during her larval development, as indicated by a good “take” of full-sized cells (these push-in cups make the cells appear smaller).
We then make a bunch of queenless nucs to put the cells in. Treat nucs started with brood on Day 18 after make-up with an oxalic dribble (Figure 3) (treat hives started with shook bees within the first week).
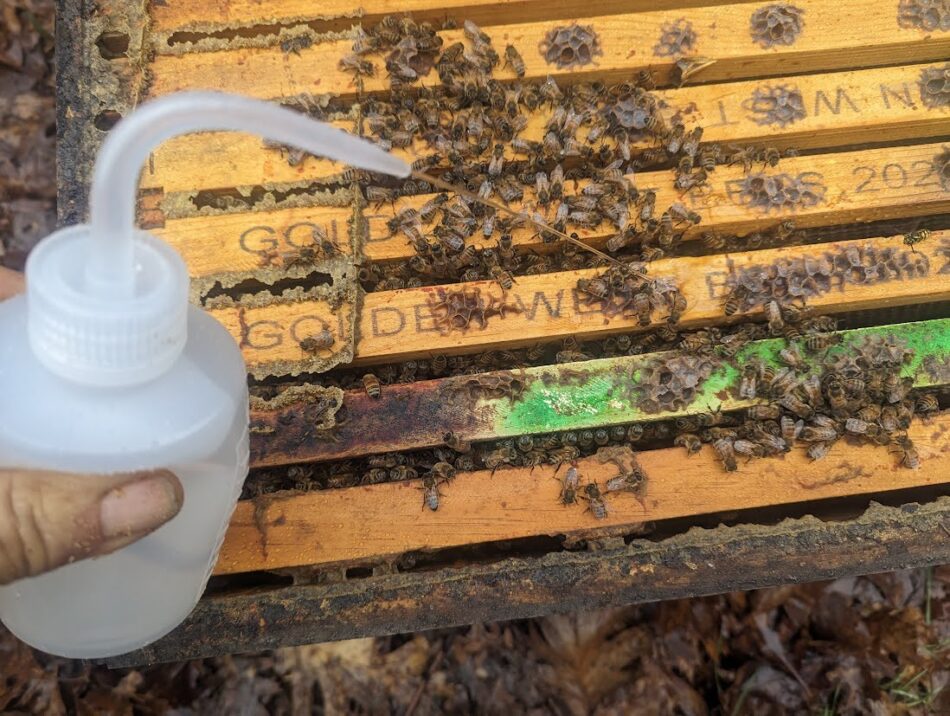
Fig. 3 It takes only seconds and pennies to eliminate most of the mites in broodless nucs if you hit them with an oxalic dribble on Day 18 [[4]] (we wait ‘til then to check for mate out).
MANAGING OUR DRONE POOL
We’re able to largely control the genetics of our drone pool, since we requeen all of our colonies (which then serve as “drone mothers”) solely with daughters of our selected breeders. There will always be some small amount of genetic diversity added to our drone pool by the ferals, and from the very few neighboring beekeepers who might bring in other stock.
We place our nucs for mate-out in yards where they’ll be predominately exposed to our own drones (Figure 4).
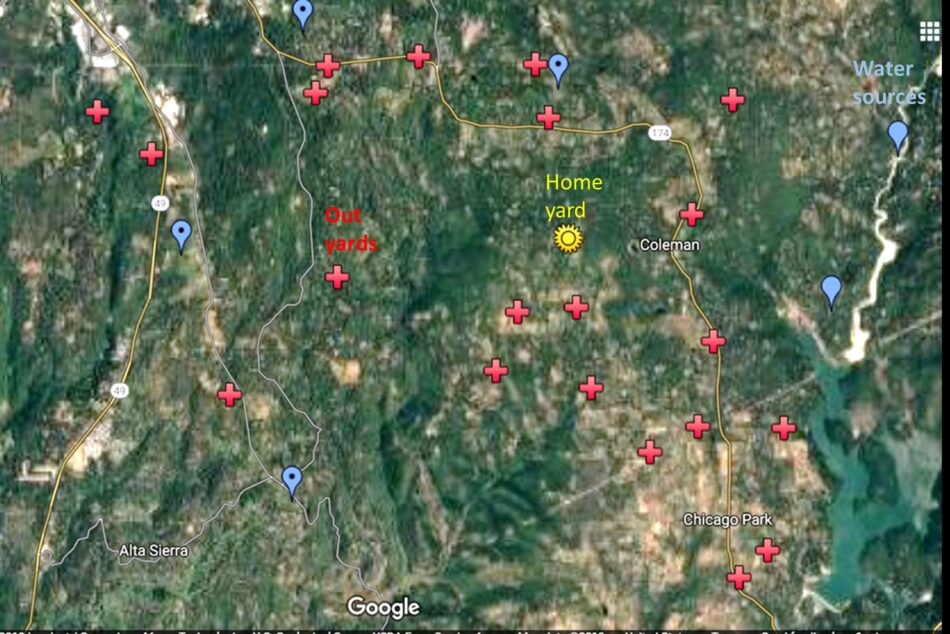
Fig. 4 Coming back from almonds, we flood the landscape with our drones, and give away free queen cells to all our neighbors. We also stock a separate isolated mating yard with our drone mothers.
Once our queens are mated, we transfer them into singles and allow each new queen to grow their colony to full strength (Figure 5).

Fig. 5 Three weeks after the queen starts laying, her brood begins emerging, and soon repopulates the growing colony with her own workers. We’ve now begun marking each hive with their queen mother, so that we can keep track of the performance of each breeder’s progeny (the true test of a breeder).
START THE VARROA RACE!
This is the start of “The Varroa Race” (Figure x), giving those new workers the challenge to prevent varroa from successfully reproducing.
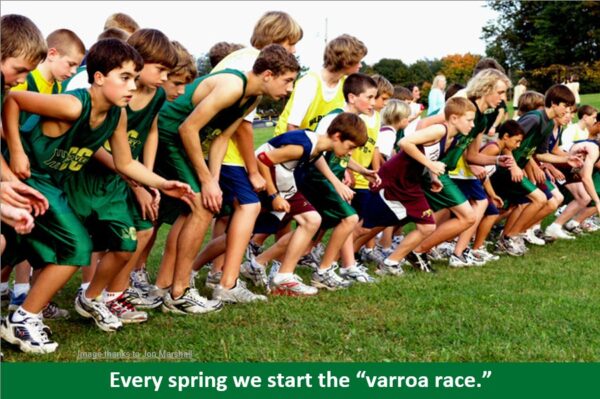
Fig. 6 After that first oxalic dribble, the colonies receive no further treatments until they’ve built up to full-strength doubles, at which point we determine the degree to which each colony has resisted mite buildup (or not), by taking a half-cup sample of bees from a comb in the upper brood chamber.
OUR MITE-RESISTANCE ASSAY
Selection requires variation — you can’t selectively breed unless there is an identifiable variation between colonies in the trait that you are selecting for (like yellow color vs. black, or 200 lbs of honey production vs. 20 lbs). In the case of selecting for resistance to varroa, Harbo and Harris put it plainly back in 1999 [[5]]: “By comparing the growth of mite populations in each colony, one can determine which bees are more resistant to mites.” So every year we compare the growth of mite populations, which means that we’ve got to let the mites increase until the yard average count is at least 5.
By early June our colonies have built up to strong doubles, so we take our first mite wash counts to check (Figure x). By that time the mites have enjoyed at least five reproductive cycles, and when we first began our program the average mite count was around 5, with the occasional colony exhibiting counts in the 20s or 30s.
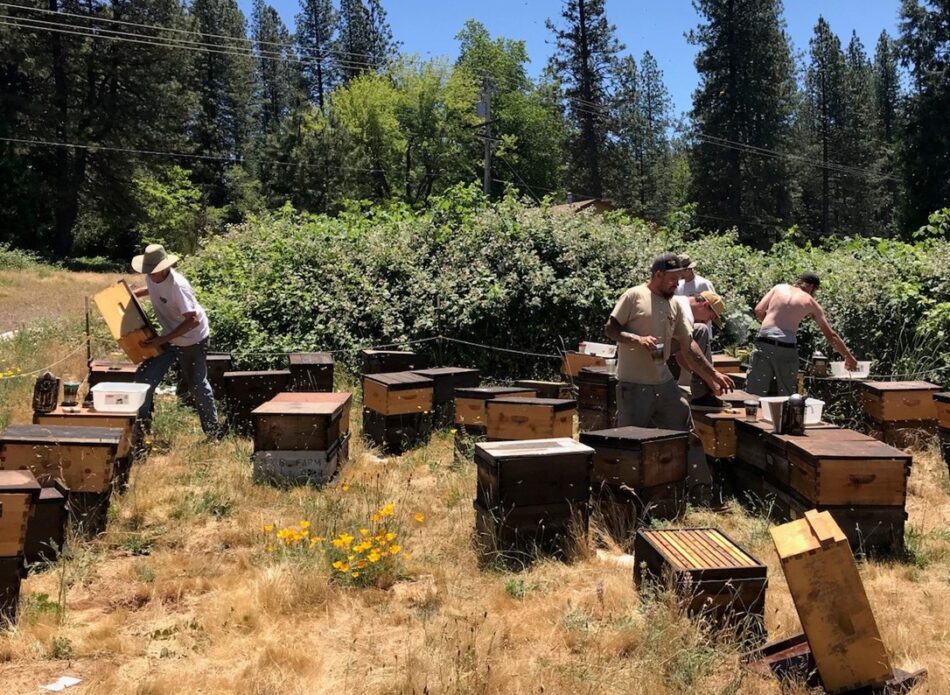
Fig. 7 Blackberries bloom in the background. With a crew of four, we can take mite wash counts at the rate of one a minute. We mark any colonies with counts of zero as potential breeders. Quickly pulling a comb for a mite count also allows us to assess each colony for gentleness (we have a zero-tolerance policy for spicy hives, since none of us like to wear protective clothing in hot weather), and productivity.
After marking the potential breeders with the date and count, we wash them again roughly every month (Figure 8).
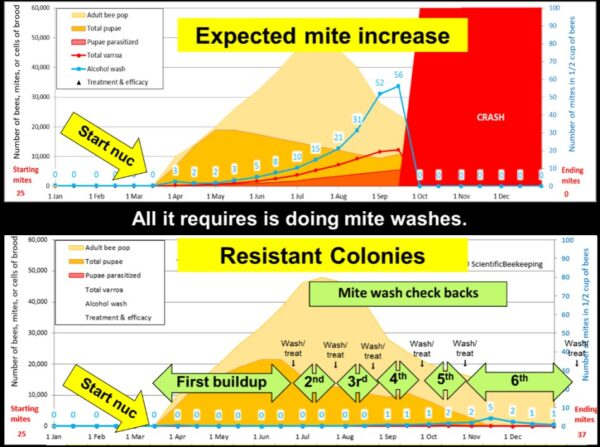
Fig. 8 Two simulations showing the difference between typical non-resistant colonies and resistant colonies. We wait at least 100 days to take our first mite wash, which allows the mite population to increase by 10-fold (or more) in non-resistant colonies.
Practical application: For the general beekeeper, spot sampling largely leaves you largely blind to what the overall mite situation is, and may miss the exceptionally high-mite hives that spread varroa throughout the yard. It’s worth it to us to take a mite wash of every hive in the operation at some point during the summer, so that we can identify any “mite factories.” An added benefit is that pulling a comb out of every hive gives us a chance to assess each colony’s condition, so that we can identify and deal with those with problems.
Those hives that score zero mites are considered as potential breeders, and labeled with the date and count (positive selection). Any colonies with mite counts above zero don’t make grade (sometimes we’ll allow a 1-count for an especially productive hive), and are treated (Figure x). Any colonies that are spicy, non-productive, or with exceptionally high mite counts are labeled to have their queens replaced (negative selection).

Fig. 9 We use the “Modified Bond Method,” meaning that no colonies need to suffer from varroa, since if they show a mite count above 1, they get treated (with oxalic, formic, or thymol, whichever is most appropriate for the mite count and environmental conditions).
Over the years of the program, what has stood out to us is that we used to take our first counts in early June, but after a few years, the first dozen hives in most yards would still be zeroes in June — so we now need to wait at least another month or two to identify potential breeders (Figure 10).
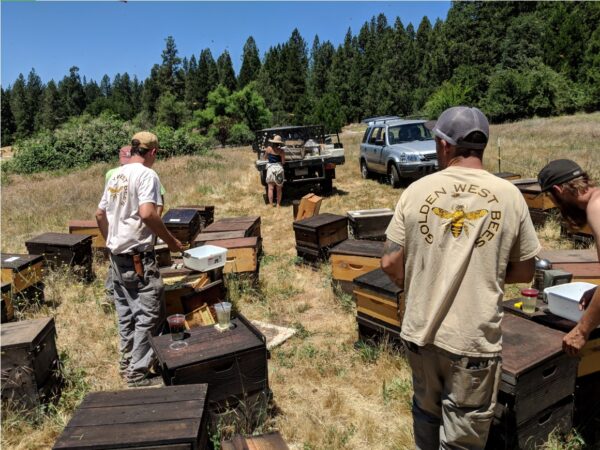
Fig. 10 In the last few years, in some yards we’ve needed to wait until August or later until enough colonies had counts above 1 to make selection. In those yards, I’ve just told the crew to just label the ten best zero-counts as potential breeders, and treat the rest.
Practical application: Although we can blast through mite washes, it requires us to take extra equipment to the yard, and isn’t really our favorite way to spend the day (although it costs us less to perform a wash than it does to apply a treatment). So once we’ve got at least ten potential breeders labeled in each yard, we treat the rest and move on to another yard.
FOLLOW UP WASHES
Since we have over fifty yards, that means that after the first round of mite washes we wind up with ~500 potential breeders marked, meaning that we will have to do 500 follow-up second washes. But that number diminishes as some potential breeders lose that status (due either to increasing mite counts, or poor performance).
So fewer potential breeders remain after the second through fifth washes (Figure 11).

Fig. 11 Not all potential breeders are able to maintain that status, and get x’d out and treated. What we’ve found, however (such as when I then assume that such a rejected hive will increase its mite count in an experimental trial), is that if we hadn’t treated, many would take their mite counts back down again of their own accord.
FINAL ASSESSMENT AND SELECTION
In November, we take our fourth mite wash counts from the colonies still remaining in the potential breeder pool. At this point, colonies have largely shut down broodrearing, and most of the mites are now on the adult bees, so mite wash counts go up. In our early years of the program, I kicked out any that did, but then (based on the advice of John Kefuss), began to give them a chance to bring them back down. In January, when we start building up our colonies to go to almonds (including the potential breeders*) most of the remaining mites go back into the brood, and many of the potential breeders “zero out again.” We take our final mite wash counts at the end of almond bloom while the colonies are still in the orchards. By that time there may be only around a hundred potential breeders left; from them we will promote about forty to Breeder status.
So here’s how we make our final assessment:
- Is the colony still gentle despite the aggressiveness induced by almond nectar?
- Did it grade at a high colony strength (and make us the most pollination money)?
- Did it put on more almond honey than the average of that drop of hives?
- And was its mite count back to zero?
Practical application: “Advanced” livestock breeding programs calculate an “Estimated Breeding Value” (EBV) for each animal [[6]]. We instead simply put a star on the tag of any potential breeder that at any mite wash is also a top performer in its yard, exceptionally gentle, or otherwise a colony that we find particularly desirable.
*OK, we do leave a few exceptional colonies home as backup when we go to almonds (where they might get stolen). But we do our final assessments, and promote the best colonies to Breeder status, while they are still in the orchards, and bring them home first for grafting (Figure 12).
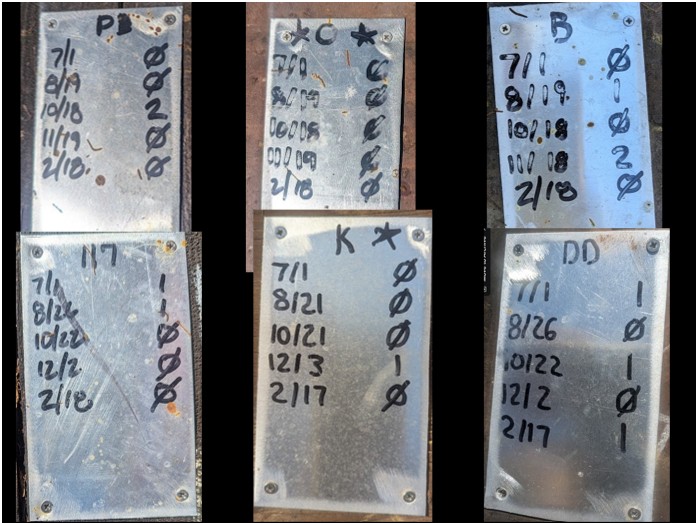
Fig. 12 Our breeders are selected by their history of mite wash counts, and by stars (indicating exceptionally strong, productive colonies). Of course they gotta be gentle as pussycats.
Practical application: Note that Breeder C not only had five consecutive counts of zero, but earned two stars over the course of the year. We’d produce some extra queen cells from her!
NEXT
OK, that’s how we do it, but how about you? I’ll wrap up this series in my next installment.
CITATIONS AND NOTES
[1] Rinderer, T, et al (2000) The release of ARS Russian honey bees. American Bee Journal 140(4): 305-308. https://www.ars.usda.gov/ARSUserFiles/60500500/PDFFiles/301-400/381-Rinderer–The%20Release%20of%20ARS.pdf
[2] Harbo, J, & J Harris (2002) Suppressing mite reproduction: SMR an update. Bee Culture 130(5): 46-48. www.ars.usda.gov/ARSUserFiles/60500500/PDFFiles/401-500/403-Harbo–Suppressing%20Mite%20Reproduction;%20SMR.pdf
[3] Page, R & H Laidlaw (1982) Closed Population Honeybee Breeding 1. Population Genetics of Sex Determination. Journal of Apicultural Research 21(1): 30-37.
[4] https://scientificbeekeeping.com/simple-early-treatment-of-nucs-against-varroa/
[5] Harbo, J & J Harris (1999) Selecting honey bees for resistance to Varroa jacobsoni. Apidology 30 (2-3): 183-196.
[6] A simple formula for Estimated Breeding Value (EBV) is EBV = h² x (P – GA), where h² is heritability, P is the animal’s record or performance, and GA is the average performance of its contemporary group. This formula estimates the additive genetic merit by multiplying the animal’s deviation from the group average by the trait’s heritability.

