


Smokin’ Hot Mite Washin’- 2025 Update

July 1, 2025
Smokin’-Hot Mite Washin’
2025 Update
Randy Oliver
ScientificBeekeeping.com
Monitoring the infestation rate of your colonies
One has an ethical responsibility to prevent the suffering of any livestock under their care. Most commercial stocks of honey bees, unless “treated” for varroa, will die an ugly (and preventable) death. Most colony losses are due to inadequate management of varroa. Even organic standards state that “All appropriate medications must be used to restore an animal to health when methods acceptable to organic production fail.” The only way to determine whether your colonies are suffering from varroa is to monitor their infestation rate.
A Necessary Sacrifice
When you get a blood draw, you sacrifice millions of living cells in order to monitor the health of your body organism as a whole. The same concept applies when one performs a mite wash to monitor the varroa infestation rate of a colony.
I don’t like to cause the death of a single bee, and go to lengths to save any bee that I can. I’ve tried sugar rolls, CO2 mite counts, and stickyboard monitoring, but find that they often underestimate the actual infestation rate. So in order to save the colony from an ugly death from the varroa-virus complex, I’m forced to sacrifice some bees. I justifiy this by keeping in mind that any worker would altruistically sacrifice themself to benefit their colony, so it’s well worth it to sacrifice 300 bees to prevent the death of the remaining 40,000 bees in the hive (keep in mind that ~1000 workers wear themselves out and die every day).
Hobby or small-scale
(Scroll down for commercial or selective breeding)
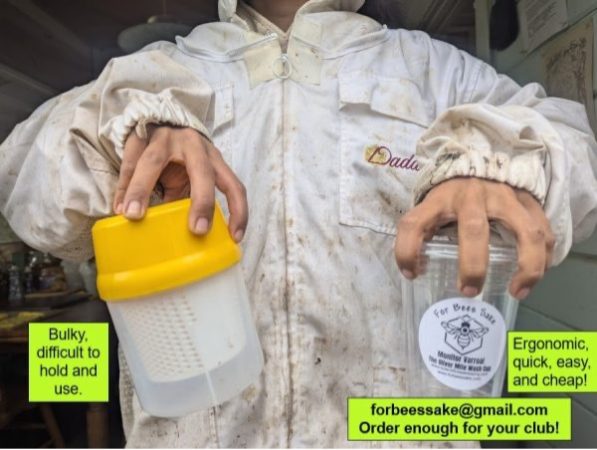

Some manufacturers copied my original design for a swirl-type mite wash cup (shaking just keeps the mites stirred up). Jake is now selling them in 10-packs.
I’ve filmed a short video of me performing a mite wash here.
Tip: When dealing with a package, nuc, or otherwise tiny colony that needs every bee, take only a 1/4-cup sample of bees (~157 bees). Even that small number of bees will give you a 96% chance of getting at least one mite if the colony has a 2% infestation level.
Commercial or selective breeding
For large scale varroa monitoring, notably for the selective breeding of mite-resistant bees, one needs to be able to assess the mite infestation rates of large numbers of colonies quickly and inexpensively.
Variation in Mite Counts
In any group of hives, even those from the same queen mother, there can be a large variation in each colony’s ability to resist varroa buildup:
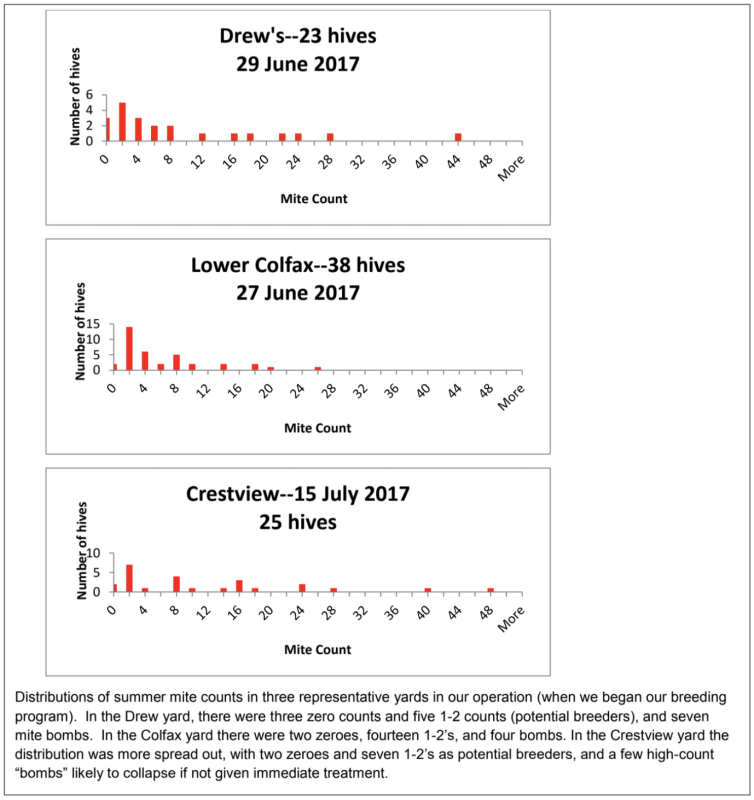
For a breeding program, you’re interested in propagating the genetics of those colonies that keep their mite counts far lower than the norm (positive selection) and eliminating the genetics of the mite bombs (negative selection). For the general beekeeper, spot sampling largely leaves you blind to what the current mite situation is, and will miss the “mite factories” that spread mites throughout the yard.
The Best Metric for a Selective Breeding Program for Mite-Resistant Bees
Several research groups [[1],[2],[3],[4]] have come to the conclusion that Harris and Harbo were right back in 1999 [[5]]:
- We define mite resistance as the ability of a colony of honey bees to impede the growth of a population of varroa.
- With this definition, a highly resistant colony of bees would cause a mite population to decline and then to either disappear or be maintained at a very low level. This is the breeding objective.
- There is no need for colonies to die in a breeding program that selects bees for resistance to mites
- By comparing the growth of mite populations in each colony, one can determine which bees are more resistant to mites.
How to Do It
The quickest and most accurate way to compare mite growth rates is to start a large number of package or nucleus hives, all beginning with minimal infestation rates, and then use alcohol or detergent washes of samples of a half cup of young worker bees to determine their degrees of infestation.
To perform selection, you must be able to measure variation, meaning that you must allow the mite infestations to grow until the less-resistant colonies exhibit wash counts of at least 10 (a level at which mites can still be controlled by a treatment).
This typically takes 2-3 months (you can assess by spot washes). At that point, tag those colonies with counts of zero or 1 as “potential breeders” and treat the rest. From that point on, rewash the potential breeders every month, treating any in which the mite counts have increased (and remove them from the potential breeder pool).
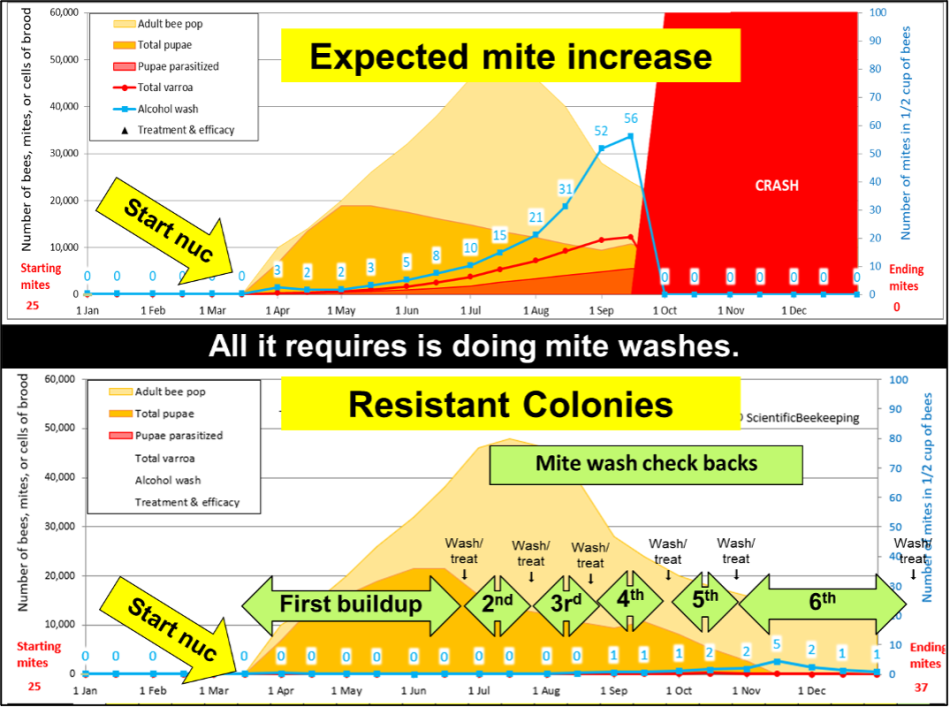
Two simulations showing the difference between typical non-resistant colonies and resistant colonies.
After identifying, marking, and withholding treatment from those potential breeders, we immediately treat the rest of the hives. Each potential breeder from the first test period must then prove that their low first count wasn’t a fluke–by testing low again at the second and third mite washes. Fortunately, I need to wash far fewer colonies for those tests, since I eliminate the vast majority from consideration at first wash, and even more at each subsequent wash.
Practical application: I’m mite washing these yards in the same order that we made up our nucs, so that each group of hives has had the same amount of time for the mites to build up. So this sampling does not delay our treating of our yards in order to keep varroa under control.
Smokin’-Hot Mite Washin’
I’m happy to say that we’ve figured out a way! What changed the game was using mechanical agitators. A two-person crew can easily perform washes at the rate of one every two minutes (including taking the bee sample, washing and counting the mites, and labeling the hive). This works out (assuming $25/hour for labor) to only $1.67 per hive sampled—less than the cost of most treatments. And that’s working at a comfortable and sedate rate–yesterday, we stepped up the pace and sampled our last yard of 25 hives in only 35 minutes (from when we pulled in ‘til we drove out). My assistant Tara and I used to sample up to 150 hives a day (including driving to five different yards).
How to Do it
Following is a short pictorial of how we currently perform mite washes quickly, accurately, and with the minimal amount of labor (typically at the rate of 3-4 man-minutes per wash).
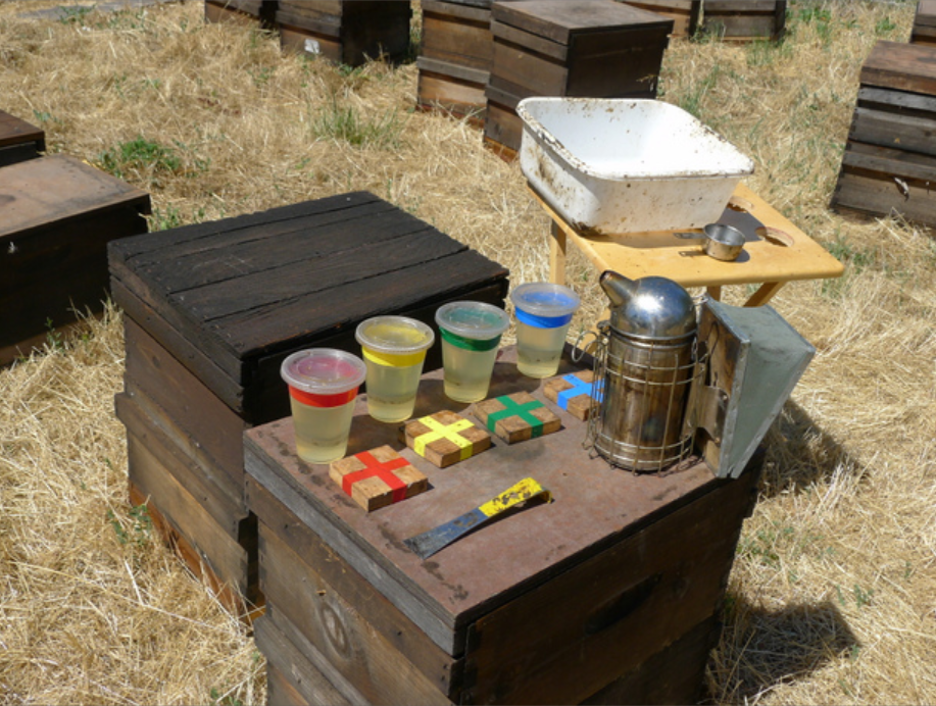
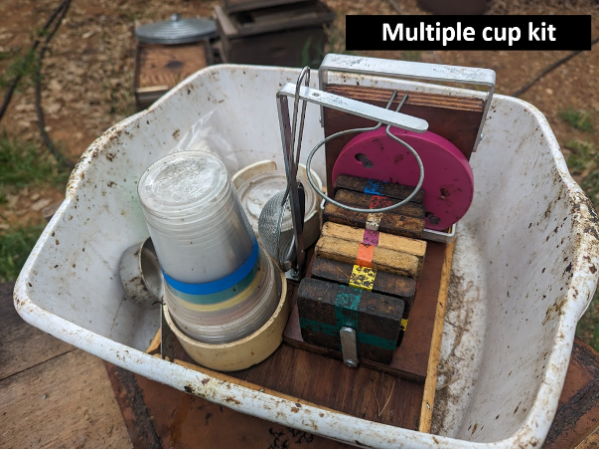
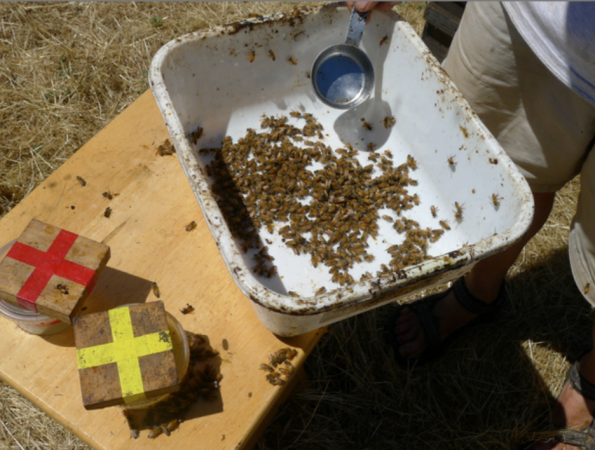
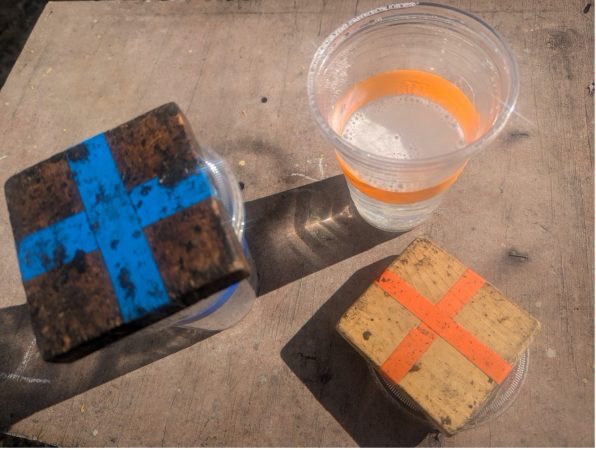
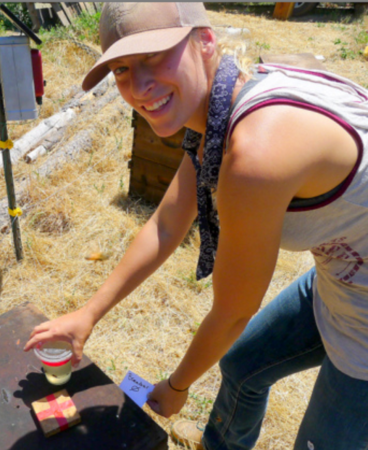
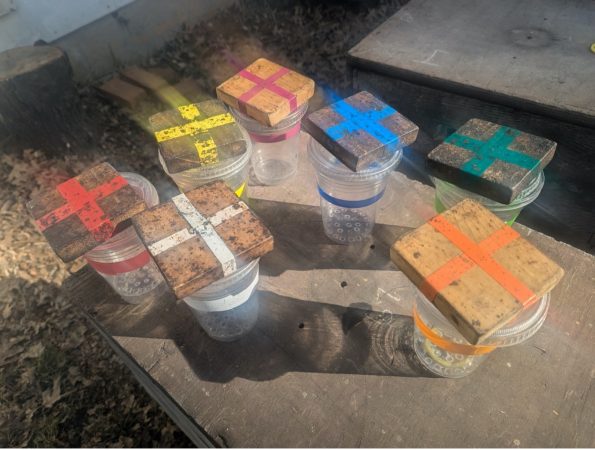
The necessary sampling equipment (above). Four color-coded mite wash cups and markers [[6]]. We no longer use the optional folding table to move along near to the hives. A white plastic 18-qt (12-qt is too small) dishwashing tub, and a stainless steel half-cup measuring cup [[7]]. . The colored tape on the cups also indicates the fill level for the wash liquid (every detail helps).
You can make a marker holder and mirror holder for counting.
Color Marking
We’ve found that there is less confusion if we simply color mark each bee sample and the hive it came from, using vinyl electrical tape (dirt-cheap on Amazon). We use 7 or 8 colors (red, green, blue, orange, yellow, white, purple), and silver) each of which starts with a different letter.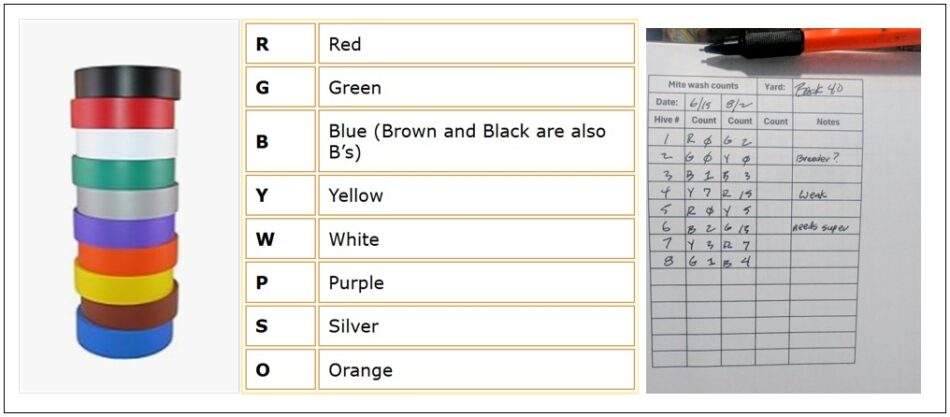
Colored vinyl tape is cheap. On the field data sheet, mark the letter for the color of the cup when you record the wash count. This gives you a checkback if there is any question.
The Washing fluid
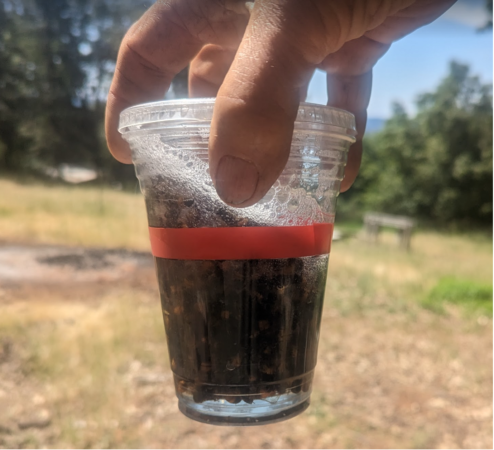
If using alcohol, you’ll get quicker release and better recovery of the mites with 90% alcohol than with 70% (50% doesn’t even kill them!) We now use Dawn Ultra detergent mixed at the rate of 1 Tablespoon per half gallon (2 liters) of water. For more info, see *
Although mites release a bit more quickly (and sink faster) in 91% alcohol, we’ve found that high-sudsing Dawn Ultra (or Dawn Professional) detergents work as well, and are far less expensive. Low-sudsing detergents do not work well (https://scientificbeekeeping.com/refining-the-mite-wash-part-4-comparing-the-release-agents/).
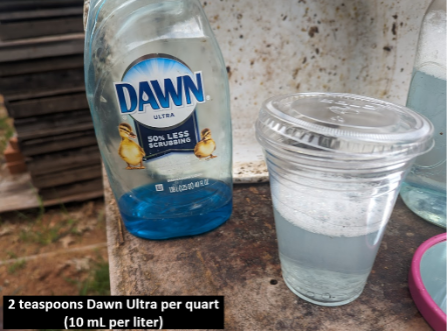
We typically mix at 1 Tablespoon per half gallon of water. If you can’t find Dawn, use a high-sudsing detergent containing sodium lauryl sulfate, sodium laureth sulfate, and C10-16 alkyldimethylamine oxide.
Timing of the First Sampling
I do my first sampling when colonies are still only doubles (before adding honey supers)–which allows adequate time for mite levels to build up enough to see a large degree of hive-to-hive variation in mite counts. The key is to sample just before you apply your first summer mite treatment (you could do it right after you pull your honey supers if that works better).
Timing for a colony started from a nuc, treated with oxalic acid when made.
Timing for an overwintered colony, treated during the winter brood break.
The point: Allow the mites to increase enough to differentiate between resistant and non-resistant colonies
Which Type of Comb to Take the Bee Sample from?
Shake the bees from a comb to the side or immediately above the broodnest.
For consistency for comparing mite wash counts, the bee samples should be taken from combs representative of the infestation rate of the colony as a whole. What I’ve found [[8],[9]] is that samples taken from combs containing open brood tend to have higher, but more erratic counts. Plus you stand a greater chance of harming the queen. Better to shake the bees from a comb on the outer edge of the broodnest (to the side or immediately above), and allow the older bees to fly off – leaving a bee sample of younger bees with a representative mite count.
I pull a similar frame from each hive—typically two frames in from the outside of the cluster. I want a frame with beebread, but don’t want to disturb the actual broodnest or the queen. Avoid combs with drones, since even a single drone can greatly skew the count upward [[10]].
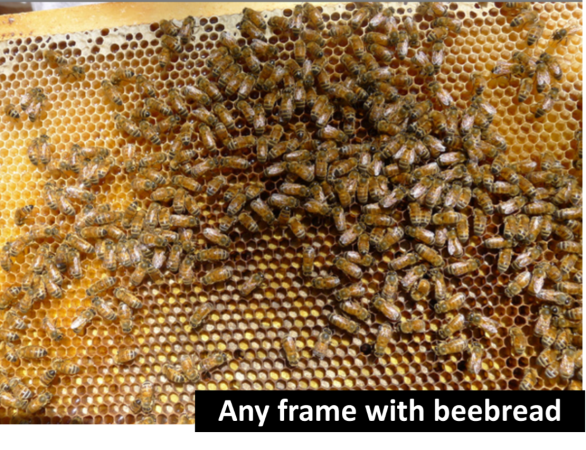
I pull a similar frame from each hive—typically two frames in from the outside of the cluster.
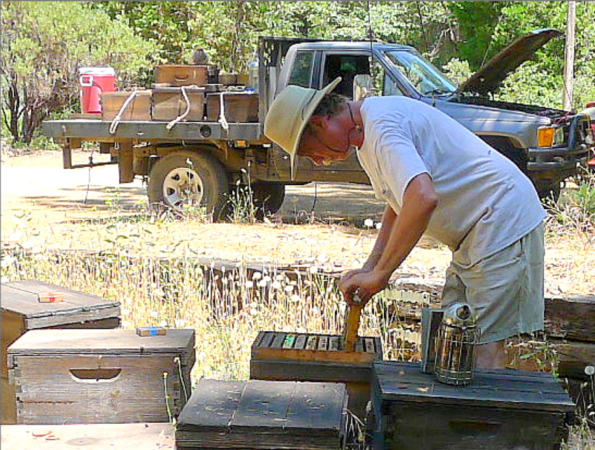
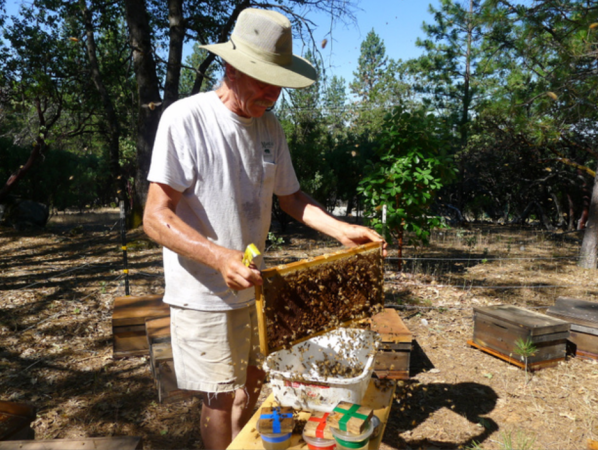
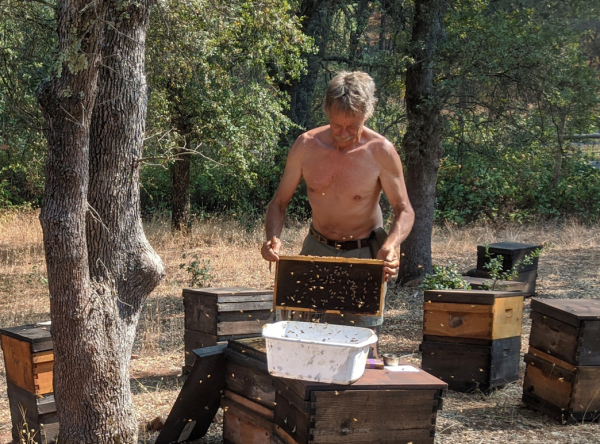
The person pulling the frames needs to have a good eye for spotting queens. I look for the queen as I step to the tub (which I now typically place on an adjacent hive) [[11]]. These photos were taken in near 100°F (38°C) weather, hence the truck and the sample table being placed in the shade
At this point (if I’ve pulled a brood frame) I can assess any hive for brood pattern, disease, honey production, etc. There’s no sense choosing breeders if they don’t head productive, healthy hives.
Practical application: This “mini inspections” pay for themselves, since they alert you to any colony that has issues or needs feeding or space.
One quick shake into the tub (do a hard snap shake, since younger bees hold on tighter than do older bees). Don’t shake any more bees than you need, as it makes it harder to spot a queen! If too many bees go into the tub, scoop some back to the hive before you even look for a queen.
Allow the older bees to fly off. This takes only several seconds — leaving only mite-rich younger bees for sampling. During the fly off, replace the comb, and close the hive.
Practical application: this also immediately tells you something about colony condition — in a shake from a healthy growing colony, most of the bees will stay in the tub (indicating a population of mostly young bees). Conversely, if most of the bees fly off, it indicates that the hive has been broodless for a while, or that is isn’t growing.
This is all the bees that you want in the tub.
Most of the bees in the upper brood box of will be mid-age and nurse bees, which are not inclined to sting. This shaking does not elicit any defensive behavior on the bees’ part— in hot weather I can do this all day long without a defensive sting.

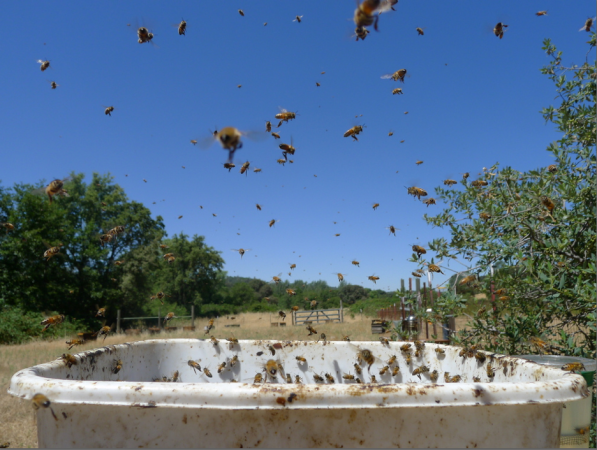
Immediately after the older bees have flown off, the remaining young bees will fan out in a single layer, making it very easy to spot the queen if you missed her on the frame.
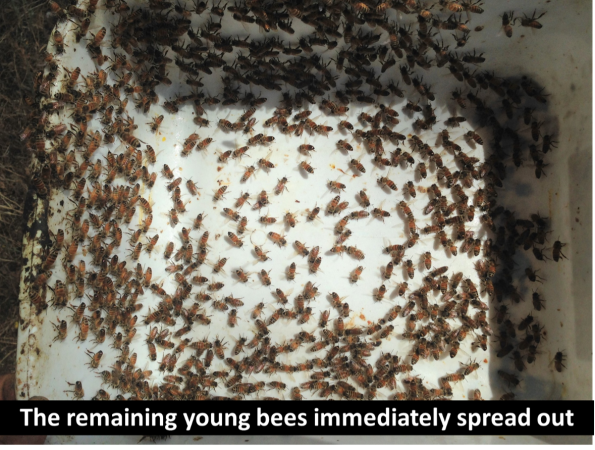
It’s typical for the remaining young bees to march in a circle. Always look for a queen before scooping up the bee sample. It is extremely rare for us to accidentally kill a queen.
Look carefully, since you don’t want to accidentally kill a potential breeder queen!
Tilt the tub, tap it on the table, and scoop the cup up under the bees, thus not causing any bees to release alarm pheromone. If there is a nectar shake on, it makes the bees stick together, so I shake the combs more gently, and wash the tub and cup with water every few hives.
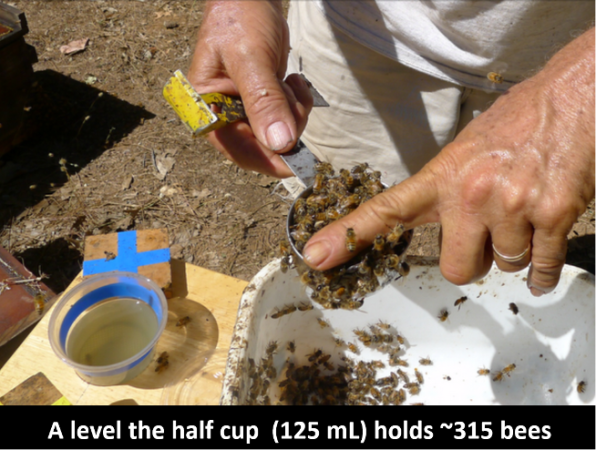
For consistency in number of bees in each sample, the cup of bees should be leveled. This can often be accomplished with a quick sideways shake of the cup. Otherwise, I immediately level the cup of bees with my finger. I’ve done this thousands of times, and have yet to be stung on the finger a single time!
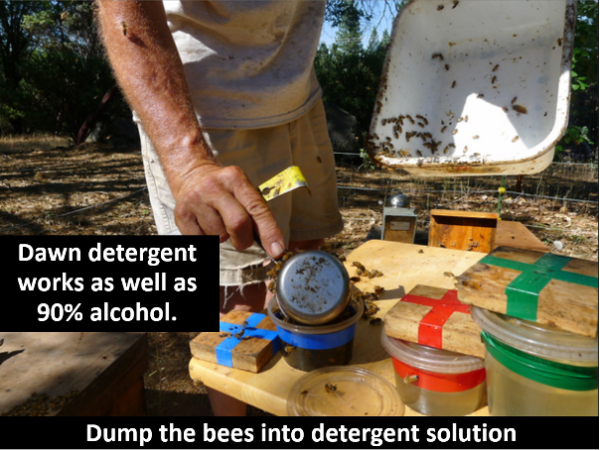
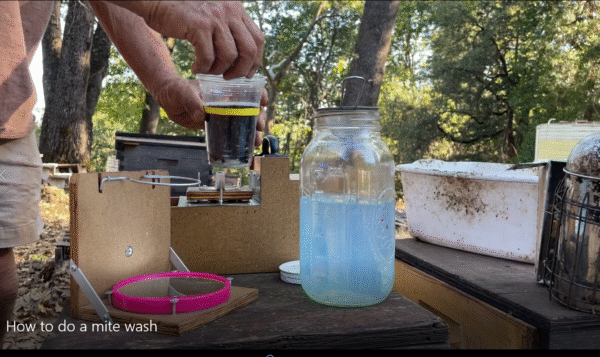
Immediately dump the bees into the detergent solution or alcohol, then press down with the bottom of the cup to prevent any bees from flying away. I snap the lid onto the cup, and pick up the marker with the matching color to place on top of the hive when I return the remaining bees. Either I or my helper(s) then take the cups to the wash station and back. I immediately move on to the next hive—there’s no dead time. Four colored cups are all that we need in rotation, since the time involved in taking the bee sample just about perfectly matches the time at the wash table.

Immediately place the colored marker matching the cup on top of the hive from which you took the bee sample! Before taking the bee sample, I take the lid off the cup and place the marker on top of it. This prevents the wind from blowing away the lid, and forces you to pick up the marker to put the lid on. At this point I knock the remaining bees in the tub out with a quick bang against the front of the hive .
Marker sitting on top of the lid.

On hot days, don’t allow any young bees to remain on the hive cover, since they will quickly die from the heat. To my surprise, after I snapped this phot, we spotted the queen in the clump of bees to the right!
Agitation of the Sample to Precipitate the Mites
If using 91% alcohol, the mites release immediately. If using detergent, allow the cup to sit for at least 60 seconds before beginning agitation.
There is no need to shake the cup! All you want to do is a gentle swirl to allow gravity to pull the mites down through the moving bee bodies:
All that’s needed is a gentle circular swirl, so that the bees at the bottom are slowly tumbling.
And here’s where the game changer enters – using battery-powered mechanical agitators:
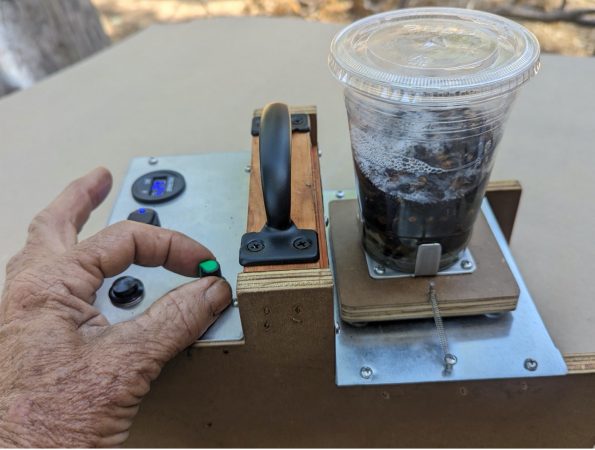
My helper Jacob McBride is producing these agitators for sale (forbeessake@gmail.com).
Most of the mites will be at the bottom of the cup after 15 seconds of agitation, and 95% by 30 seconds (close to 100% by 60 seconds). At that point, lift out the inner cup containing the bees, and count the mites.
I’ve filmed a brief video of me performing a wash here.
Counting the Mites
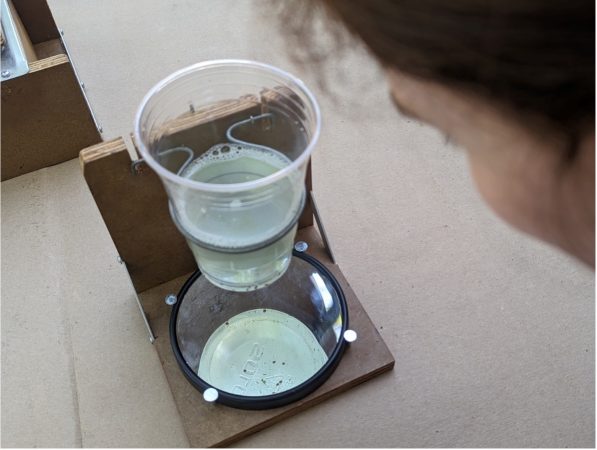
Hold the cup 4” above a 10x magnifying mirror to count the mites.
At the wash station, the washperson records the first letter of the cup color along with the mite count.
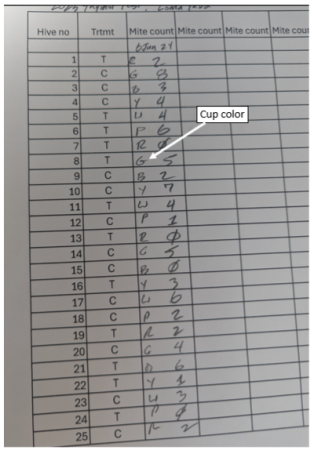
They can then holler out to the sample taker, “Red is a count of 4.” The sample taker then repeats that sentence back, and writes the date and count on the hive, as they pick up the marker.
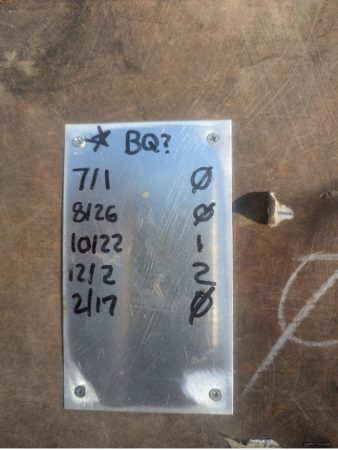
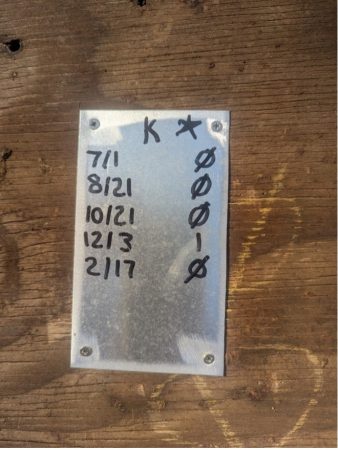
Tags on our “potential breeder” colonies. The best recording system that we’ve found is 3” x 5” aluminum tags screwed to the hive covers. The only felt pen that lasts is the Marks-a-Lot Ultra. We put a star on colonies that are top performers as far as colony strength and honey production.
Alternatively, you can stick an index card partially under the migratory cover, making sure that it’s stuck in the propolis:
Either the washperson or a sampler returns refilled cups to the field, placing them with their markers on top onto the next hives to be sampled:
Practical application: by the time we’re done, each hive can be labeled as to mite count and whether it is a potential breeder to test again, whether it is queenless, sick or weak and needs to be taken care of, needs a super, etc. The yard crew then follows us the next day, now knowing in advance what needs to be done, and takes care of everything very quickly. Thus, we’re using the most experienced member of the crew to do a quick evaluation of the status of every hive at this critical juncture. Our savings in mite treatments, labor, and fewer lost hives more than pay for the cost of the sampling, and as a bonus we are now engaged in a realistically serious breeding program for varroa-resistant bees.
The Impossible Becomes Possible
Until we got this method down, I would have considered finding time to do 1000 mite washes to be impossible. But now we think nothing of performing 300 or more washes in an afternoon.
Notes and Citations
[1] Eynard, S, et al. (2024) Sequence-based genome-wide association studies reveal the polygenic architecture of Varroa destructor resistance in Western honey bees Apis mellifera. bioRxiv 2024-02.
[2] Guichard, M, et al. (2020) Advances and perspectives in selecting resistance traits against the parasitic mite Varroa destructor in honey bees. Genetics Selection Evolution 52: 1-22.
[3] Guichard, M, et al. (2023) Prospects, challenges and perspectives in harnessing natural selection to solve the ‘varroa problem’ of honey bees. Evolutionary Applications 16(3): 593-608.
[4] Sprau, L, et al. (2024) The selection traits of mite non-reproduction (MNR) and Varroa sensitive hygiene (VSH) show high variance in subsequent generations and require intensive time investment to evaluate. Apidologie 55(5): 68.
[5] Harbo, J & J Harris (1999) Selecting honey bees for resistance to Varroa jacobsoni. Apidology 30 (2-3): 183-196.
[6] I use colored vinyl tape. We tried numbering and lettering, but found that colors were far less confusing. We also tried more than 4 colors, but found that 4 colored cups was all that was necessary for 2-4 crew members. We can get it down to a minute a sample with 4 people.
[7] The curve of the Rubbermaid tub exactly matches that of the stainless steel measuring cup—every little detail counts for efficiency! We carry two tubs, nested. One holds all the wash cups, and slips into the clean one for taking samples below. The tubs fit crosswise into a deep super for transport (as does the mite washer). Tips: if you’re using alcohol, do not stack the wash cups after use—they will stick tightly together (not an issue with detergent). If you stack two wash tubs, put the measuring cup in the lower one to keep the tubs from sticking together.
[8] QUESTIONS ON SAMPLING HIVES FOR VARROA
https://scientificbeekeeping.com/re-evaluating-varroa-monitoring-part-2/
[9] HOW DOES MITE DISTRIBUTION VARY FRAME-TO-FRAME IN A HIVE?
https://scientificbeekeeping.com/re-evaluating-varroa-monitoring-part-3/
[10] https://scientificbeekeeping.com/drones-and-varroa-part-1/
[11] I can walk and chew gum at the same time, but have not yet mastered walking, chewing gum, and looking for the queen simultaneously.

